Page 453 of 595

452 Practical hints
What to do if …
On the pages that follow, you will find a
compilation of the most important warning
and malfunction messages that may
appear in the multifunction display.
For your convenience the messages are
divided into two sections:
�Text messages (�page 453)
�Symbol messages (�page 469)
Warning!G
No messages will be displayed if either the
instrument cluster or the multifunction
display is inoperative.
As a result, you will not be able to see infor-
mation about your driving conditions, such
as speed or outside temperature, warn-
ing/indicator lamps, malfunction/warning
messages or the failure of any systems.
Driving characteristics may be impaired.
If you must continue to drive, please do so
with added caution. Visit an authorized
Mercedes-Benz Light Truck Center as soon
as possible.
iSwitching on the ignition causes all
instrument cluster lamps (except high beam
headlamp indicator lamp, and turn signal
indicator lamps unless activated) as well as the
multifunction display to come on. Make sure the
lamps and multifunction display are in working
order before starting your journey.
Page 484 of 595
483 Practical hints
What to do if …
Display symbolDisplay messagesPossible cause/consequencePossible solution
. License plate lamp
LeftThe left license plate lamp is
malfunctioning.�Replace the bulb as soon as possible
(
�page 518).
License plate lamp
RightThe right license plate lamp is
malfunctioning.�Replace the bulb as soon as possible
(
�page 518).
AUTO Light
inoperativeThe light sensor is malfunction-
ing. The headlamps switch on
automatically.�Contact an authorized Mercedes-Benz
Light Truck Center as soon as possible.
To switch off the headlamps
(U. S. vehicles only):
�In the control system, set lamp operation
to manual mode (
�page 146).
�Switch off the headlamps using the
exterior lamp switch (
�page 145).
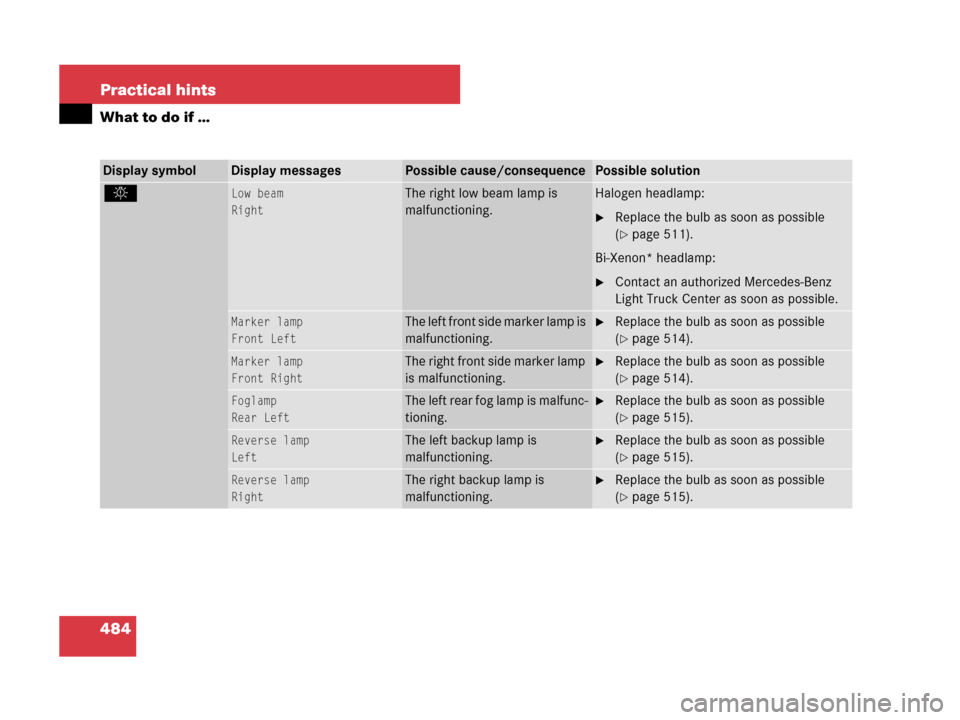
Low beam
LeftThe left low beam lamp is
malfunctioning.Halogen headlamp:
�Replace the bulb as soon as possible
(
�page 511).
Bi-Xenon* headlamp:
�Contact an authorized Mercedes-Benz
Light Truck Center as soon as possible.
Page 485 of 595
484 Practical hints
What to do if …
Display symbolDisplay messagesPossible cause/consequencePossible solution
. Low beam
RightThe right low beam lamp is
malfunctioning.Halogen headlamp:
�Replace the bulb as soon as possible
(
�page 511).
Bi-Xenon* headlamp:
�Contact an authorized Mercedes-Benz
Light Truck Center as soon as possible.
Marker lamp
Front LeftThe left front side marker lamp is
malfunctioning.�Replace the bulb as soon as possible
(
�page 514).
Marker lamp
Front RightThe right front side marker lamp
is malfunctioning.�Replace the bulb as soon as possible
(
�page 514).
Foglamp
Rear LeftThe left rear fog lamp is malfunc-
tioning.�Replace the bulb as soon as possible
(
�page 515).
Reverse lamp
LeftThe left backup lamp is
malfunctioning.�Replace the bulb as soon as possible
(
�page 515).
Reverse lamp
RightThe right backup lamp is
malfunctioning.�Replace the bulb as soon as possible
(
�page 515).
Page 510 of 595
509 Practical hints
Replacing bulbs
Front lamps
Rear lamps
LampType
1Parking and standing
lampW5W
2Headlamps:
High beam/high beam
flasher
H7 (55 W)
Bi-Xenon headlamps*:
High beam/high beam
flasher spot lamp
H7 (55 W)
3Headlamps:
Low beam
H7 (55 W)
Bi-Xenon headlamps*:
Low beam1
1Vehicles with Bi-Xenon* headlamps: Do not re-
place the Bi-Xenon bulbs yourself. Contact an
authorized Mercedes-Benz Light Truck Center.
D2S-35 W
4Additional turn signal
lampLED
5Side marker lampWY 5 W
LampType
6Turn signal lamp3457 AK
S-8
(30/2.2 cp
bulb)
7Front fog lampH11 (55 W)
Corner-illuminating
front fog lamp*
H11 (55 W)
LampType
8High mounted brake
lamp
LED
9Backup lampP21W
aTail, brake, parking,
standing, side marker
lampP21/4W
bTurn signal lampPY 21 W
cRear fog lamp (driver’s
side only)P21/4W
dLicense plate lampsC5W
Page 511 of 595

510 Practical hints
Replacing bulbs
Notes on bulb replacement
�Only use 12-volt bulbs of the same type
and with the specified watt rating.
�Switch lights off before changing a bulb
to prevent short circuits.
�Always use a clean lint-free cloth when
handling bulbs.
�Your hands should be dry and free of oil
and grease.
�If the newly installed bulb does not
come on, visit an authorized
Mercedes-Benz Light Truck Center.Have the LEDs and bulbs for the following
lamps replaced by an authorized
Mercedes-Benz Light Truck Center:
�the additional turn signal lamps in the
exterior rear view mirrors
�the high mounted brake lamp
�the Bi-Xenon* low beam lamps
�the Bi-Xenon high beam flasher spot-
light*
Warning!G
Bulbs and bulb sockets can be very hot.
Allow the lamp to cool down before chang-
ing a bulb.
Keep bulbs out of reach of children.
Halogen lamps contain pressurized gas.
A bulb can explode if you:
�touch or move it when hot
�drop the bulb
�scratch the bulb
Wear eye and hand protection.
Because of high voltage in Xenon lamps, it is
dangerous to replace the bulb or repair the
lamp and its components. We recommend
that you have such work done by a qualified
technician.
!Do not replace the LEDs yourself. You could
otherwise damage the LEDs or parts of the vehi-
cle. Only have the LEDs replaced by a an autho-
rized Mercedes-Benz Light Truck Center.
iReplacing the bulbs for the front lamps is a
technically complex process. For your conve-
nience, we recommend that you have this work
carried out by an authorized Mercedes-Benz
Light Truck Center.
Have the headlamp adjustment checked
regularly.
Page 512 of 595
511 Practical hints
Replacing bulbs
Replacing bulbs for front lamps
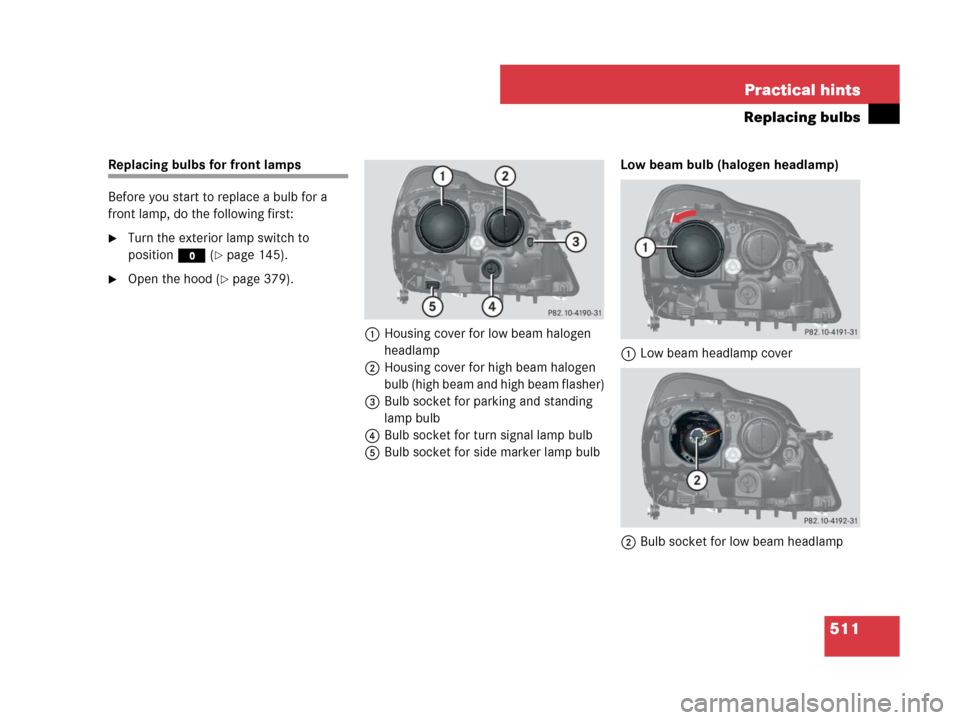
Before you start to replace a bulb for a
front lamp, do the following first:
�Turn the exterior lamp switch to
positionM (
�page 145).
�Open the hood (�page 379).
1Housing cover for low beam halogen
headlamp
2Housing cover for high beam halogen
bulb (high beam and high beam flasher)
3Bulb socket for parking and standing
lamp bulb
4Bulb socket for turn signal lamp bulb
5Bulb socket for side marker lamp bulbLow beam bulb (halogen headlamp)
1Low beam headlamp cover
2Bulb socket for low beam headlamp
Page 513 of 595
512 Practical hints
Replacing bulbs
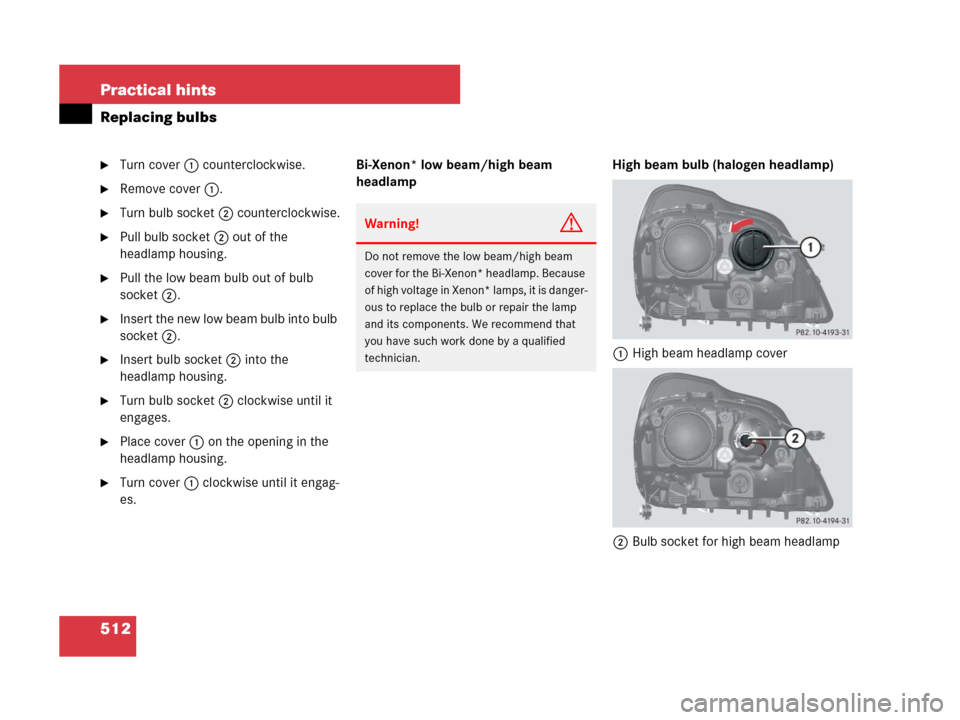
�Turn cover1 counterclockwise.
�Remove cover1.
�Turn bulb socket2 counterclockwise.
�Pull bulb socket2 out of the
headlamp housing.
�Pull the low beam bulb out of bulb
socket2.
�Insert the new low beam bulb into bulb
socket2.
�Insert bulb socket2 into the
headlamp housing.
�Turn bulb socket2 clockwise until it
engages.
�Place cover1 on the opening in the
headlamp housing.
�Turn cover1 clockwise until it engag-
es.Bi-Xenon* low beam/high beam
headlampHigh beam bulb (halogen headlamp)
1High beam headlamp cover
2Bulb socket for high beam headlamp
Warning!G
Do not remove the low beam/high beam
cover for the Bi-Xenon* headlamp. Because
of high voltage in Xenon* lamps, it is danger-
ous to replace the bulb or repair the lamp
and its components. We recommend that
you have such work done by a qualified
technician.
Page 519 of 595
518 Practical hints
Replacing bulbs
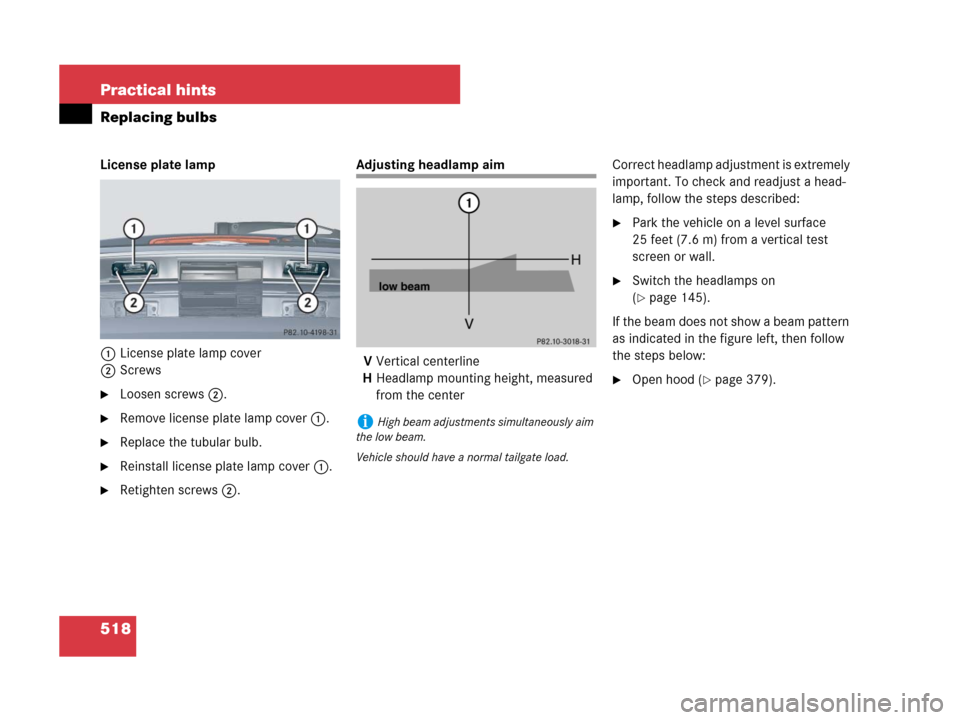
License plate lamp
1License plate lamp cover
2Screws
�Loosen screws2.
�Remove license plate lamp cover1.
�Replace the tubular bulb.
�Reinstall license plate lamp cover1.
�Retighten screws2.
Adjusting headlamp aim
VVertical centerline
HHeadlamp mounting height, measured
from the centerCorrect headlamp adjustment is extremely
important. To check and readjust a head-
lamp, follow the steps described:
�Park the vehicle on a level surface
25 feet (7.6 m) from a vertical test
screen or wall.
�Switch the headlamps on
(
�page 145).
If the beam does not show a beam pattern
as indicated in the figure left, then follow
the steps below:
�Open hood (�page 379).
iHigh beam adjustments simultaneously aim
the low beam.
Vehicle should have a normal tailgate load.


Bi-Xenon headlamps*:
High beam/high beam
flasher")