Page 127 of 522

126 Controls in detailLocking and unlockingIllumination of the emergency release but-
ton:�
The button will flash for 30 minutes af-
ter opening the trunk.
�
The button will flash for 60 minutes af-
ter closing the trunk.
Valet locking
1Neutral position
2Locked�
Close the trunk (
�page 122).
�
Remove the mechanical key from the
SmartKey (
�page 436).
�
Insert the mechanical key in the trunk
lid lock.
i
The emergency release button does not
open the trunk, if the vehicle battery is dis-
charged or disconnected.
i
If the vehicle has previously been locked us-
ing the SmartKey or KEYLESS-GO*, opening the
trunk from the inside using the emergency re-
lease button will trigger the anti-theft alarm sys-
tem.
To cancel the alarm, do one of the following:
�
Insert the SmartKey or the SmartKey with
KEYLESS-GO* in the starter switch.
�
Press button Œ or ‹ on the SmartKey
or the SmartKey with KEYLESS-GO*.
In vehicles with KEYLESS-GO*:
�
Pull an outside door handle.
The SmartKey with KEYLESS-GO* must be
within 3 ft (1 m) of the vehicle.
�
Press the KEYLESS-GO* start/stop button
(�page 39).
The SmartKey with KEYLESS-GO* must be
inside the vehicle.
i
To deny any unauthorized person access to
the trunk, e.g. when you valet park the vehicle,
lock it separately with the mechanical key. Leave
only the SmartKey or SmartKey with
KEYLESS-GO* less its mechanical key with the
vehicle.
Page 128 of 522

127 Controls in detail
Locking and unlocking
�
Turn the mechanical key clockwise to
position2 to lock the trunk.
The trunk remains locked even when the
vehicle is centrally unlocked.
�
Insert the mechanical key in the trunk
lid lock.
�
Turn the mechanical key counterclock-
wise to neutral position1 to unlock the
trunk.
You can now open the trunk
(�page 120).
Automatic central locking
The doors and the trunk automatically lock
when the ignition is switched on and the
wheels are turning at vehicle speeds of ap-
proximately 9 mph (15 km / h) or more.
The locking knobs in the doors move down.
You can open a locked door from the in-
side. Open door only when conditions are
safe to do so.
You can deactivate the automatic locking
mode using the control system
(�page 176).
Locking and unlocking from the inside
You can lock or unlock the doors and the
trunk from inside using the central locking
switch. This can be useful, for example, if
you want to lock the vehicle before starting
to drive.
The fuel filler flap cannot be locked or un-
locked with the central locking switch.
i
You can only cancel the separate trunk lock-
ing mode by means of the mechanical key.
i
The doors are designed to unlock automati-
cally after an accident if the force of the impact
exceeds a preset threshold. The vehicle locks au-
tomatically when the ignition is switched on and
the wheels are turning at vehicle speeds of ap-
proximately 9 mph (15 km/h) or more. You could
therefore lock yourself out when the vehicle
�
is pushed or towed
�
is on a test stand
Warning!
G
When leaving the vehicle, always remove the
SmartKey or SmartKey with KEYLESS-GO*
from the starter switch, take it with you, and
lock the vehicle. Do not leave children unat-
tended in the vehicle, or with access to an
unlocked vehicle. A child’s unsupervised ac-
cess to a vehicle could result in an accident
and/or serious personal injury.
Page 129 of 522
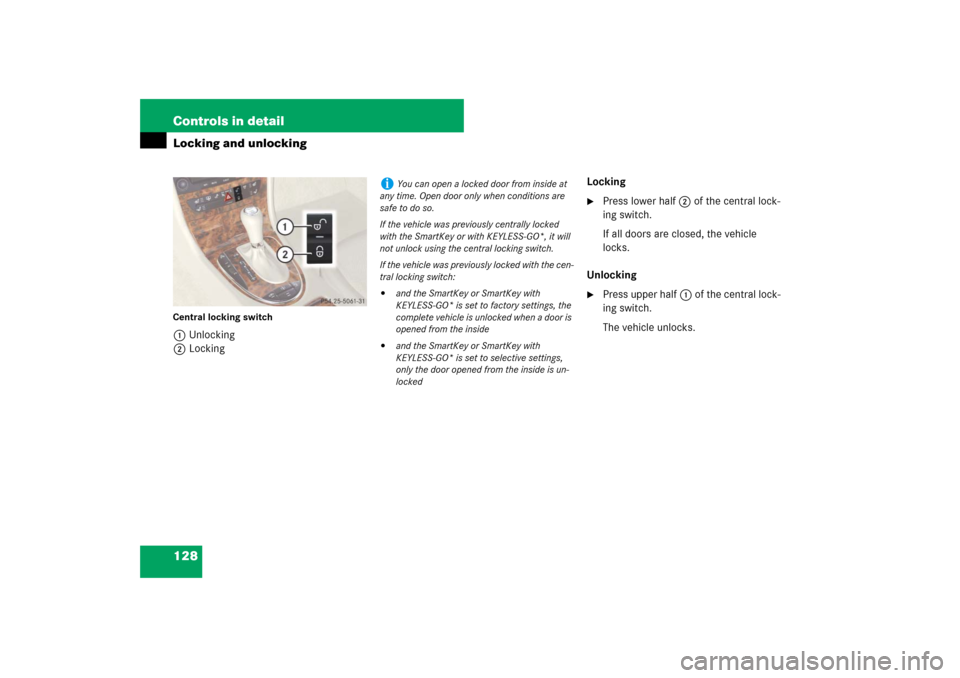
128 Controls in detailLocking and unlockingCentral locking switch1Unlocking
2LockingLocking
�
Press lower half 2 of the central lock-
ing switch.
If all doors are closed, the vehicle
locks.
Unlocking
�
Press upper half1 of the central lock-
ing switch.
The vehicle unlocks.
i
You can open a locked door from inside at
any time. Open door only when conditions are
safe to do so.
If the vehicle was previously centrally locked
with the SmartKey or with KEYLESS-GO*, it will
not unlock using the central locking switch.
If the vehicle was previously locked with the cen-
tral locking switch:
�
and the SmartKey or SmartKey with
KEYLESS-GO* is set to factory settings, the
complete vehicle is unlocked when a door is
opened from the inside
�
and the SmartKey or SmartKey with
KEYLESS-GO* is set to selective settings,
only the door opened from the inside is un-
locked
Page 139 of 522

138 Controls in detailLightingManual headlamp mode
The low beam headlamps and the parking
lamps can be switched on and off with the
exterior lamp switch.�
Turn the exterior lamp switch to
positionB.
Automatic headlamp mode
The following lamps switch on and off au-
tomatically depending on the brightness of
the ambient light:
�
Low beam headlamps
�
Tail and parking lamps
�
License plate lamps
�
Side marker lamps
�
Turn exterior lamp switch to
positionU.
With the SmartKey in starter switch
position1 or the KEYLESS-GO*
start/stop button pressed once, only
the parking lamps and the side marker
lamps will switch on and off automati-
cally.
When the engine is running, the low
beam headlamps, the tail and parking
lamps, the license plate lamps, and the
side marker lamps will switch on and
off automatically.
i
If you hear a warning signal you have forgot-
ten to switch off the headlamps before opening
the driver’s door.
In addition the message
Switch off lights
appears in the multifunction display.
Switch off the headlamps.
Warning!
G
If the exterior lamp switch is set toU,�
the headlamps may switch off unexpect-
edly when the system senses bright am-
bient light, for example light from
oncoming traffic.
�
the headlamps will not be automatically
switched on under foggy conditions.
To minimize risk to you and to others, acti-
vate headlamps by turning exterior lamp
switch to B when driving or when traffic
and/or ambient lighting conditions require
you to do so.
In low ambient lighting conditions, only
switch from position U to B with the
vehicle at a standstill in a safe location.
Switching from U to B will briefly
switch off the headlamps. Doing so while
driving in low ambient lighting conditions
may result in an accident.
The automatic headlamp feature is only an
aid to the driver. The driver is responsible for
the operation of the vehicle’s lights at all
times.i
USA only:
With the automatic headlamp mode activated
you can switch on the high beam headlamps in
low ambient lighting conditions.
Page 145 of 522
144 Controls in detailLightingHazard warning flasher
The hazard warning flasher can be
switched on at all times, even with the
SmartKey removed from the starter switch
or with the SmartKey with KEYLESS-GO*
removed from the vehicle.
The hazard warning flasher switches on au-
tomatically when an air bag deploys.
The hazard warning flasher switch is locat-
ed on the upper part of the center console.
1Hazard warning flasher switchSwitching on hazard warning flasher
�
Press the hazard warning flasher
switch1.
All turn signals lamps are flashing.Switching off hazard warning flasher
�
Press hazard warning flasher switch1
again.
i
With the hazard warning flasher activated
and the combination switch set for either left or
right turn, only the respective left or right turn
signals will operate when the ignition is switched
on.
i
If the hazard warning flasher has been acti-
vated automatically, press hazard warning flash-
er switch1 once to switch it off.
Page 146 of 522

145 Controls in detail
Lighting
Interior lighting in the front
The controls are located in the overhead
control panel.1Left front reading lamp on/off
2Automatic control on/off
3Rear interior lighting on/off
4Right front reading lamp on/off
5Front interior lighting on/off
6Interior lighting
7Ambient lighting
8Front reading lamps
Deactivating automatic control
�
Press switch2.
The interior lighting remains switched
off in darkness, even when you:�
unlock the vehicle
�
remove the SmartKey from the
starter switch
�
open a door
�
open the trunk
Activating automatic control
�
Press switch2.
The interior lighting switches on in
darkness, when you:�
unlock the vehicle
�
remove the SmartKey from the
starter switch
�
open a door
�
open the trunk
The interior lighting switches off after a
preset time (
�page 176).
!
An interior lamp switched on manually does
not go out automatically.
Leaving an interior lamp switch in the ON posi-
tion for extended periods of time with the engine
turned off could result in a discharged battery.
i
The interior lighting is factory-set to auto-
matic mode.
i
If a door remains open, the interior lighting
switches off automatically after approximately
5minutes.
An interior lamp switched on manually does not
go out automatically.
Page 148 of 522

147 Controls in detail
Lighting
Rear reading lamps�
Press rear reading lamp
switch1or6 to switch on the re-
spective rear reading lamp.
�
Press rear reading lamp
switch1or6 again to switch off the
respective rear reading lamp.
Ambient lighting
�
Press ambient lighting switch3or7
repeatedly until ambient lighting4
has reached the desired intensity.
You can switch the ambient lighting on and
off, using the “Control system”
(
�page 175).
Door entry lamps
For better orientation in the dark, the cor-
responding door entry lamps will switch on
in the darkness when you open a door and
the automatic control is activated.
The door entry lamps will switch off when
the corresponding door is closed.
Trunk lamps
The trunk lamps switch on if the trunk is
opened.
If the trunk lid remains open, the trunk
lamps switch off automatically after ap-
proximately 10 minutes.
i
If you turn the SmartKey in the starter
switch to position0 and switch off the head-
lamps, the door entry lamps will remain lit for ap-
proximately 5 minutes.
Page 152 of 522

151 Controls in detail
Control system
�Control system
The control system is activated as soon as
the SmartKey in the starter switch is
turned to position1 or as soon as the
KEYLESS-GO start/stop button* is in
position1. The control system enables you
to:�
call up information about your vehicle
�
change vehicle settings
For example, you can use the control sys-
tem to find out when your vehicle is next
due for service, to set the language for
messages in the instrument cluster dis-
play, and much more.
The control system relays information to
the multifunction display.
Multifunction display
1Outside temperature
2Trip odometer
3Automatic transmission program mode
4Main odometer
5Current gear selector lever position
Above illustration shows the standard
display.
For more information on menus displayed
in the multifunction display, see “Menus”
(�page 154).
i
The displays for the audio systems (radio,
CD player) will appear in English, regardless of
the language selected.
Warning!
G
A driver’s attention to the road and traffic
conditions must always be his/her primary
focus when driving.
For your safety and the safety of others, se-
lecting features through the multifunction
steering wheel should only be done by the
driver when traffic and road conditions per-
mit it to be done safely.
Bear in mind that at a speed of just 30 mph
(approximately 50 km/h), your vehicle is
covering a distance of 44 feet (approximate-
ly 14 m) every second.