Page 410 of 522

409 Practical hints
What to do if …
Display message
Possible cause/consequence
Possible solution
Tire pressure is
only displayed
after driving for
a few minutes
Vehicles with Advanced TPMS*:
The tire inflation pressure is being checked.
�
Drive the vehicle for a few minutes.
Tire pressure
monitor
inoperative
The Advanced TPMS* (Canada only) is
malfunctioning.
�
Have the Advanced TPMS* checked by an authorized
Mercedes-Benz Center.
Tire pressure
monitor
inoperative
No wheel sensors
There are wheels without appropriate wheel
sensors mounted (e.g. winter tires).
�
Have the Advanced TPMS* checked by an authorized
Mercedes-Benz Center.
�
Have the appropriate wheel sensors installed by an
authorized Mercedes-Benz Center.
Tire pres. monitor
No wheel sensors
One or more sensors malfunction (e.g. bat-
tery in one or more wheel sensor is empty).
One or more wheels without appropriate
wheel sensors mounted (e.g. spare tire).
�
Have the Advanced TPMS* checked by an authorized
Mercedes-Benz Center.
�
Have the wheel sensors installed by an authorized
Mercedes-Benz Center.
The tire pressure for the respective tire is shown in the
multifunction display.
Page 411 of 522
410 Practical hintsWhat to do if …Display message
Possible cause/consequence
Possible solution
Tire pressure
monitor
currently unavailable
The Advanced TPMS* is unable to monitor
the tire pressure due to�
a nearby radio interference source.
�
excessive wheel sensor temperatures.
As soon as the causes for the malfunction are no longer
present, the Advanced TPMS* automatically becomes ac-
tive again after a few minutes driving.
Warning!
G
Do not drive with a flat tire. A flat tire affects
the ability to steer or brake the vehicle.
You may lose control of the vehicle. Contin-
ued driving with a flat tire will cause exces-
sive heat build-up and possibly a fire.
Page 428 of 522
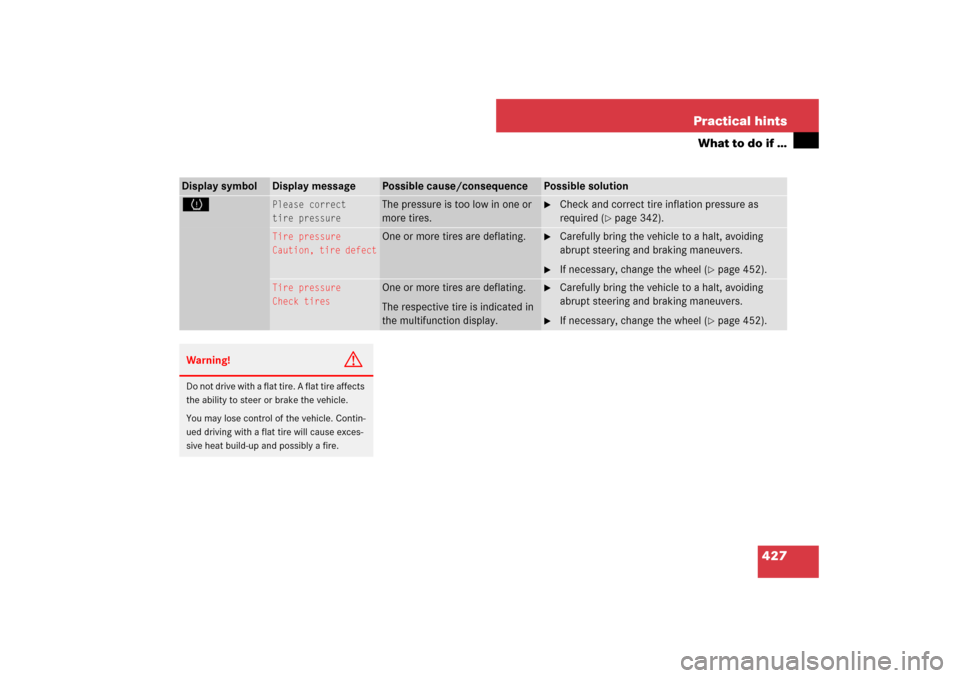
427 Practical hints
What to do if …
Display symbol
Display message
Possible cause/consequence
Possible solution
H
Please correct
tire pressure
The pressure is too low in one or
more tires.
�
Check and correct tire inflation pressure as
required (
�page 342).
Tire pressure
Caution, tire defect
One or more tires are deflating.
�
Carefully bring the vehicle to a halt, avoiding
abrupt steering and braking maneuvers.
�
If necessary, change the wheel (
�page 452).
Tire pressure
Check tires
One or more tires are deflating.
The respective tire is indicated in
the multifunction display.
�
Carefully bring the vehicle to a halt, avoiding
abrupt steering and braking maneuvers.
�
If necessary, change the wheel (
�page 452).
Warning!
G
Do not drive with a flat tire. A flat tire affects
the ability to steer or brake the vehicle.
You may lose control of the vehicle. Contin-
ued driving with a flat tire will cause exces-
sive heat build-up and possibly a fire.
Page 429 of 522
428 Practical hintsWhat to do if …Display symbol
Display message
Possible cause/consequence
Possible solution
H
Tire pressure
Check tires
The tire pressure in one or more
tires is already below the mini-
mum value.
�
Carefully bring the vehicle to a halt, avoiding
abrupt steering and braking maneuvers.
�
Check and adjust tire pressure as required.
�
If necessary, change the wheel (
�page 452).
Check tires
The tire pressure in one or more
tires is already below the mini-
mum value.
The respective tire is indicated in
the multifunction display.
�
Carefully bring the vehicle to a halt, avoiding
abrupt steering and braking maneuvers.
�
Check and adjust tire pressure as required.
�
If necessary, change the wheel (
�page 452).
Warning!
G
Do not drive with a flat tire. A flat tire affects
the ability to steer or brake the vehicle.
You may lose control of the vehicle. Contin-
ued driving with a flat tire will cause exces-
sive heat build-up and possibly a fire.
Page 449 of 522
 with
the bulb counterclockwise and remove
it.
�
Pull the bulb out of bulb socket3")
448 Practical hintsReplacing bulbsParking and standing lamp bulb
Halogen headlamps�
Turn bulb socket3 (
�page 446) with
the bulb counterclockwise and remove
it.
�
Pull the bulb out of bulb socket3
(�page 446).
�
Press the new bulb gently into bulb
socket3 (
�page 446).
�
Place bulb socket3 (
�page 446)
back into the lamp and turn clockwise
until it engages.
Bi-Xenon* headlamps
In vehicles with Bi-Xenon* headlamps, the
bulbs of the parking and standing lamps
are LEDs.Additional turn signal lamp bulbs
The additional turn signal lamps in the
exterior rear view mirrors have LEDs.
If a malfunction occurs or LEDs fail to func-
tion, the entire turn signal unit must be re-
placed. Have the turn signal unit replaced
by an authorized Mercedes-Benz Center.
Front side marker lamp bulbs
Since replacing the side marker lamp bulbs
is a technically highly demanding process,
we recommend you have the side marker
lamp bulbs replaced by an authorized
Mercedes-Benz Center.
Replacing bulbs for rear lamps
Tail lamp unit
The tail lamps are equipped with HiP bulbs.
!
Do not replace the LEDs yourself. You could
otherwise damage the LEDs or parts of the vehi-
cle. Only have the LEDs replaced by an autho-
rized Mercedes-Benz Center.
Warning!
G
The bulbs in the tail lamps cannot be re-
placed individually. The tail lamp bulbs are
under pressure and could explode during an
attempt to replace them.
If the tail lamps are malfunctioning, have
them exchanged at an authorized
Mercedes-Benz Center.
Page 453 of 522
.
�")
452 Practical hintsFlat tirePreparing the vehicle�
Park the vehicle in a safe distance from
moving traffic on a hard, flat surface
when possible.
�
Turn on the hazard warning flasher
(�page 144).
�
Turn the steering wheel so that the
front wheels are in a straight ahead po-
sition.
�
Set the parking brake (
�page 62).
�
Move the gear selector lever toP.
Vehicles with SmartKey:
�
Turn off the engine (
�page 63).
�
Remove the SmartKey from the starter
switch.Vehicles with SmartKey with
KEYLESS-GO*:
�
Turn off the engine by pressing the
KEYLESS-GO* start/stop button on the
gear selector lever once (
�page 64).
�
Open the driver’s door (this puts the ig-
nition in position0, same as with the
SmartKey removed from the starter
switch). The driver’s door then can be
closed again.
�
Have any passenger exit the vehicle at
a safe distance from the roadway.
Mounting the spare wheel
i
Open door only when conditions are safe to
do so.
Warning!
G
The dimensions of the spare wheel
(Minispare or collapsible tire) are different
from those of the road wheels. As a result,
the vehicle handling characteristics change
when driving with a spare wheel mounted.
Adapt your driving style accordingly.
The spare wheel is for temporary use only.
When driving with spare wheel mounted,
ensure proper tire pressure and do not ex-
ceed a vehicle speed of 50 mph (80 km/h).
Drive to the nearest Mercedes-Benz Center
as soon as possible to have the spare wheel
replaced with a regular road wheel.
Never operate the vehicle with more than
one spare wheel mounted.
Do not switch off the ESP
® when a
Minispare or collapsible tire is mounted.
Page 458 of 522

457 Practical hints
Flat tire
1Flap
2On/off switch
3Electrical plug
4Air hose with pressure gauge and vent
screw
5Union nut�
Open flap 1 on electric air pump.
�
Pull out electrical plug 3 and air hose
with pressure gauge 4.
�
Remove the valve cap from the
collapsible tire valve.
�
Screw union nut5 onto the collaps-
ible tire valve.
�
Insert electrical plug 3 into vehicle
cigarette lighter socket.
�
Turn the SmartKey in the starter switch
to position1.
�
PressI on electric air pump switch 2.
The electric air pump should now
switch on and inflate the collapsible
tire.
�
Inflate the tire to approximately 51 psi
(3.5 bar).
This takes about 5 minutes for the col-
lapsible tire. Air hose 4 and union
nut5 can become hot during infla-
tion. Exercise proper caution to avoid
burning yourself when using the equip-
ment.
�
Press0 on electric air pump switch 2.
�
Turn the SmartKey in the starter switch
to position0.
�
If the tire pressure is above 51 psi
(3.5 bar), release excess tire pressure
using the vent screw.
�
Detach the electric air pump.
!
Do not operate the electric air pump longer
than 8 minutes without interruption. Otherwise it
may overheat.
You may operate the electric air pump again af-
ter it has cooled off.
Warning!
G
Follow recommend tire inflation pressures.
Do not overinflate tires. Overinflating tires
can result in sudden deflation (blowout) be-
cause they are more likely to become punc-
tured or damaged by road debris, potholes,
etc.
Do not underinflate tires. Underinflated tires
wear unevenly, adversely affect handling
and fuel economy, and are more likely to fail
from being overheated.
��
Page 459 of 522

458 Practical hintsFlat tire�
Store the electrical plug 3 and the air
hose 4 behind the flap 1 and place
the electric air pump back in the desig-
nated storage space underneath the
trunk floor (
�page 432).
Lowering the vehicle
�
Lower vehicle by turning crank coun-
terclockwise until vehicle is resting ful-
ly on its own weight.
�
Remove the jack.
1-5 Wheel bolts
�
Tighten the five wheel bolts evenly, fol-
lowing the diagonal sequence illustrat-
ed (1 to 5), until all bolts are tight.
Observe a tightening torque of 96 lb-ft
(130 Nm).
Before storing the jack, it should be fully
collapsed, with handle folded in (storage
position).
�
Store the jack and the other vehicle
tools in the designated storage space
underneath the trunk floor
(�page 432).
Warning!
G
Have the tightening torque checked after
changing a wheel. The wheels could come
loose if they are not tightened to a torque of
96 lb-ft (130 Nm).
i
Wrap the damaged wheel in the protective
film that comes with the spare wheel and put the
wheel in the trunk.
You can also place the damaged wheel down into
the spare wheel well. In this case, you must stow
the holder from the spare wheel well in the trunk.
Vehicles with Advanced TPMS* (Canada only):
Do not activate the tire inflation pressure moni-
tor until a full size wheel/tire with functioning
sensor has been placed back into service on the
vehicle.
��