Page 380 of 522
379 Practical hints
What to do if …
Where will I find ...?
Unlocking/locking in an emergency
Opening/closing in an emergency
Resetting activated head restraints
Replacing SmartKey batteries
Replacing bulbs
Replacing wiper blades
Flat tire
Bleeding the fuel system
(diesel engine only)
Battery
Jump starting
Towing the vehicle
Fuses
Page 442 of 522

441 Practical hints
Replacing SmartKey batteries
�Replacing SmartKey batteries
If the batteries in the SmartKey/SmartKey
with KEYLESS-GO* are discharged, the ve-
hicle can no longer be locked or unlocked.
It is recommended to have the batteries re-
placed at an authorized Mercedes-Benz
Center.Batteries contain materials that can harm
the environment if disposed of improperly.
Recycling of batteries is the preferred
method of disposal. Many states require
sellers of batteries to accept old batteries
for recycling.SmartKey/SmartKey with
KEYLESS-GO*
Replacement batteries: Lithium, type
CR 2025 or equivalent.�
Remove the mechanical key1 out of
the SmartKey/SmartKey with
KEYLESS-GO* (
�page 436).
1Mechanical key
2Battery compartment
�
Insert mechanical key1 into opening.
�
Press mechanical key1 in direction of
arrow.
The battery compartment is unlatched.
Warning!
G
Batteries contain poisonous and corrosive
substances. Therefore keep the batteries
out of reach of children.
If a battery is swallowed, seek medical help
immediately.
i
When inserting the batteries, make sure
they are clean and free of lint.
i
When replacing batteries, always replace
both batteries.
The required replacement batteries are available
at any Mercedes-Benz Center.
��
Page 443 of 522
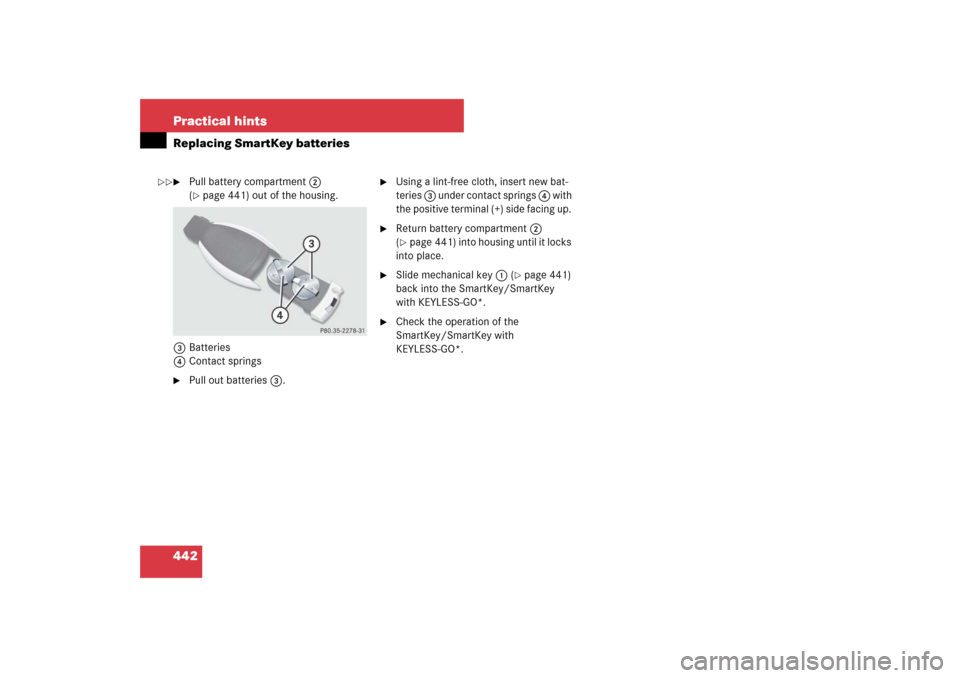
442 Practical hintsReplacing SmartKey batteries�
Pull battery compartment2
(�page 441) out of the housing.
3Batteries
4Contact springs
�
Pull out batteries3.
�
Using a lint-free cloth, insert new bat-
teries 3 under contact springs 4 with
the positive terminal (+) side facing up.
�
Return battery compartment 2
(�page 441) into housing until it locks
into place.
�
Slide mechanical key 1 (
�page 441)
back into the SmartKey/SmartKey
with KEYLESS-GO*.
�
Check the operation of the
SmartKey/SmartKey with
KEYLESS-GO*.
��
Page 462 of 522
.
�
Make sure the gear selector lever is set
to positionP.
�
Turn off all electrical consumers.
!
As with any")
461 Practical hints
Battery
Disconnecting the battery�
Apply the parking brake (
�page 62).
�
Make sure the gear selector lever is set
to positionP.
�
Turn off all electrical consumers.
!
As with any other battery, disconnect the
battery if you do not intend to operate your vehi-
cle for an extended period of time to prevent bat-
tery discharge or connect an accessory battery
charge unit expressly approved by
Mercedes-Benz for your vehicle model to main-
tain the battery charge. Contact an authorized
Mercedes-Benz Center for further information.
The battery, the battery ventilation hose and the
lateral plug must always be securely installed
when the vehicle is in operation.
!
Never loosen or detach battery terminal
clamps while the engine is running or the
SmartKey is in the starter switch. Otherwise the
alternator and other electronic components
could be severely damaged.
Have the battery checked regularly by an autho-
rized Mercedes-Benz Center.
Refer to Maintenance Booklet for maintenance
intervals or contact an authorized
Mercedes-Benz Center for further information.
Warning!
G
Do not place metal objects on the battery as
this could result in a short circuit.
Use leak-proof batteries only to avoid the
risk of acid burns in the event of an acci-
dent.
Warning!
G
With a disconnected battery�
you will no longer be able to turn the
SmartKey in the starter switch and
pressing the KEYLESS-GO* start/stop
button on the gear selector lever will
have no effect
�
the gear selector lever will remain
locked in positionP
!
Always disconnect the battery in the order
described below. Otherwise the vehicle’s
electronics can be damaged.
��
Page 463 of 522

462 Practical hintsBattery�
Remove SmartKey from starter switch.
Vehicles with KEYLESS-GO*:�
Press the start/stop button until
the engine shuts off.
�
Open the driver’s door.
�
Open the trunk.
�
Read and observe safety instructions
and precautions (
�page 331) and
(
�page 460).
�
Remove the luggage box (
�page 433).
�
Disconnect the negative lead from neg-
ative terminal2 (
�page 460).
�
Remove cover1 (
�page 460) from
the positive terminal.
�
Disconnect the positive lead.
Removing the battery�
Remove the screw-nuts securing the
battery.
�
Remove the battery bracket3
(�page 460).
�
Pull out the battery ventilation hose4
(�page 460) from the battery (de-
pending on battery arrangement in
your vehicle model, the ventilation
hose is located either on the left or
right side of the battery).
�
Take out the battery.
Charging and reinstalling the batteryWarning!
G
Never charge a battery while still installed in
the vehicle unless the accessory battery
charge unit* approved by Mercedes-Benz is
being used. Gases may escape during charg-
ing and cause explosions that may result in
paint damage, corrosion or personal injury.
An accessory battery charge unit* specially
adapted for Mercedes-Benz vehicles and
tested and approved by Mercedes-Benz is
available, permitting the charging of the bat-
tery in its installed position. Contact an au-
thorized Mercedes-Benz Center for
information and availability. Charge battery
in accordance with the separate instruc-
tions for the accessory battery charger.
��
Page 468 of 522

467 Practical hints
Towing the vehicle
Warning!
G
With the engine not running, there is no
power assistance for the brake and steering
systems. In this case, it is important to keep
in mind that a considerably higher degree of
effort is necessary to brake and steer the ve-
hicle. Adapt your driving accordingly.!
If the vehicle is towed with the front axle
raised (not permissible for vehicles with
4MATIC), the gear selector lever must be in
positionN and the engine must be shut off
(SmartKey in starter switch position0 or1).
Active braking action through the ESP
® may
otherwise seriously damage the brake system.
When towing the vehicle with all wheels on the
ground, the gear selector lever must be in
positionN and the SmartKey must be in starter
switch position2.
When towing the vehicle with all wheels on the
ground or the front axle raised, the vehicle may
be towed only for distances up to 30 miles
(50 km) and at a speed not to exceed 30 mph
(50 km/h).
!
Towing of the vehicle should only be done
using the properly installed towing eye bolt.
Never attach tow cable, tow rope or tow rod to
the vehicle chassis, frame or suspension parts.
i
When towing the vehicle with all wheels on
the ground, please note the following:
With the automatic central locking activated and
the SmartKey in starter switch position2, or
KEYLESS-GO
* start/stop button in position2,
the vehicle doors lock if the left front wheel as
well as the right rear wheel are turning at vehicle
speeds of approximately 9 mph (15 km/h) or
more.
To prevent the vehicle door locks from locking,
deactivate the automatic central locking
(
�page 127).
i
To signal turns while being towed with the
hazard warning flasher in use, turn SmartKey in
starter switch to position2 and activate the
combination switch for the left or right turn sig-
nal in the usual manner – only the selected turn
signal will operate.
Upon canceling the turn signal, the hazard warn-
ing flasher will operate again.
i
The gear selector lever will remain locked in
positionP and the SmartKey will not turn in the
starter switch if the battery is disconnected or
discharged. For more information see “Batter-
ies” (�page 460) or “Jump starting”
(
�page 464).
For information on manual unlocking of the gear
selector lever, see (
�page 438).
Page 503 of 522
 197
Gear ranges 189
Gear selector lever 184
Gear selector lever control one-t")
502 IndexAutomatic transmission
Accelerator position 188
Automatic shift program 190
Emergency operation (Limp-Home
Mode) 197
Gear ranges 189
Gear selector lever 184
Gear selector lever control one-touch
gearshifting 191
Gear selector lever positions 186
Gear shifting malfunctions 197
Kickdown 188
Kickdown, manual shift program
E63AMG 196
Manual shift program E 63 AMG 194
Program mode selector switch 190
Shifting procedure 185
Starting engine 52
Steering wheel gearshift control
one-touch gearshifting* 192
B
BabySmart
TM
Air bag deactivation system 81
Self-test 81Backrest 277
Seat 43
Seat, multicontour* 131
Backup lamps
Messages in display 422
Replacing bulbs 443
Bar 360
BAS 99
Batteries, SmartKey
Checking battery condition 119
Replacing 441
Batteries, SmartKey with KEYLESS-GO*
Checking battery condition 119
Replacing 441
Batteries, Vehicle
Charging 462
Disconnecting 461
Jump starting 464
Messages in display 412
Reconnecting 463
Reinstalling 462
Removing 462
Bead 360
Beverage holder see Cup holders
Bi-Xenon headlamps* see Headlamps
Bleeding the fuel system 459Block heater* (Canada only) 365
Brake fluid
Checking 324
Messages in display 413
Brake lamp
Cleaning lenses 372
Replacing bulbs 443
Brake pads
Message in display 412
Brakes 310
High-performance brake system
(E 63 AMG only) 312
Warning lamp 383
Break-in period 308
Bulbs see Replacing bulbs
C
California retail buyers and lessees, impor-
tant notice for 11
Can holder see Cup holders
Capacities and recommended
fuel/lubricants 491
Cargo area see Trunk
Cargo tie-down rings 280
Carpets, cleaning 376
Catalytic converter (gasoline
engine) 318
Page 510 of 522

509 Index
Key, SmartKey
Battery check lamp 110
Checking batteries 119
Factory setting 112
Global locking 112, 113
Global unlocking 112, 113
Locking/unlocking 36, 64, 110
Loss of 119
Messages in the multifunction
display 420, 421
Opening and closing the power
tilt/sliding sunroof or panorama roof
with power tilt/sliding panel* 239
Opening and closing the
windows 239
Opening, Trunk 120
Positions in starter switch 37
Remote control 110
Replacing batteries 441
Restoring to factory setting 113
Selective setting 112
Starting the engine 52
Turning off the engine 63Key, SmartKey with KEYLESS-GO*
Battery check lamp 114
Checking batteries 119
Factory setting 116
Global locking 117, 118
Global unlocking 116, 117
Locking/unlocking 37, 64, 113
Loss of 119
Messages in the multifunction
display 420, 421, 424
Opening and closing the power
tilt/sliding sunroof or panorama roof
with power tilt/sliding panel* 239
Opening and closing the
windows 239
Opening, Trunk 120
Replacing batteries 441
Restoring to factory setting 118
Selective setting 117
Starting the engine 53
Turning off the engine 64
KEYLESS-GO* see Key, SmartKey with
KEYLESS-GO*
Kickdown 188
Kilopascal 360L
Labels
Certification 476
Emission control information 476
Vacuum line routing diagram 477
Lamps, exterior
Exterior lamp switch 56, 137
Front 444
Messages in display 422
Rear 445
Switching on/off 137