Page 327 of 522
326 OperationEngine compartment
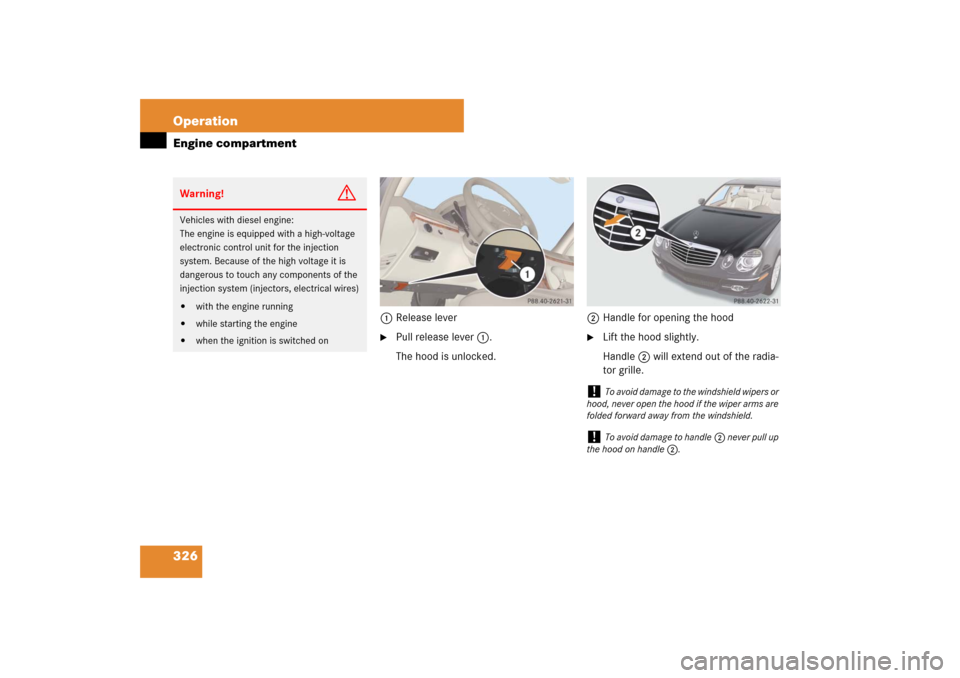
1Release lever�
Pull release lever1.
The hood is unlocked.2Handle for opening the hood
�
Lift the hood slightly.
Handle2 will extend out of the radia-
tor grille.
Warning!
G
Vehicles with diesel engine:
The engine is equipped with a high-voltage
electronic control unit for the injection
system. Because of the high voltage it is
dangerous to touch any components of the
injection system (injectors, electrical wires)�
with the engine running
�
while starting the engine
�
when the ignition is switched on
!
To avoid damage to the windshield wipers or
hood, never open the hood if the wiper arms are
folded forward away from the windshield.
!
To avoid damage to handle2 never pull up
the hood on handle2.
Page 373 of 522

372 OperationVehicle care
Ornamental moldings
For regular cleaning and care of ornamen-
tal moldings, use a damp cloth.Headlamps, tail lamps, side markers,
turn signal lenses
�
Use a mild car wash detergent, such as
Mercedes-Benz approved Car Sham-
poo, with plenty of water.
!
Make sure that the windshield wiper switch
is set toM (
�page 58). Otherwise, e.g. the
rain sensor could activate and cause the wipers
to move unintentionally. This may lead to vehicle
damage.
Due to the width of the vehicle, fold in exterior
rear view mirrors prior to running the vehicle
through an automatic car wash to prevent dam-
age to the mirrors.
i
After running the vehicle through an auto-
matic car wash, wipe any wax off of the wind-
shield (
�page 374) and the wiper blade inserts
(
�page 374). This will prevent smears and re-
duce wiping noise which can be caused by resid-
ual wax on the windshield.
When leaving the car wash, make sure that the
mirrors are folded out. Otherwise they may
vibrate.
!
Do not use chrome cleaner on ornamental
moldings. Although ornamental moldings may
have chrome appearance, they could be made of
anodized aluminum that will be damaged when
cleaned with chrome cleaner. Instead, use a
damp cloth to clean those ornamental moldings.
For very dirty ornamental moldings of which you
are sure are chrome-plated, use a chrome clean-
er. If in doubt whether an ornamental molding is
chrome-plated, contact an authorized
Mercedes-Benz Center.
!
Only use window cleaning solutions that are
suitable for plastic lamp lenses. Window clean-
ing solutions which are not suitable may damage
the plastic lamp lenses of the headlamps. There-
fore, do not use abrasives, solvents or cleaners
that contain solvents.
Never apply strong force and only use a soft,
non-scratching cloth when cleaning the lenses.
Do not attempt to wipe dirty lenses with a dry
cloth or sponge.
Otherwise you may scratch or damage the lens
surface.
Page 375 of 522
.
�
Turn combination switch to wiper
settingu (
�page 58).")
374 OperationVehicle careCleaning the windows and the wiper
blades�
Make sure the hood is fully closed.
�
Switch on the ignition (
�page 38).
�
Turn combination switch to wiper
settingu (
�page 58).
�
With wiper arms in vertical position,
switch off the ignition (
�page 63).
�
Fold the wiper arms forward until they
snap into place.
�
Clean the wiper blade inserts with a
clean cloth and detergent solution.
�
Use a soft, clean cloth and a mild win-
dow cleaning solution on all outside
and inside glass surfaces.
An automotive glass cleaner is recom-
mended.
!
The windshield wipers must be in a vertical
position before folding them away from the wind-
shield. They could otherwise damage the hood.
Never open the hood when the wiper arms are
folded forward.
Warning!
G
For safety reasons, switch off wipers and re-
move SmartKey from starter switch (vehi-
cles with KEYLESS-GO*: Make sure the
vehicle’s on-board electronics have
status0) before cleaning the windshield
and/or the wiper blades. Otherwise, the
wiper motor could suddenly turn on and
cause injury.!
Do not pull on the wiper blade inserts. They
could tear.
!
Fold the windshield wiper arms back onto
the windshield before turning the SmartKey in
the starter switch or pressing the KEYLESS-GO
start/stop button (vehicles with KEYLESS-GO*).
Hold on to the wiper when folding the wiper arm
back. If released, the force of the impact from
the tensioning spring could crack the windshield.
!
To clean the window interior, do not use a
dry cloth, abrasives, solvents or cleaners con-
taining solvents. Do not touch the inside of the
front, rear or side windows with hard objects
such as an ice scraper or ring. Doing so may
damage the windows.
Page 451 of 522
.
�
Turn")
450 Practical hintsReplacing wiper blades
Placing wiper arms in vertical positionWiper blades in vertical positionVehicles with SmartKey�
Turn SmartKey to starter switch
position1 (
�page 37).
�
Turn combination switch to wiper
settingu (
�page 58).
�
With wiper arms in the vertical position,
turn SmartKey in starter switch to
position0.
�
Remove SmartKey from starter switch.
Warning!
G
For safety reasons, switch off wipers and re-
move SmartKey from starter switch (vehi-
cles with KEYLESS-GO*: Make sure the
vehicle’s on-board electronics have
status0) before replacing a wiper blade.
Otherwise, the wiper motor could suddenly
turn on and cause injury. Warning!
G
Wiper blades are components that are sub-
ject to wear and tear. Change the wiper
blades twice a year, preferably in the spring
and fall. Otherwise the windows will not be
properly wiped. As a result, you may not be
able to observe surrounding traffic condi-
tions and could cause an accident.
!
To avoid damage to the hood:
�
The wiper arms should only be folded for-
ward when in the vertical position.
�
Never open the hood when the wiper arm is
folded forward.
!
Hold on to the wiper when folding the wiper
arm back. If released, the force of the impact
from the tensioning spring could crack the wind-
shield.
Do not allow the wiper arms to contact the wind-
shield glass without a wiper blade inserted.
Make sure the wiper blades are properly in-
stalled. Improperly installed wiper blades may
cause windshield damage.
For your convenience, we recommend that you
have this work carried out by an authorized
Mercedes-Benz Center.
Page 520 of 522
519 Index
Washer reservoir level 500
Washing the vehicle 369
Wear pattern, Tires 363
Weight, Vehicle 490
Wheel
Change 452
Removing 455
Spare 455
Tightening torque 458
Wheels, Sizes 482
Wheels, Tires and 333
Window curtain air bags 75
Windows see Power windows 237
Windows, cleaning 374
Windshield
Cleaning 59
Cleaning wiper blades 374
Defogging 213, 230
Windshield washer fluid 500
Messages in display 430
Mixing ratio 500
Refilling 332
Wiping 59
Windshield washer system 500Windshield wipers 58
Cleaning 374
Replacing wiper blade 450
Winter driving
Block heater* (Canada only) 365
Snow chains 365
Tires 364
Winter driving instructions 316
Winter tires 364
Wood trims, cleaning 377