Page 377 of 522

376 OperationVehicle careHard plastic trim items�
Use Mercedes-Benz approved Interior
Care, a soft, lint-free cloth and apply
with light pressure.
Steering wheel and gear selector lever
�
Wipe with a damp cloth and dry thor-
oughly or clean with Mercedes-Benz
approved Leather Care.Carpets
�
Use Mercedes-Benz approved Carpet
and Fabric Care for cleaning the car-
pets.
Headliner and shelf below rear window
�
Use a soft bristle brush or a dry-sham-
poo cleaner in case of excessive dirt.
Seat belts
�
Only use clear, lukewarm water and
soap.Upholstery
Using aftermarket seat covers or wearing
clothing that have the tendency to give off
coloring (e.g. when wet, etc.) may cause
the upholstery to become permanently dis-
colored. By lining the seats with a proper
intermediate cover, contact-discoloration
will be prevented.
!
Do not use oil, wax or scouring agents on
these parts.
Never apply strong force and only use a soft,
non-scratching cloth when cleaning the surface.
Do not attempt to wipe the surface with a dry
cloth or sponge.
Otherwise you may scratch or damage the sur-
face.
!
Never apply strong force and only use a soft,
non-scratching cloth when cleaning the surface.
Do not attempt to wipe the surface with a dry
cloth or sponge.
Otherwise you may scratch or damage the sur-
face.
!
The seat belts must not be treated with
chemical cleaning agents. Do not dry the seat
belts at temperatures above 176°F (80°C) or in
direct sunlight.
Warning!
G
Do not bleach or dye seat belts as this may
severely weaken them. In a crash they may
not be able to provide adequate protection.
Warning!
G
Only use seat or head restraint covers which
have been tested and approved by
Mercedes-Benz for your vehicle model.
Using other seat or head restraint covers
may interfere with or prevent the activation
of the active head restraints. Contact an
authorized Mercedes-Benz Center for
availability.
��
Page 378 of 522
377 Operation
Vehicle care
Leather upholstery
Please note that leather upholstery is a
natural product and is therefore subject to
a natural aging process. Leather uphol-
stery may also react to certain ambient in-
fluences such as high humidity or high
temperature by showing wrinkles for ex-
ample.�
Wipe leather upholstery with a damp
cloth and dry thoroughly or clean with
Mercedes-Benz approved Leather
Care.
Exercise particular care when cleaning per-
forated leather as its underside should not
become wet.Wood trims
�
Dampen cloth using water and use
damp cloth to clean wood trims in your
vehicle.
!
Wipe with light pressure to avoid damage to
the upholstery.
!
Do not use solvents like tar remover or
wheel cleaner nor polishes or waxes as these
may be abrasive.
Page 395 of 522
75The indicator lamp does not illuminate
and/or does not remain illuminated
with the weight of a t")
394 Practical hintsWhat to do if …Problem
Possible cause/consequence
Suggested solution
(USA only)75The indicator lamp does not illuminate
and/or does not remain illuminated
with the weight of a typical
12-month-old child in a standard child
restraint or less on the front passenger
seat.
The system is malfunctioning.
�
Make sure that there is nothing between seat cush-
ion and child seat and check installation of the child
seat.
�
Make sure that no objects applying supplemental
weight onto the seat are present.
�
Make sure that no objects which apply forces to the
seat are present (e.g. objects such as books, brief-
cases etc. lodged behind or around the seat, head
restraints pushing against roof etc.). The system
may recognize such forces as supplemental weight.
�
If the light remains out, have the system checked as
soon as possible by an authorized Mercedes-Benz
Center. Do not transport a child on the front passen-
ger seat until the system has been repaired.
�
Read and observe messages in the multifunction
display and follow corrective steps (
�page 403).
Warning!
G
If the
75
indicator lamp does
not illuminate or remains out with the
weight of a typical 12-month-old child in a
standard child restraint or less on the front
passenger seat,
do not transport a child on the front passen-
ger seat until the system has been repaired.
Page 423 of 522

422 Practical hintsWhat to do if …Display symbol
Display message
Possible cause/consequence
Possible solution
.
Active headlamps
inoperative
The active Bi-Xenon* headlamp system is
malfunctioning.
�
Contact an authorized Mercedes-Benz
Center as soon as possible.
Active headlamps
Auxiliary bulb on
The active Bi-Xenon* headlamps are mal-
functioning. Another light is being used.
�
Contact an authorized Mercedes-Benz
Center as soon as possible.
Reverse lamp
left side
The left reverse lamp is malfunctioning.
�
Replace the bulb as soon as possible.
Reverse lamp
right side
The right reverse lamp is malfunctioning.
�
Replace the bulb as soon as possible.
Brake-/tail lamp, left
Auxiliary bulb on
The left brake/tail lamp is malfunction-
ing.
This message will only appear if a critical
number of LEDs have stopped working.
�
Contact an authorized Mercedes-Benz
Center as soon as possible.
Brake-/tail lamp, right
Auxiliary bulb on
The right brake/tail lamp is malfunction-
ing.
This message will only appear if a critical
number of LEDs have stopped working.
�
Contact an authorized Mercedes-Benz
Center as soon as possible.
3rd brake lamp
The high mounted brake lamp is malfunc-
tioning.
This message will only appear if a critical
number of LEDs have stopped working.
�
Contact an authorized Mercedes-Benz
Center as soon as possible.
Page 425 of 522
424 Practical hintsWhat to do if …Display symbol
Display message
Possible cause/consequence
Possible solution
.
AUTO-Light
inoperative
The light sensor is malfunctioning. The
headlamps switch on automatically.
�
In the control system, set lamp operation
to manual mode (
�page 138).
�
Switch on headlamps using the exterior
lamp switch.
Low beam
left side
The left low beam lamp is malfunction-
ing.
Halogen headlamp:�
Replace the bulb as soon as possible.
Bi-Xenon* headlamp:
�
Contact an authorized Mercedes-Benz
Center as soon as possible.
Low beam
right side
The right low beam lamp is malfunc-
tioning.
Halogen headlamp:�
Replace the bulb as soon as possible.
Bi-Xenon* headlamp:
�
Contact an authorized Mercedes-Benz
Center as soon as possible.
Page 426 of 522

425 Practical hints
What to do if …
Display symbol
Display message
Possible cause/consequence
Possible solution
.
Rear left foglamp
The left rear fog lamp is malfunctioning.
�
Contact an authorized Mercedes-Benz
Center as soon as possible.
Rear right foglamp
The right rear fog lamp is malfunction-
ing.
�
Contact an authorized Mercedes-Benz
Center as soon as possible.
Switch off lights
You have removed the SmartKey from
the starter switch, opened the driver’s
door and left the headlamps on or re-
moved the SmartKey with
KEYLESS-GO* from the vehicle and left
the headlamps on.
�
Switch off the headlamps.
Tail lamp, left side
Auxiliary bulb on
The left tail lamp is malfunctioning. A
substitute bulb is being used.
�
Contact an authorized Mercedes-Benz
Center as soon as possible.
Tail lamp, right side
Auxiliary bulb on
The right tail lamp is malfunctioning. A
substitute bulb is being used.
�
Contact an authorized Mercedes-Benz
Center as soon as possible.
Cornering lamp
left
The left corner-illuminating front fog
lamp* is malfunctioning.
�
Contact an authorized Mercedes-Benz
Center as soon as possible.
Cornering lamp
right
The right corner-illuminating front fog
lamp* is malfunctioning.
�
Contact an authorized Mercedes-Benz
Center as soon as possible.
Page 427 of 522

426 Practical hintsWhat to do if …Display symbol
Display message
Possible cause/consequence
Possible solution
.
Rear left turn signal
The left rear turn signal lamp is malfunc-
tioning.
�
Contact an authorized Mercedes-Benz
Center as soon as possible.
Rear right turn signal
The right rear turn signal lamp is malfunc-
tioning.
�
Contact an authorized Mercedes-Benz
Center as soon as possible.
Front left turn signal
The left front turn signal lamp is malfunc-
tioning.
�
Replace the bulb as soon as possible.
Front right turn signal
The right front turn signal lamp is mal-
functioning.
�
Replace the bulb as soon as possible.
Left mirror
turn signal
The turn signal in the left exterior rear
view mirror is malfunctioning.
This message will only appear if a critical
number of LEDs have stopped working.
�
Contact an authorized Mercedes-Benz
Center as soon as possible.
Right mirror
turn signal
The turn signal in the right exterior rear
view mirror is malfunctioning.
This message will only appear if a critical
number of LEDs have stopped working.
�
Contact an authorized Mercedes-Benz
Center as soon as possible.
Switch off lights
or
remove key
The exterior lamp switch is set toU
and you have forgotten to take out the
SmartKey. The parking lamps remain
switched on.
�
Switch off the headlamps.
or
�
Remove the SmartKey from the starter
switch.
Page 440 of 522
439 Practical hints
Opening/closing in an emergency
�Opening/closing in an emergency
Power tilt/sliding sunroof or panorama roof with power tilt/sliding panel*
You can open or close the tilt/sliding sun-
roof or tilt/sliding panel manually should
an electrical malfunction occur.
The tilt/sliding sunroof or tilt/sliding panel
drive is located behind cover1 of the in-
terior overhead light.
1Cover�
Remove the SmartKey from the starter
switch.
�
Press on cover1 in direction of the ar-
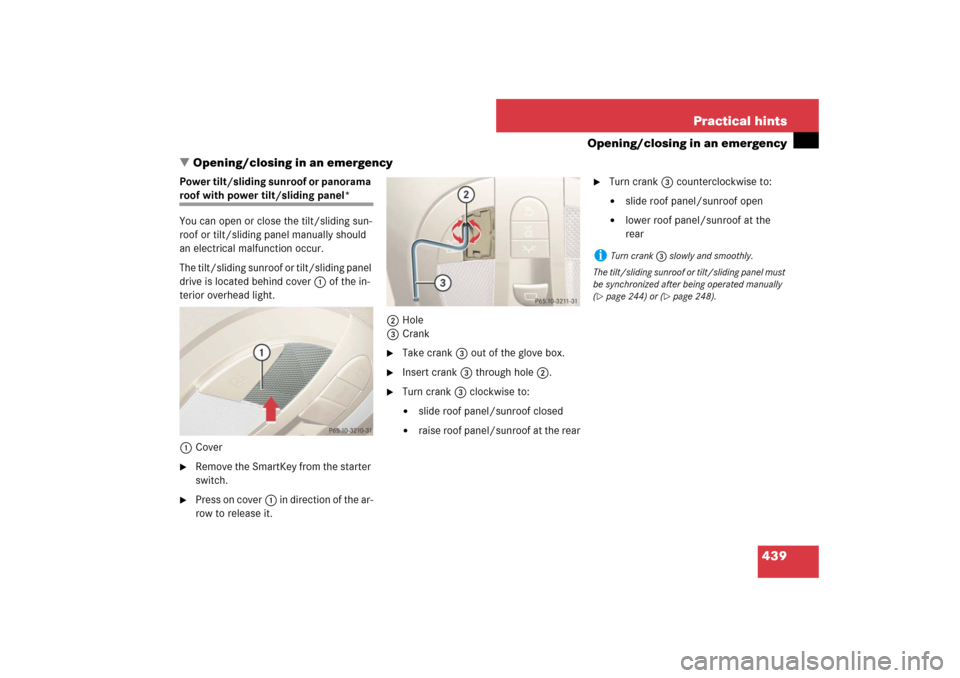
row to release it.2Hole
3Crank
�
Take crank3 out of the glove box.
�
Insert crank3 through hole2.
�
Turn crank3 clockwise to:�
slide roof panel/sunroof closed
�
raise roof panel/sunroof at the rear
�
Turn crank3 counterclockwise to:�
slide roof panel/sunroof open
�
lower roof panel/sunroof at the
rear
i
Turn crank3 slowly and smoothly.
The tilt/sliding sunroof or tilt/sliding panel must
be synchronized after being operated manually
(
�page 244) or (
�page 248).