Page 135 of 514

134 Controls in detailSeatsFolding bench seat in cargo compart-ment (optional on E 63 AMG)Folding out the folding bench seat
1Release handle for seat backrest
2Release handle for seat cushioni
The folding bench seat in the cargo compart-
ment is approved only for persons up to a height
of 4.6 ft (1.40 m) and a maximum weight of
110lb (50kg).
The twin roller blind must be installed when the
folding bench seat is in use.Warning!
G
When using the folding bench seat in the
cargo compartment, the seats in front of it
must be in the driving position.
Only drive when the head restraints for the
folding bench seat have been properly ad-
justed. The head restraints should be adjust-
ed so that the back of the head is supported
at approximately eye level. This can reduce
a child’s risk of injury in the event of an ac-
cident.
Warning!
G
Make sure that the seat belt is positioned
correctly on the body and is engaged in the
seat belt buckle.
Damaged covers should be replaced with
original covers only.
Do not leave children unattended in the ve-
hicle, even when they are secured in a child
restraint system.
Make sure that luggage and other objects
are adequately secured. The load could oth-
erwise injure someone in the event of an ac-
cident, during hard braking or steering
maneuvers.
Page 136 of 514

135 Controls in detailSeats
Before folding out the seat backrest, you
must:�
fold the rear seat backrests into an up-
right position and lock them into place
�
move the handle for the twin roller
blind into the upper position
�
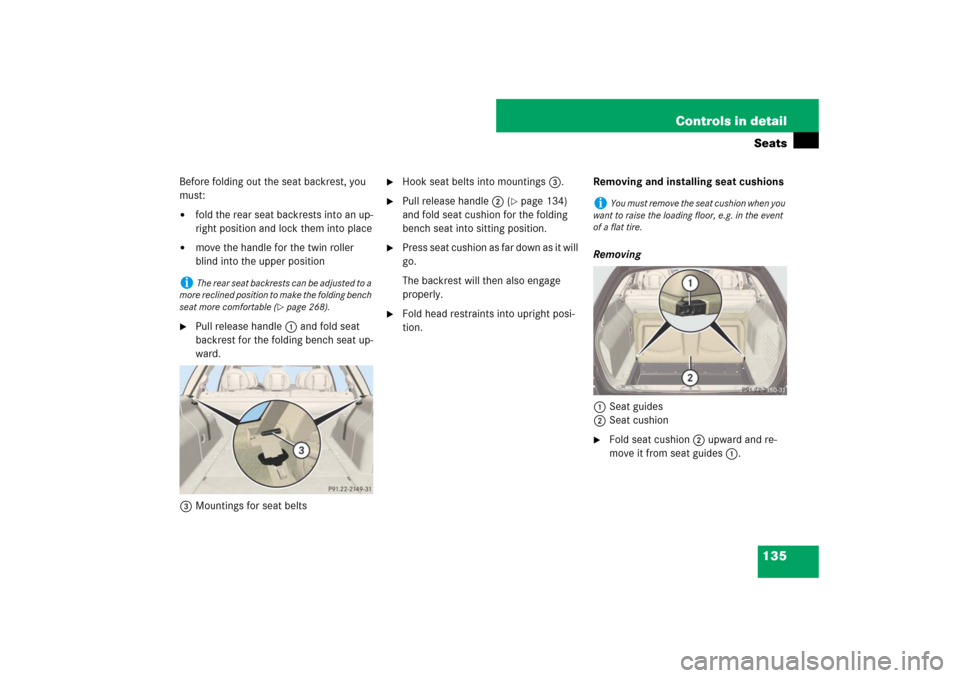
Pull release handle 1 and fold seat
backrest for the folding bench seat up-
ward.
3Mountings for seat belts
�
Hook seat belts into mountings 3.
�
Pull release handle 2 (
�page 134)
and fold seat cushion for the folding
bench seat into sitting position.
�
Press seat cushion as far down as it will
go.
The backrest will then also engage
properly.
�
Fold head restraints into upright posi-
tion.Removing and installing seat cushions
Removing
1Seat guides
2Seat cushion
�
Fold seat cushion 2 upward and re-
move it from seat guides 1.
i
The rear seat backrests can be adjusted to a
more reclined position to make the folding bench
seat more comfortable (
�page 268).
i
You must remove the seat cushion when you
want to raise the loading floor, e.g. in the event
of a flat tire.
Page 137 of 514
136 Controls in detailSeatsInstalling�
Insert seat cushion 2 (
�page 135)
into seat guides 1 (
�page 135) from
behind 3 at a slight angle.
�
Fold seat cushion 2 (
�page 135)
back into original position 4 until it
engages.Folding back folding bench seat
1Tab
2Backrest
�
Pull seat cushion upward using tab 1
and fold it back into original position
until it engages.1Release knob
�
Press release knob 1 and fold head
restraints down.
!
To avoid damage, insert the head restraints
completely into their guides and engage the seat
belt buckles in their guides.
Page 139 of 514

138 Controls in detailMemory functionPrior to operating the vehicle, the driver
should check and adjust the seat height,
seat position fore and aft, and seat back-
rest angle if necessary, to ensure adequate
control, reach and comfort. The head re-
straint should also be adjusted for proper
height. See also the section on air bags
(�page 70) for more information on prop-
er seat positioning.
In addition, adjust the steering wheel to
ensure adequate control, reach, operation
and comfort. Both the interior and outside
rear view mirrors should be adjusted for
adequate rear vision.
Fasten seat belts. Infants and small chil-
dren should be seated in a properly se-
cured restraint system that complies with
U.S. Federal Motor Vehicle Safety Stan-
dards 213 and 225 and Canadian Motor
Vehicle Safety Standards 213 and 210.2.With the memory function you can store up
to three different settings.
Each stored position on the driver’s side
includes the following settings:
�
Driver’s seat, backrest, head restraint
position
�
Multicontour seat*: previously saved
setting
�
Steering wheel position
�
Exterior rear view mirror positionsEach stored position on the front
passenger side includes the following
settings:
�
Front passenger seat, backrest, head
restraint position
�
Multicontour seat*: previously saved
setting
Warning!
G
Do not activate the memory function while
driving. Activating the memory function
while driving could cause the driver to lose
control of the vehicle.
Page 244 of 514

243 Controls in detail
Power tilt/sliding sunroof
�Power tilt/sliding sunroof
Opening and closing the power tilt/sliding sunroof
The tilt/sliding sunroof is opened and
closed electrically. The switch for the
tilt/sliding sunroof is on the overhead con-
trol panel.Sunroof switch1Push back to slide sunroof open
2Push forward to slide sunroof closed
3Push up to raise sunroof at rear
4Pull down to lower sunroof at rearWith the sunroof closed or tilted open, a
screen can be slid into the sunroof opening
to guard against sun rays. When sliding the
sunroof open, the screen will also retract.
Warning!
G
When closing the tilt/sliding sunroof, make
sure there is no danger of anyone being
harmed by the closing procedure.
The opening/closing procedure of the
tilt/sliding sunroof can be immediately halt-
ed by releasing the switch or, if the switch
was moved past the resistance point and re-
leased, by moving the switch in any direc-
tion.
The tilt/sliding sunroof is made out of glass.
In the event of an accident, the glass may
shatter. This may result in an opening in the
roof.
In a vehicle rollover, occupants not wearing
their seat belts or not wearing them properly
may be thrown out of the opening. Such an
opening also presents a potential for injury
for occupants wearing their seat belts prop-
erly as entire body parts or portions of them
may protrude from the passenger compart-
ment.
��
Page 267 of 514

266 Controls in detailLoadingSplit rear bench seat
To expand the cargo compartment, you
can fold down the left and right rear seat
backrests.
The two sections can be folded down sep-
arately to enlarge the cargo compartment.Folding the backrest forward
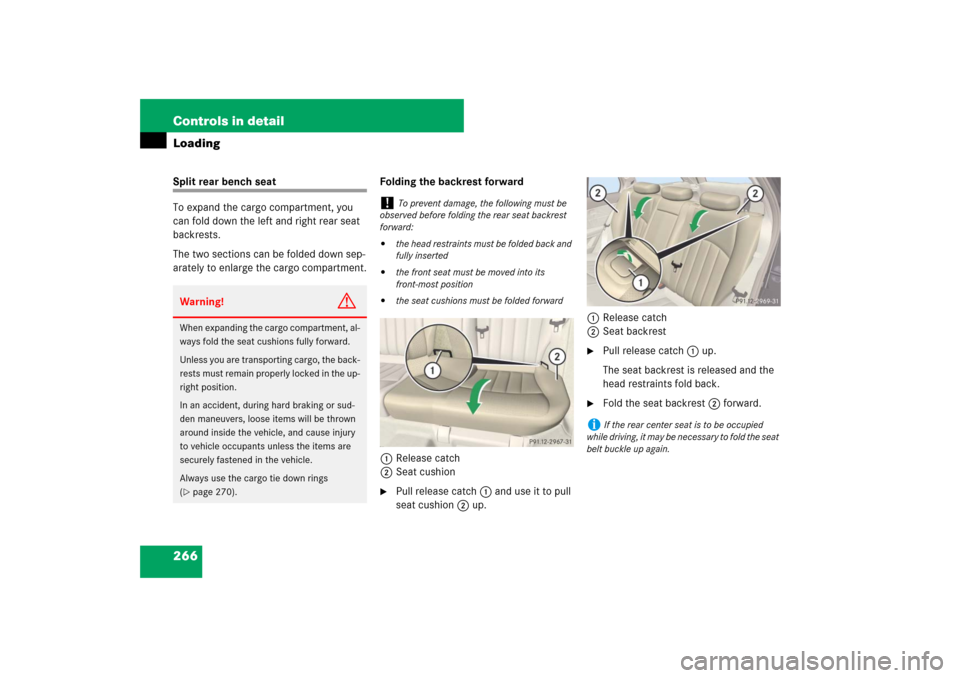
1Release catch
2Seat cushion
�
Pull release catch1 and use it to pull
seat cushion2 up.1Release catch
2Seat backrest
�
Pull release catch1 up.
The seat backrest is released and the
head restraints fold back.
�
Fold the seat backrest2 forward.
Warning!
G
When expanding the cargo compartment, al-
ways fold the seat cushions fully forward.
Unless you are transporting cargo, the back-
rests must remain properly locked in the up-
right position.
In an accident, during hard braking or sud-
den maneuvers, loose items will be thrown
around inside the vehicle, and cause injury
to vehicle occupants unless the items are
securely fastened in the vehicle.
Always use the cargo tie down rings
(�page 270).
!
To prevent damage, the following must be
observed before folding the rear seat backrest
forward:
�
the head restraints must be folded back and
fully inserted
�
the front seat must be moved into its
front-most position
�
the seat cushions must be folded forward
i
If the rear center seat is to be occupied
while driving, it may be necessary to fold the seat
belt buckle up again.
Page 272 of 514

271 Controls in detail
Loading
Cargo management system* (Canada only)
Your vehicle may be equipped with a cargo
management system and accompanying
accessories which enable you to utilize
your cargo compartment in a variety of
ways. You can store the cargo manage-
ment system in the pouch that comes with
the vehicle.
1Cargo railsInserting the mounting elements into
the cargo rails
1Cargo rail
2Mounting element
You can move the mounting element to
various engaging points on the cargo rail
and fix it in place.
These engaging points are located
2 inches apart from one another on the
cargo rail and are indicated by markings.
�
Turn mounting element 2 toL.
�
Insert mounting element 2 in cargo
rail 1.
�
Turn mounting element 2 until it en-
gages in the‹ position.
You should be able to feel the mounting
element engage in the cargo rail.
i
The pouch and telescoping rod can be
placed in the storage box in the cargo compart-
ment.
i
You can turn the mounting element in the
cargo rail to four positions:
‹To lock the mounting element.
NTo insert or remove the cargo tie-down
ring, the belt reel or the telescoping rod.
LTo insert or remove the mounting ele-
ment.
STo move the mounting element to the
next engaging point.
Page 273 of 514
272 Controls in detailLoadingInserting the cargo tie-down ring in the
mounting element
1Cargo tie-down ring
2Mounting element
�
Turn mounting element 2 in the cargo
rail toN.
�
Insert cargo tie-down ring 1 into
mounting element 2.
�
Turn mounting element 2 until it en-
gages in the‹ position.
You should be able to feel the mounting
element engage in the cargo rail.Belt reel
1Belt reel
2Mounting element
3Locking buttonWarning!
G
The cargo tie-down rings should be subject
to equal loads. Make sure to comply with
the information provided in the loading in-
structions (
�page 269).
i
The belt reel can be used to tighten
light-weight loads against the side wall of the
cargo compartment, thus securing them from
slipping.