Page 132 of 514

131 Controls in detailSeats
Lumbar support
The curvature of the front seats can be ad-
justed to help enhance lower back support
and seating comfort.
1Adjustment lever�
Move adjustment lever1 in direction
of the arrows until you have reached a
comfortable seating position.
Multicontour seat*
The multicontour seat has a movable seat
cushion and inflatable air cushions built
into the backrest to provide additional lum-
bar and side support.
The seat cushion movement, backrest
cushion height and curvature can be con-
tinuously varied with switches on the right
side of the seat on the driver side, or the
left side of the seat on the passenger side.
1Backrest side bolster
2Backrest center
3Backrest bottom
4Seat cushion depth
�
Switch on the ignition (
�page 37).
Seat cushion depth
�
Adjust the seat cushion depth to the
length of your upper leg using
switch4.
Backrest contour
�
Adjust the contour of the backrest to
the desired position using æ or
ç.
�
Move the backrest support cushion to
the bottom by using button3 or to the
center by using button2.
Backrest side bolsters
�
Adjust the side bolsters so that they
provide good lateral support using
switch1.
i
If, after a period of time, the seat no longer
provides the desired contour, then repeat the ad-
justment procedure.
Page 133 of 514

132 Controls in detailSeatsSeat heating*
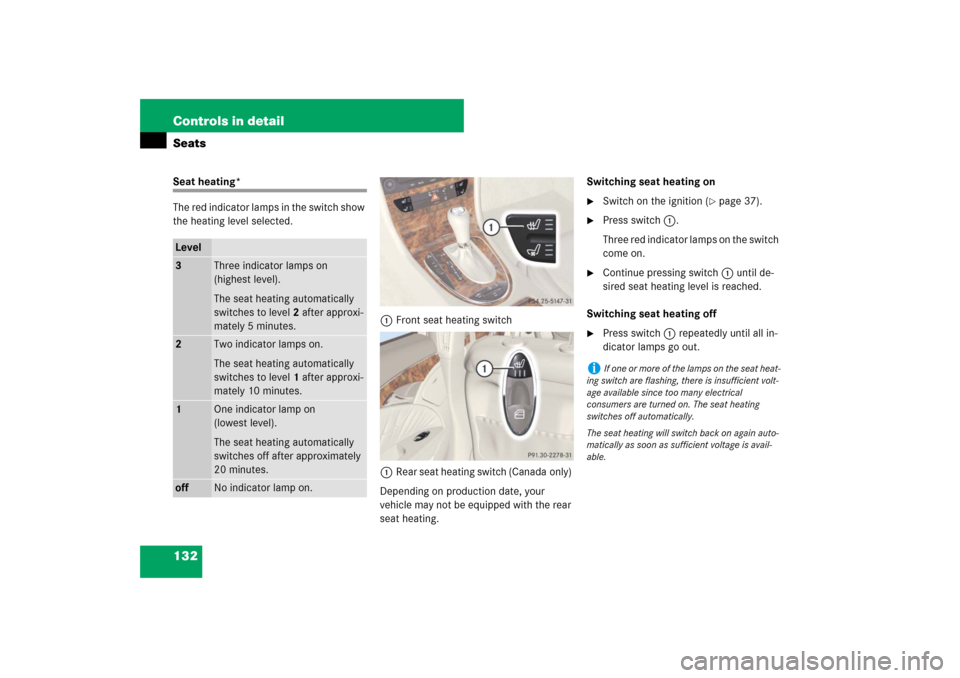
The red indicator lamps in the switch show
the heating level selected.
1Front seat heating switch
1Rear seat heating switch (Canada only)
Depending on production date, your
vehicle may not be equipped with the rear
seat heating.Switching seat heating on
�
Switch on the ignition (
�page 37).
�
Press switch1.
Three red indicator lamps on the switch
come on.
�
Continue pressing switch1 until de-
sired seat heating level is reached.
Switching seat heating off
�
Press switch1 repeatedly until all in-
dicator lamps go out.
Level3
Three indicator lamps on
(highest level).
The seat heating automatically
switches to level2 after approxi-
mately 5 minutes.
2
Two indicator lamps on.
The seat heating automatically
switches to level1 after approxi-
mately 10 minutes.
1
One indicator lamp on
(lowest level).
The seat heating automatically
switches off after approximately
20 minutes.
off
No indicator lamp on.
i
If one or more of the lamps on the seat heat-
ing switch are flashing, there is insufficient volt-
age available since too many electrical
consumers are turned on. The seat heating
switches off automatically.
The seat heating will switch back on again auto-
matically as soon as sufficient voltage is avail-
able.
Page 134 of 514

133 Controls in detailSeats
Seat ventilation*The blue indicator lamps on the switch
show the ventilation level selected.
1Seat ventilation switch
�
Switch on the ignition (
�page 37).Switching seat ventilation on
�
Press button1 repeatedly until the
desired ventilation level is set.
One or more blue indicator lamps on
the switch show the selected ventila-
tion level.
Switching seat ventilation off
�
Press button1 repeatedly until all in-
dicator lamps go out.
Level3
Three indicator lamps on
(highest level).
2
Two indicator lamps on.
1
One indicator lamp on
(lowest level).
off
No indicator lamp on.
i
The seat ventilation for the driver’s seat can
be activated using summer opening feature
(
�page 241).
i
If one or more of the lamps on the seat ven-
tilation switch are flashing, there is insufficient
voltage available since too many electrical con-
sumers are turned on. The seat ventilation
switches off automatically.
The seat ventilation will switch back on again au-
tomatically as soon as sufficient voltage is avail-
able.
Page 135 of 514

134 Controls in detailSeatsFolding bench seat in cargo compart-ment (optional on E 63 AMG)Folding out the folding bench seat
1Release handle for seat backrest
2Release handle for seat cushioni
The folding bench seat in the cargo compart-
ment is approved only for persons up to a height
of 4.6 ft (1.40 m) and a maximum weight of
110lb (50kg).
The twin roller blind must be installed when the
folding bench seat is in use.Warning!
G
When using the folding bench seat in the
cargo compartment, the seats in front of it
must be in the driving position.
Only drive when the head restraints for the
folding bench seat have been properly ad-
justed. The head restraints should be adjust-
ed so that the back of the head is supported
at approximately eye level. This can reduce
a child’s risk of injury in the event of an ac-
cident.
Warning!
G
Make sure that the seat belt is positioned
correctly on the body and is engaged in the
seat belt buckle.
Damaged covers should be replaced with
original covers only.
Do not leave children unattended in the ve-
hicle, even when they are secured in a child
restraint system.
Make sure that luggage and other objects
are adequately secured. The load could oth-
erwise injure someone in the event of an ac-
cident, during hard braking or steering
maneuvers.
Page 136 of 514

135 Controls in detailSeats
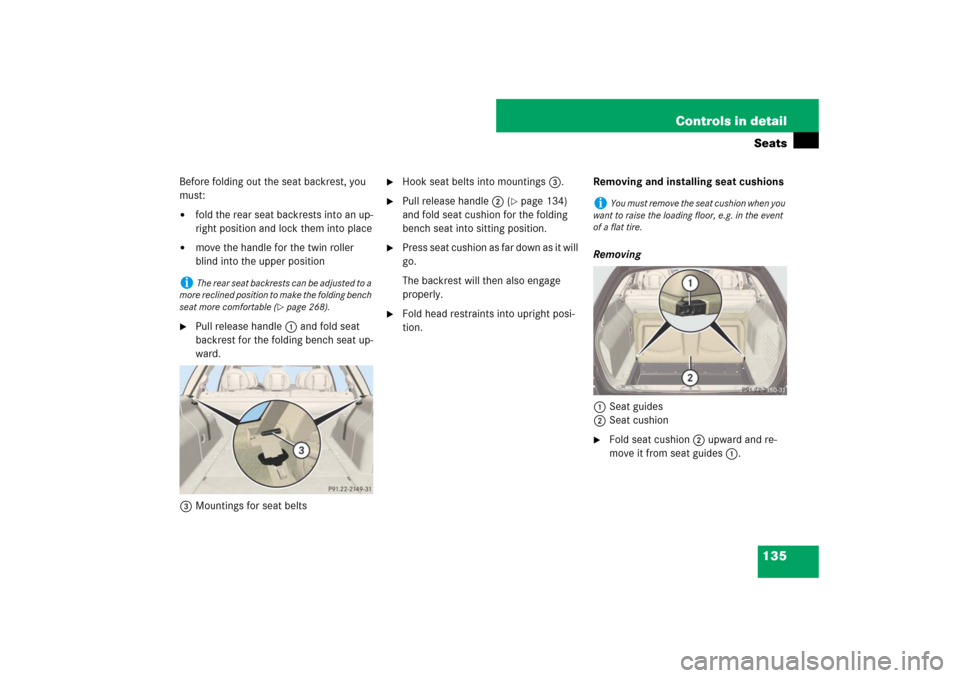
Before folding out the seat backrest, you
must:�
fold the rear seat backrests into an up-
right position and lock them into place
�
move the handle for the twin roller
blind into the upper position
�
Pull release handle 1 and fold seat
backrest for the folding bench seat up-
ward.
3Mountings for seat belts
�
Hook seat belts into mountings 3.
�
Pull release handle 2 (
�page 134)
and fold seat cushion for the folding
bench seat into sitting position.
�
Press seat cushion as far down as it will
go.
The backrest will then also engage
properly.
�
Fold head restraints into upright posi-
tion.Removing and installing seat cushions
Removing
1Seat guides
2Seat cushion
�
Fold seat cushion 2 upward and re-
move it from seat guides 1.
i
The rear seat backrests can be adjusted to a
more reclined position to make the folding bench
seat more comfortable (
�page 268).
i
You must remove the seat cushion when you
want to raise the loading floor, e.g. in the event
of a flat tire.
Page 137 of 514
136 Controls in detailSeatsInstalling�
Insert seat cushion 2 (
�page 135)
into seat guides 1 (
�page 135) from
behind 3 at a slight angle.
�
Fold seat cushion 2 (
�page 135)
back into original position 4 until it
engages.Folding back folding bench seat
1Tab
2Backrest
�
Pull seat cushion upward using tab 1
and fold it back into original position
until it engages.1Release knob
�
Press release knob 1 and fold head
restraints down.
!
To avoid damage, insert the head restraints
completely into their guides and engage the seat
belt buckles in their guides.
Page 138 of 514
137 Controls in detailSeats
1Release catch
2Backrest�
Press release catch 1 and push head
restraints as far in as they will go.
�
Fold seat backrest2 of folding bench
seat back into original position until it
engages.
Page 140 of 514

139 Controls in detail
Memory function
MMemory button
1, 2, 3Memory position button�
Switch on the ignition (
�page 37).
or
�
Open the respective door.
Storing positions into memory�
Adjust the seats, steering wheel and
exterior rear view mirrors to the de-
sired position (
�page 41).
�
Press memory buttonM.
�
Release memory buttonM
(�page 139) and press memory posi-
tion button 1, 2 or 3 (
�page 139) with-
in 3 seconds.
All the settings are stored at the select-
ed position.
Recalling positions from memory�
Press and hold memory position
button1, 2 or3 (
�page 139) until the
seat, steering wheel and exterior rear
view mirrors have completely moved to
the stored positions.
!
Do not operate the power seats using the
memory button if the seat backrest is in an ex-
cessively reclined position. Doing so could cause
damage to front or rear seats.
First move seat backrest to an upright position.
i
Releasing the memory position button stops
movement to the stored positions immediately.
The multicontour seat* will continue to be ad-
justed.