Page 328 of 522
327 Operation
Engine compartment
�
Pull handle2 to its stop out of radia-
tor grille.
�
Lift bottom of hood at edge of radiator
grille.
The hood will be automatically held
open at shoulder height by gas-filled
struts. Closing
�
Let the hood drop from a height of ap-
proximately 1 ft (30 cm).
The hood will lock audibly.
�
Check to make sure the hood is fully
closed.
If you can raise the hood at a point
above the headlamps, then it is not
properly closed. Open it again and let it
drop with somewhat greater force.
Engine oil
The amount of oil your engine needs will
depend on a number of factors, including
driving style. Higher oil consumption can
occur when�
the vehicle is new
�
the vehicle is driven frequently at
higher engine speeds
Engine oil consumption checks should only
be made after the vehicle break-in period.
Warning!
G
When closing the hood, use extreme caution
not to catch hands or fingers. Be careful that
you do not close the hood on anyone.
Make sure that the hood is securely en-
gaged before driving off. Do not continue
driving if the hood can no longer engage af-
ter an accident, for example. The hood could
otherwise come loose while the vehicle is in
motion and endanger you and others.
i
Do not use any special lubricant additives,
as these may damage the drive assemblies. Us-
ing special additives not approved by
Mercedes-Benz may cause damage not covered
by the Mercedes-Benz Limited Warranty.
More information on this subject is available at
any Mercedes-Benz Center.
Page 333 of 522

332 OperationEngine compartmentWindshield washer system and headlamp cleaning system*
The windshield washer reservoir is located
in the engine compartment.
1Cap for windshield washer reservoir
Fluid for the windshield washer system and
the headlamp cleaning system is supplied
from the windshield washer reservoir. It
has a capacity of: �
4.8 US qt (4.5 l) in vehicles without
headlamp cleaning system
�
6.9 US qt (6.5 l) in vehicles with head-
lamp cleaning systemDuring all seasons, add MB Windshield
Washer Concentrate “MB SummerFit” to
water. Premix the windshield washer fluid
in a suitable container.
�
Use the tab to pull cap1 upwards.
�
Refill the reservoir with MB Windshield
Washer Concentrate and water (or
commercially available premixed wind-
shield washer solvent/antifreeze, de-
pending on ambient temperatures).For more information, see “Windshield and
headlamp washer fluid mixing ratio”
(
�page 500).
Warning!
G
Washer solvent/antifreeze is highly flamma-
ble. Do not spill washer solvent/ antifreeze
on hot engine parts, because it may ignite
and burn. You could be seriously burned.
!
Always use washer solvent/antifreeze
where temperatures may fall below freezing
point. Failure to do so could result in damage to
the washer system/reservoir.
!
Only use washer fluid which is suitable for
plastic lenses. Improper washer fluid can dam-
age the plastic lenses of the headlamps.
Page 373 of 522

372 OperationVehicle care
Ornamental moldings
For regular cleaning and care of ornamen-
tal moldings, use a damp cloth.Headlamps, tail lamps, side markers,
turn signal lenses
�
Use a mild car wash detergent, such as
Mercedes-Benz approved Car Sham-
poo, with plenty of water.
!
Make sure that the windshield wiper switch
is set toM (
�page 58). Otherwise, e.g. the
rain sensor could activate and cause the wipers
to move unintentionally. This may lead to vehicle
damage.
Due to the width of the vehicle, fold in exterior
rear view mirrors prior to running the vehicle
through an automatic car wash to prevent dam-
age to the mirrors.
i
After running the vehicle through an auto-
matic car wash, wipe any wax off of the wind-
shield (
�page 374) and the wiper blade inserts
(
�page 374). This will prevent smears and re-
duce wiping noise which can be caused by resid-
ual wax on the windshield.
When leaving the car wash, make sure that the
mirrors are folded out. Otherwise they may
vibrate.
!
Do not use chrome cleaner on ornamental
moldings. Although ornamental moldings may
have chrome appearance, they could be made of
anodized aluminum that will be damaged when
cleaned with chrome cleaner. Instead, use a
damp cloth to clean those ornamental moldings.
For very dirty ornamental moldings of which you
are sure are chrome-plated, use a chrome clean-
er. If in doubt whether an ornamental molding is
chrome-plated, contact an authorized
Mercedes-Benz Center.
!
Only use window cleaning solutions that are
suitable for plastic lamp lenses. Window clean-
ing solutions which are not suitable may damage
the plastic lamp lenses of the headlamps. There-
fore, do not use abrasives, solvents or cleaners
that contain solvents.
Never apply strong force and only use a soft,
non-scratching cloth when cleaning the lenses.
Do not attempt to wipe dirty lenses with a dry
cloth or sponge.
Otherwise you may scratch or damage the lens
surface.
Page 423 of 522
422 Practical hintsWhat to do if …Display symbol
Display message
Possible cause/consequence
Possible solution
.
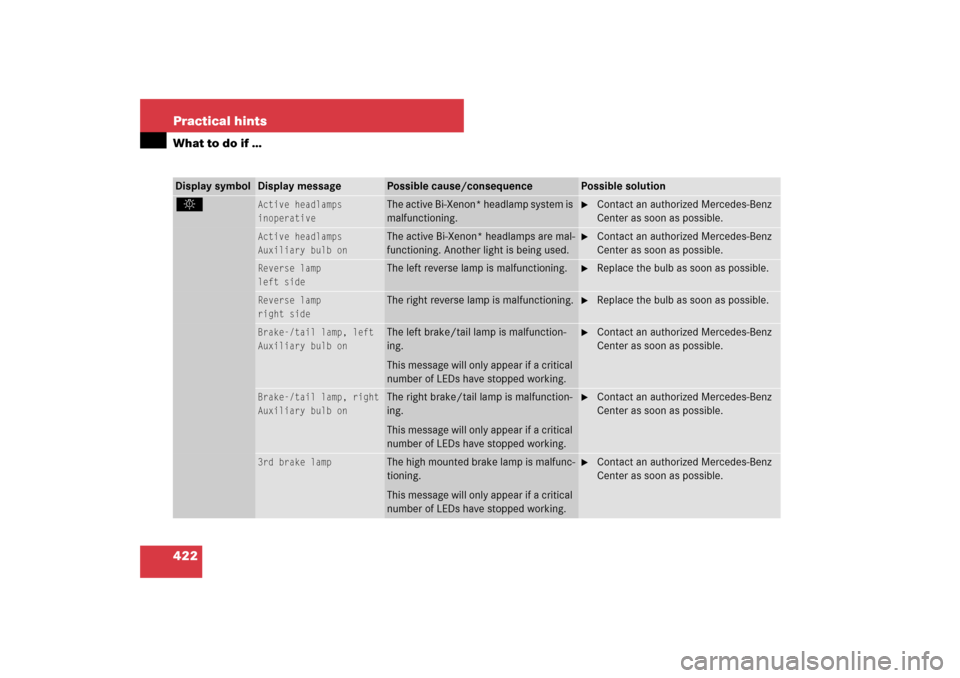
Active headlamps
inoperative
The active Bi-Xenon* headlamp system is
malfunctioning.
�
Contact an authorized Mercedes-Benz
Center as soon as possible.
Active headlamps
Auxiliary bulb on
The active Bi-Xenon* headlamps are mal-
functioning. Another light is being used.
�
Contact an authorized Mercedes-Benz
Center as soon as possible.
Reverse lamp
left side
The left reverse lamp is malfunctioning.
�
Replace the bulb as soon as possible.
Reverse lamp
right side
The right reverse lamp is malfunctioning.
�
Replace the bulb as soon as possible.
Brake-/tail lamp, left
Auxiliary bulb on
The left brake/tail lamp is malfunction-
ing.
This message will only appear if a critical
number of LEDs have stopped working.
�
Contact an authorized Mercedes-Benz
Center as soon as possible.
Brake-/tail lamp, right
Auxiliary bulb on
The right brake/tail lamp is malfunction-
ing.
This message will only appear if a critical
number of LEDs have stopped working.
�
Contact an authorized Mercedes-Benz
Center as soon as possible.
3rd brake lamp
The high mounted brake lamp is malfunc-
tioning.
This message will only appear if a critical
number of LEDs have stopped working.
�
Contact an authorized Mercedes-Benz
Center as soon as possible.
Page 425 of 522
424 Practical hintsWhat to do if …Display symbol
Display message
Possible cause/consequence
Possible solution
.
AUTO-Light
inoperative
The light sensor is malfunctioning. The
headlamps switch on automatically.
�
In the control system, set lamp operation
to manual mode (
�page 138).
�
Switch on headlamps using the exterior
lamp switch.
Low beam
left side
The left low beam lamp is malfunction-
ing.
Halogen headlamp:�
Replace the bulb as soon as possible.
Bi-Xenon* headlamp:
�
Contact an authorized Mercedes-Benz
Center as soon as possible.
Low beam
right side
The right low beam lamp is malfunc-
tioning.
Halogen headlamp:�
Replace the bulb as soon as possible.
Bi-Xenon* headlamp:
�
Contact an authorized Mercedes-Benz
Center as soon as possible.
Page 426 of 522
425 Practical hints
What to do if …
Display symbol
Display message
Possible cause/consequence
Possible solution
.
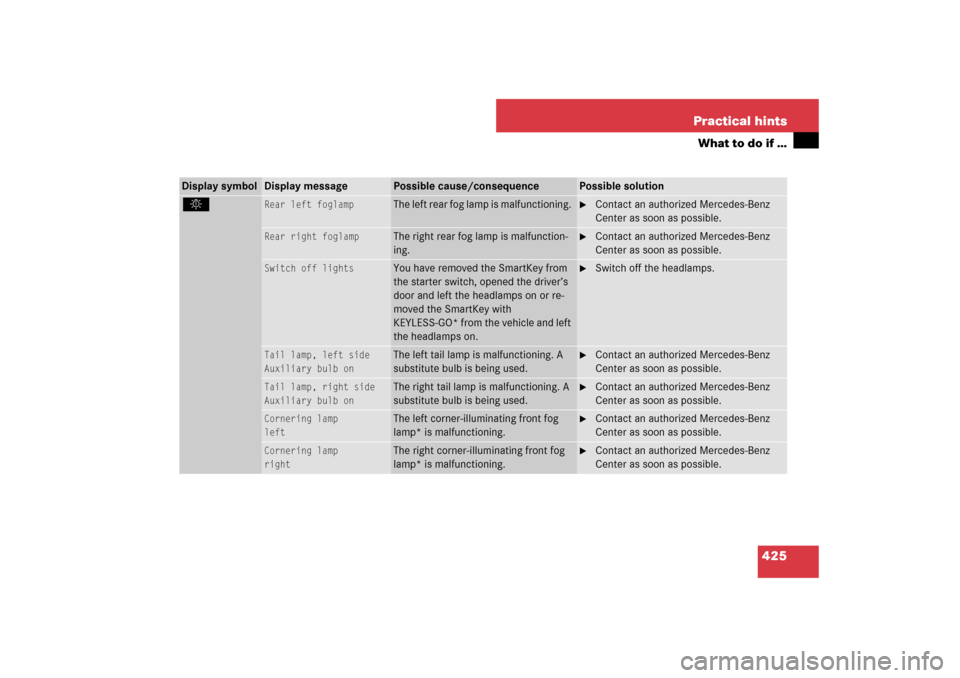
Rear left foglamp
The left rear fog lamp is malfunctioning.
�
Contact an authorized Mercedes-Benz
Center as soon as possible.
Rear right foglamp
The right rear fog lamp is malfunction-
ing.
�
Contact an authorized Mercedes-Benz
Center as soon as possible.
Switch off lights
You have removed the SmartKey from
the starter switch, opened the driver’s
door and left the headlamps on or re-
moved the SmartKey with
KEYLESS-GO* from the vehicle and left
the headlamps on.
�
Switch off the headlamps.
Tail lamp, left side
Auxiliary bulb on
The left tail lamp is malfunctioning. A
substitute bulb is being used.
�
Contact an authorized Mercedes-Benz
Center as soon as possible.
Tail lamp, right side
Auxiliary bulb on
The right tail lamp is malfunctioning. A
substitute bulb is being used.
�
Contact an authorized Mercedes-Benz
Center as soon as possible.
Cornering lamp
left
The left corner-illuminating front fog
lamp* is malfunctioning.
�
Contact an authorized Mercedes-Benz
Center as soon as possible.
Cornering lamp
right
The right corner-illuminating front fog
lamp* is malfunctioning.
�
Contact an authorized Mercedes-Benz
Center as soon as possible.
Page 427 of 522
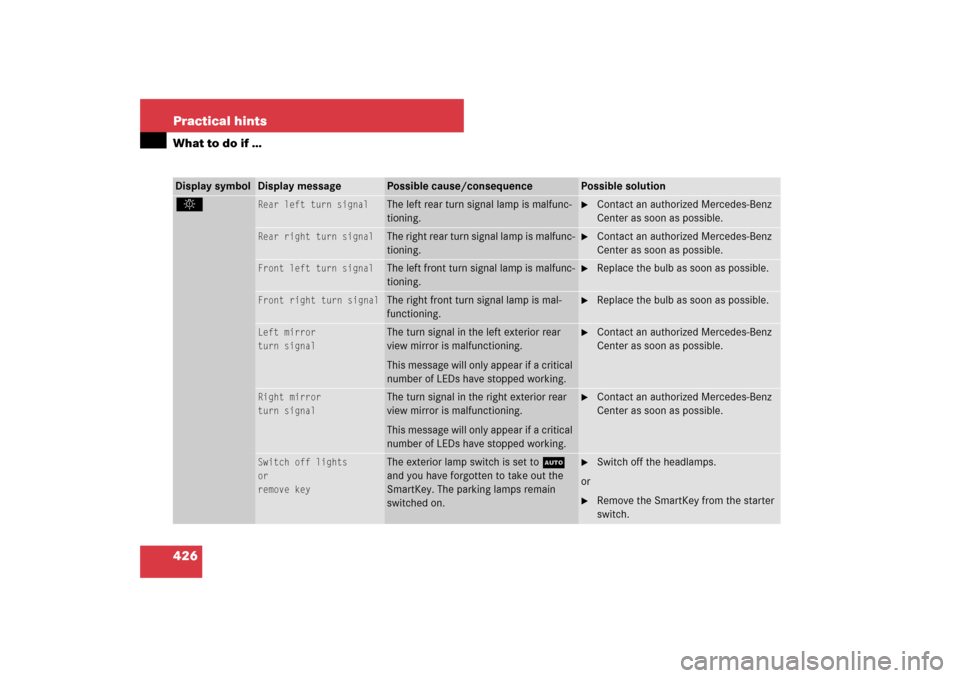
426 Practical hintsWhat to do if …Display symbol
Display message
Possible cause/consequence
Possible solution
.
Rear left turn signal
The left rear turn signal lamp is malfunc-
tioning.
�
Contact an authorized Mercedes-Benz
Center as soon as possible.
Rear right turn signal
The right rear turn signal lamp is malfunc-
tioning.
�
Contact an authorized Mercedes-Benz
Center as soon as possible.
Front left turn signal
The left front turn signal lamp is malfunc-
tioning.
�
Replace the bulb as soon as possible.
Front right turn signal
The right front turn signal lamp is mal-
functioning.
�
Replace the bulb as soon as possible.
Left mirror
turn signal
The turn signal in the left exterior rear
view mirror is malfunctioning.
This message will only appear if a critical
number of LEDs have stopped working.
�
Contact an authorized Mercedes-Benz
Center as soon as possible.
Right mirror
turn signal
The turn signal in the right exterior rear
view mirror is malfunctioning.
This message will only appear if a critical
number of LEDs have stopped working.
�
Contact an authorized Mercedes-Benz
Center as soon as possible.
Switch off lights
or
remove key
The exterior lamp switch is set toU
and you have forgotten to take out the
SmartKey. The parking lamps remain
switched on.
�
Switch off the headlamps.
or
�
Remove the SmartKey from the starter
switch.
Page 444 of 522
443 Practical hints
Replacing bulbs
�Replacing bulbs
Bulbs
Safe vehicle operation depends on proper
exterior lighting and signaling. It is there-
fore essential that all bulbs and lamp as-
semblies are in good working order at all
times.
Correct headlamp adjustment is extremely
important. Have headlamps checked and
readjusted at regular intervals and when a
bulb has been replaced. Contact your au-
thorized Mercedes-Benz Center for head-
lamp adjustment.
i
If the headlamps or front fog lamps are
fogged up on the inside as a result of high humid-
ity, driving the vehicle a distance with the lights
on should clear up the fogging.
i
Substitute bulbs will be brought into use
when lamps malfunction. Read and observe mes-
sages in the multifunction display (
�page 422).