Page 112 of 522
111 Controls in detail
Locking and unlocking
Warning!
G
When leaving the vehicle, always remove the
SmartKey from the starter switch, take it
with you, and lock the vehicle. Do not leave
children unattended in the vehicle, or with
access to an unlocked vehicle. It is possible
for children to open a looked door from the
inside, which could result in an accident
and/or serious personal injury.i
USA only:
This device complies with Part 15 of the FCC
Rules. Operation is subject to the following two
conditions:
(1) This device may not cause harmful interfer-
ence, and
(2) this device must accept any interference re-
ceived, including interference that may
cause undesired operation.
Any unauthorized modification to this device
could void the user’s authority to operate the
equipment.
i
Canada only:
This device complies with RSS-210 of Industry
Canada. Operation is subject to the following
two conditions:
(1) This device may not cause interference, and
(2) this device must accept any interference re-
ceived, including interference that may
cause undesired operation of the device.
Any unauthorized modification to this device
could void the user’s authority to operate the
equipment.
i
You can also open and close the windows
and tilt/sliding sunroof or tilt/sliding panel* us-
ing the SmartKey (
�page 239).
!
If you can no longer lock or unlock the vehi-
cle with the SmartKey, then the batteries in the
SmartKey are discharged, the SmartKey is mal-
functioning or the vehicle battery is drained.
�
Check the batteries in the SmartKey and re-
place them if necessary (
�page 441).
�
Use the mechanical key to unlock the
driver’s door (
�page 436) and the trunk
(
�page 437).
�
Use the mechanical key to lock the driver’s
door (
�page 437) and the trunk
(
�page 126).
�
Have the vehicle battery checked by an
authorized Mercedes-Benz Center.
If the SmartKey is malfunctioning, contact an
authorized Mercedes-Benz Center.
Page 115 of 522
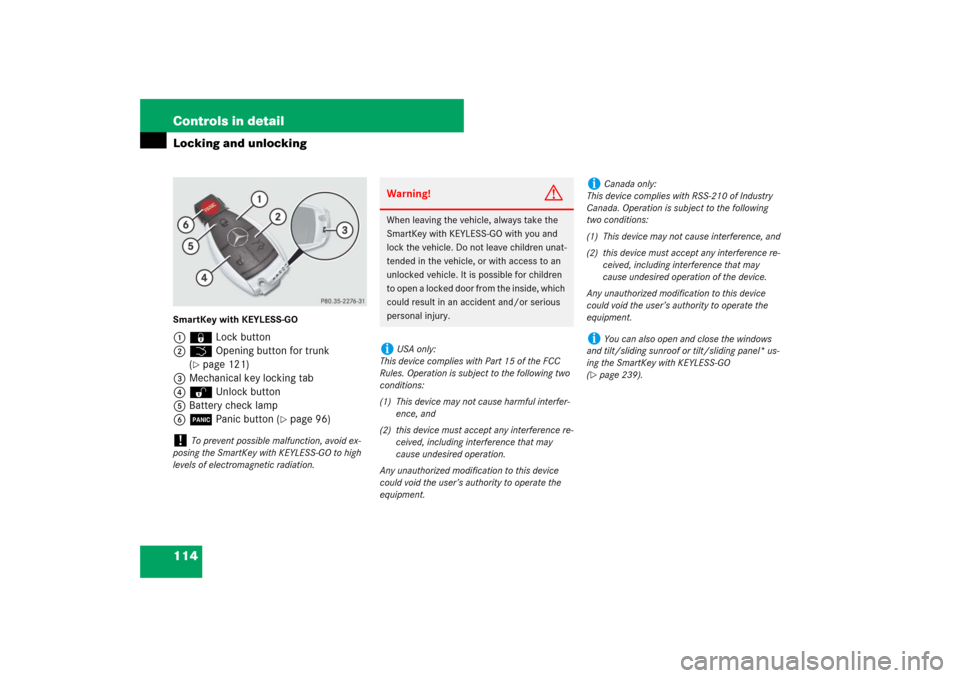
114 Controls in detailLocking and unlockingSmartKey with KEYLESS-GO 1‹ Lock button
2Š Opening button for trunk
(
�page 121)
3Mechanical key locking tab
4ΠUnlock button
5Battery check lamp
6Â Panic button (
�page 96)
!
To prevent possible malfunction, avoid ex-
posing the SmartKey with KEYLESS-GO to high
levels of electromagnetic radiation.
Warning!
G
When leaving the vehicle, always take the
SmartKey with KEYLESS-GO with you and
lock the vehicle. Do not leave children unat-
tended in the vehicle, or with access to an
unlocked vehicle. It is possible for children
to open a locked door from the inside, which
could result in an accident and/or serious
personal injury.i
USA only:
This device complies with Part 15 of the FCC
Rules. Operation is subject to the following two
conditions:
(1) This device may not cause harmful interfer-
ence, and
(2) this device must accept any interference re-
ceived, including interference that may
cause undesired operation.
Any unauthorized modification to this device
could void the user’s authority to operate the
equipment.
i
Canada only:
This device complies with RSS-210 of Industry
Canada. Operation is subject to the following
two conditions:
(1) This device may not cause interference, and
(2) this device must accept any interference re-
ceived, including interference that may
cause undesired operation of the device.
Any unauthorized modification to this device
could void the user’s authority to operate the
equipment.
i
You can also open and close the windows
and tilt/sliding sunroof or tilt/sliding panel* us-
ing the SmartKey with KEYLESS-GO
(
�page 239).
Page 138 of 522

137 Controls in detail
Lighting
�Lighting
For information on how to switch on the
headlamps and use the turn signals, see
“Switching on headlamps” (
�page 56)
and see “Turn signals” (
�page 57).
Exterior lamp switchExterior lamp switch
i
If you drive in countries where vehicles drive
on the other side of the road than the country
where the vehicle is registered, you must have
the headlamps modified for symmetrical low
beams. Relevant information can be obtained at
your authorized Mercedes-Benz Center.
i
Vehicles equipped with active Bi-Xenon*
headlamps:
The active Bi-Xenon headlamps monitor your
steering angle and driving speed, then automati-
cally shift their beams to either side to better fol-
low the curvature of the road ahead, increasing
usable illumination over conventional head-
lamps.
1‚
Standing lamps, left (turn left two
stops)
2ˆ
Standing lamps, right (turn left
one stop)
3M
Off
Daytime running lamp mode
(�page 139)
4U
Automatic headlamp mode
Daytime running lamp mode
(�page 139)
5C
Parking lamps (also side marker
lamps, tail lamps, license plate
lamps, instrument panel lamps)
6B
Low beam headlamps or high
beam headlamps when the com-
bination switch is pushed for-
ward. The tail lamps, license
plate lamps, side marker lamps,
parking lamps and instrument
panel lamps also come on.
7‡
Front fog lamps
8†
Rear fog lamp
Page 146 of 522
145 Controls in detail
Lighting
Interior lighting in the front
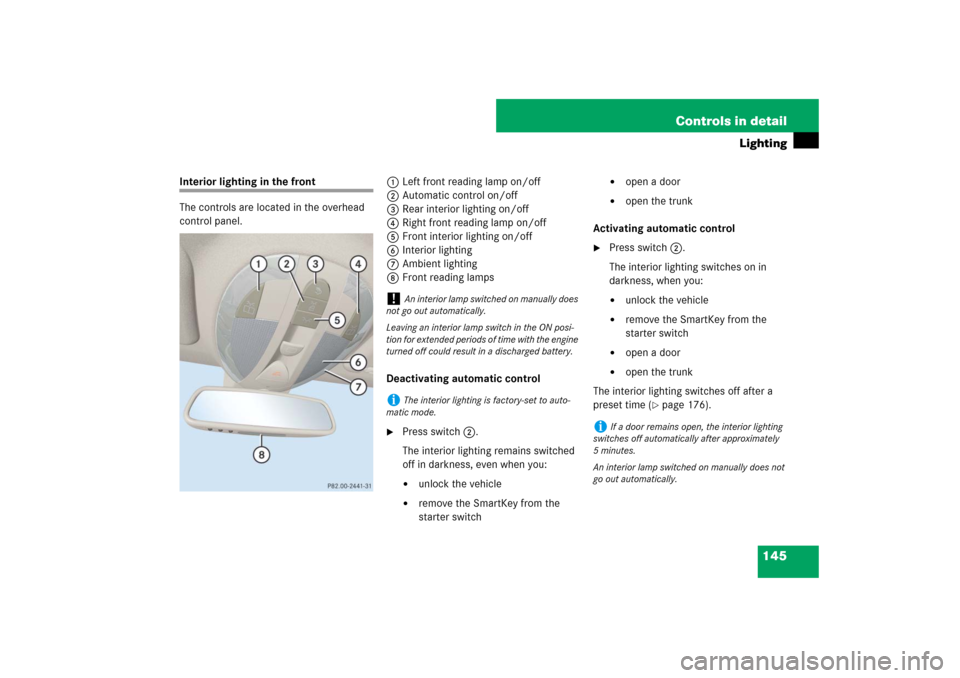
The controls are located in the overhead
control panel.1Left front reading lamp on/off
2Automatic control on/off
3Rear interior lighting on/off
4Right front reading lamp on/off
5Front interior lighting on/off
6Interior lighting
7Ambient lighting
8Front reading lamps
Deactivating automatic control
�
Press switch2.
The interior lighting remains switched
off in darkness, even when you:�
unlock the vehicle
�
remove the SmartKey from the
starter switch
�
open a door
�
open the trunk
Activating automatic control
�
Press switch2.
The interior lighting switches on in
darkness, when you:�
unlock the vehicle
�
remove the SmartKey from the
starter switch
�
open a door
�
open the trunk
The interior lighting switches off after a
preset time (
�page 176).
!
An interior lamp switched on manually does
not go out automatically.
Leaving an interior lamp switch in the ON posi-
tion for extended periods of time with the engine
turned off could result in a discharged battery.
i
The interior lighting is factory-set to auto-
matic mode.
i
If a door remains open, the interior lighting
switches off automatically after approximately
5minutes.
An interior lamp switched on manually does not
go out automatically.
Page 147 of 522
146 Controls in detailLightingManual control
Switching front/rear interior lighting on
and off�
Press front/rear interior lighting
switch5 or 3 (
�page 145) to switch
on the desired interior light.
�
Press front/rear interior lighting
switch5 or 3 again to switch off the
respective interior light.
Switching front reading lamps on and off
The front reading lamps are located in the
lower edge of the interior rear view mirror.
�
Press front reading lamp
switch1or4 (
�page 145) to
switch on the desired front reading
lamp.
�
Press front reading lamp
switch1or4 again to switch off the
respective front reading lamp.Ambient lighting
You can switch the ambient lighting7
(
�page 145) on and off, using the “Control
system” (
�page 175).
Interior lighting in the rear
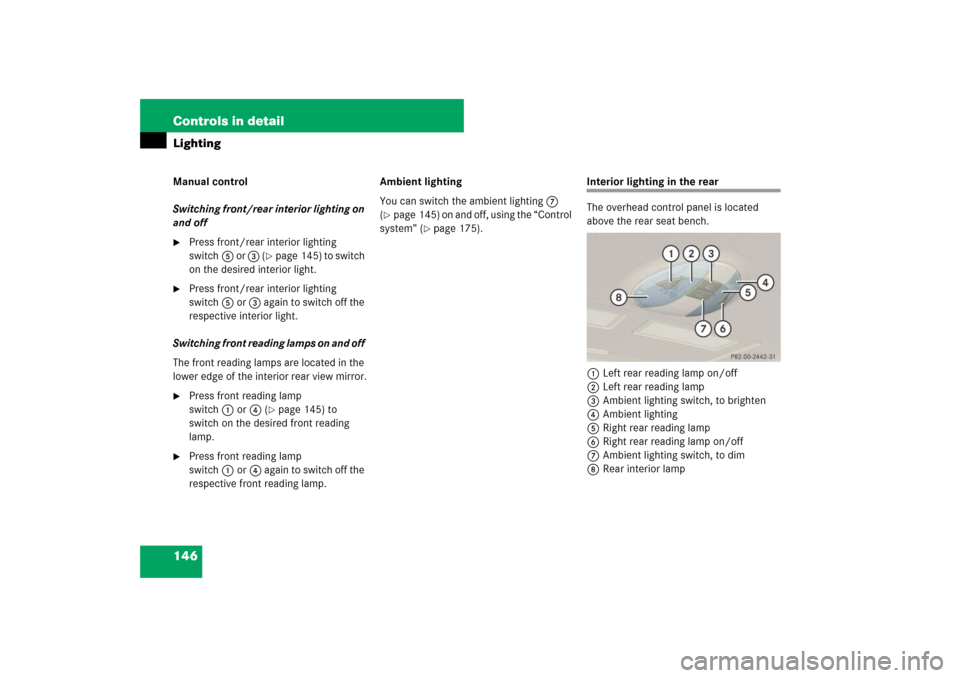
The overhead control panel is located
above the rear seat bench.
1Left rear reading lamp on/off
2Left rear reading lamp
3Ambient lighting switch, to brighten
4Ambient lighting
5Right rear reading lamp
6Right rear reading lamp on/off
7Ambient lighting switch, to dim
8Rear interior lamp
Page 204 of 522
203 Controls in detail
Good visibility
Rear window defroster
The rear window defroster uses a large
amount of power. To keep the battery
drain to a minimum, switch off the
defroster as soon as the rear window is
clear. The defroster is automatically
deactivated after approximately 6 to
17 minutes of operation depending on the
outside temperature.�
Switch on the ignition (
�page 37).Activating
�
Press button1 (
�page 206) or
(
�page 222) or buttonF
(�page 207) or (
�page 223) on the
respective climate control panel.
The indicator lamp on the button
comes on.Deactivating
�
Press buttonF or1 again.
The indicator lamp on the button goes
out.
Warning!
G
Any accumulation of snow and ice should be
removed from the rear window before
driving. Visibility could otherwise be
impaired, endangering you and others.
!
If the rear window defroster switches off too
soon and the indicator lamp starts flashing, this
means that too many electrical consumers are
operating simultaneously and there is insuffi-
cient voltage in the battery. The system re-
sponds automatically by deactivating the rear
window defroster.
As soon as the battery has sufficient voltage, the
rear window defroster automatically turns itself
back on.
Page 206 of 522
205 Controls in detail
Dual-zone automatic climate control
1
Thumbwheel for air volume control
for left center air vent
2
Left center air vent, adjustable
3
Cockpit air vent, fixed (Canada only)
4
Right center air vent, adjustable
5
Thumbwheel for air volume control
for right center air vent
6
Right side defroster air vent, fixed
7
Right side air vent, adjustable
8
Thumbwheel for air volume control
for right side air vent
9
Climate control panel
a
Thumbwheel for air volume control
for left side air vent
b
Left side air vent, adjustable
c
Left side defroster air vent, fixed
i
For draft-free ventilation, move the sliders
for the center air vents and side air vents to the
middle position.
Page 215 of 522
214 Controls in detailDual-zone automatic climate controlMaximum cooling MAX COOL (USA only)
You can use this setting to provide the fast-
est possible cooling of the vehicle interior
(when windows and tilt/sliding sunroof or
tilt/sliding panel* are closed).
Activating�
Press button8 (
�page 206).
MAX COOL
appears in the display4
(
�page 206).
The air conditioning switches
automatically to the following functions:
�
maximum cooling
�
maximum blowing power
�
the air recirculation mode is switched
onDeactivating
�
Press button8 (
�page 206) again.
MAX COOL
disappears in the display4
(
�page 206).
The previous settings are once again in
effect.
Air recirculation mode
Switch to air recirculation mode to prevent
unpleasant odors from entering the vehicle
from the outside (e.g. before a driving
through a tunnel). This setting cuts off the
intake of outside air and recirculates the
air in the passenger compartment.
i
To switch the maximum cooling function off,
you can also press button ´, U, 0 or
1 (
�page 206).
Warning!
G
Fogged windows impair visibility, endanger-
ing you and others. If the windows begin to
fog on the inside, switching off the air
recirculation mode immediately should clear
interior window fogging. If interior window
fogging persists, make sure the air
conditioning (
�page 217) is activated, or
press button0 or P.