Page 41 of 522
�
Press KEYLESS-GO start/stop button
twice.
This supplies power for all electrical
consumers. All lamps in the instrument
cluster (except low beam")
40 Getting startedUnlockingIgnition (or position 2)�
Press KEYLESS-GO start/stop button
twice.
This supplies power for all electrical
consumers. All lamps in the instrument
cluster (except low beam headlamp in-
dicator lamp, high beam headlamp indi-
cator lamp, and turn signal indicator
lamps unless activated) come on. If a
lamp in the instrument cluster fails to
come on when the ignition is switched
on, have it checked and replaced if nec-
essary. If a lamp in the instrument clus-
ter remains on after starting the engine
or comes on while driving, see “Lamps
in instrument cluster” (
�page 380).For information on starting the engine us-
ing the KEYLESS-GO start/stop button,
see “Starting with KEYLESS-GO*”
(
�page 53).
i
If you now press the KEYLESS-GO
start/stop button once, the power supply is
again switched off.
i
When you switch on the ignition, the indica-
tor and warning lamps (except low beam head-
lamp indicator lamp, high beam headlamp
indicator lamp, and turn signal indicator lamps
unless activated) in the instrument cluster come
on. The indicator and warning lamps (except low
beam headlamp indicator lamp, high beam head-
lamp indicator lamp, and turn signal indicator
lamps if activated) should go out when the en-
gine is running. This indicates that the respective
systems are operational.
Page 57 of 522
 or the oxidation catalyst
(dies")
56 Getting startedDrivingAfter a cold start, the automatic transmis-
sion shifts at a higher engine revolution.
This allows the catalytic converter
(gasoline engine) or the oxidation catalyst
(diesel engine) to reach its operating tem-
perature earlier.
For more information on driving, see “Driv-
ing instructions” (
�page 309).
Switching on headlamps
Low beam headlamps
The exterior lamp switch is located on the
dashboard to the left of the steering wheel.Exterior lamp switch1Off
2Low beam headlamps on�
Turn the exterior lamp switch to
positionB.
The low beam headlamps and the low
beam headlamp indicator lampB in
the instrument cluster come on
(�page 26).
!
If you hear a warning signal and the mes-
sage Release parking brake
appears in the
multifunction display when driving off, you have
forgotten to release the parking brake.
Release the parking brake (
�page 62).
Warning!
G
On slippery road surfaces, never downshift
in order to obtain braking action. This could
result in drive wheel slip and reduced vehi-
cle control. Your vehicle’s ABS will not pre-
vent this type of loss of control.
Warning!
G
It is dangerous to shift the gear selector le-
ver out ofP orN if the engine speed is high-
er than idle speed. If your foot is not firmly
on the brake pedal, the vehicle could accel-
erate quickly forward or in reverse. You
could lose control of the vehicle and hit
someone or something. Only shift into gear
when the engine is idling normally and when
your right foot is firmly on the brake pedal.!
Simultaneously depressing the accelerator
pedal and applying the brakes reduces engine
performance and causes premature brake and
drivetrain wear.
��
Page 58 of 522
57 Getting started
Driving
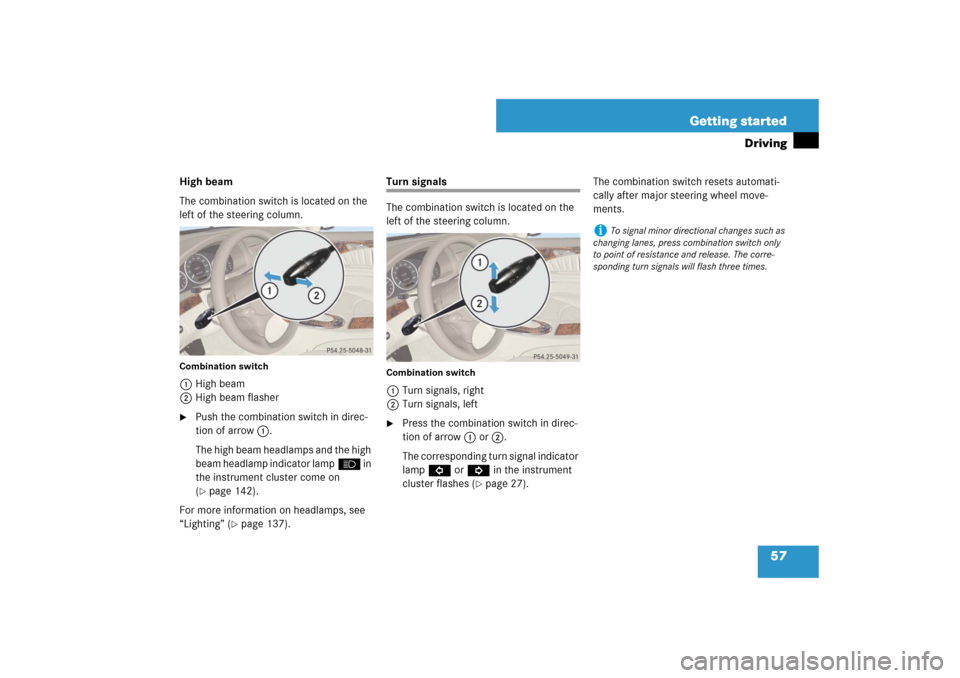
High beam
The combination switch is located on the
left of the steering column.Combination switch1High beam
2High beam flasher�
Push the combination switch in direc-
tion of arrow1.
The high beam headlamps and the high
beam headlamp indicator lampA in
the instrument cluster come on
(�page 142).
For more information on headlamps, see
“Lighting” (
�page 137).
Turn signals
The combination switch is located on the
left of the steering column.Combination switch1Turn signals, right
2Turn signals, left�
Press the combination switch in direc-
tion of arrow1 or2.
The corresponding turn signal indicator
lamp L or K in the instrument
cluster flashes (
�page 27).The combination switch resets automati-
cally after major steering wheel move-
ments.
i
To signal minor directional changes such as
changing lanes, press combination switch only
to point of resistance and release. The corre-
sponding turn signals will flash three times.
Page 60 of 522

59 Getting started
Driving
Intermittent wiping
Only switch on intermittent wiping under
wet weather conditions or in the presence
of precipitation.�
Turn the combination switch to
positionU or V.
The wipers move across the wind-
shield. Afterward, the wiping intervals
are determined by the wetness of the
windshield.After the initial wipe, pauses between
wipes are automatically controlled by the
rain sensor.
Single wipe
�
Press the combination switch briefly in
direction of arrow2 (
�page 58) to
the resistance point.
The windshield wipers wipe one time
without washer fluid.Wiping with windshield washer fluid
�
Push the combination switch in direc-
tion of arrow2 (
�page 58) past the
resistance point.
The windshield wipers operate with
washer fluid.
For information on filling up the windshield
washer reservoir, see “Windshield washer
system and headlamp cleaning system*”
(
�page 332).
!
Do not leave windshield wipers in
intermittent setting when the vehicle is taken to
an automatic car wash or during windshield
cleaning. Windshield wipers will operate in the
presence of water sprayed on the windshield,
and windshield wipers may be damaged as a re-
sult.
!
If you have set intermittent wiping, dirt on
the surface of the rain sensor or optical effects
may cause the windshield wipers to wipe in an
undesired fashion. This could then damage the
windshield wiper blades or scratch the windows.
You should therefore switch off the windshield
wipers when weather conditions are dry.
i
Intermittent wiping is interrupted when the
vehicle is at a standstill and a door is opened.
This protects persons getting into or out of the
vehicle from being sprayed.
Intermittent wiping will be continued when
�
all doors are closed
and
�
the gear selector lever is in positionD or R
or
�
the wiper setting is changed using the com-
bination switch
i
To prevent smears on the windshield or
noisy/chattering wiper blades, wipe with wind-
shield washer fluid every now and then even
when it is raining.
Page 64 of 522
.
For more information, see “Lighting”
(
�page 137).
Turning off engine �
Move the gea")
63 Getting started
Parking and locking
Switching off headlamps�
Turn the exterior lamp switch toM
(�page 56).
For more information, see “Lighting”
(
�page 137).
Turning off engine �
Move the gear selector lever to
positionP.
�
Apply the parking brake (
�page 62).Turning off with the SmartKey
�
Turn the SmartKey in the starter switch
(�page 38) to position0 and remove
it.
The immobilizer is activated.
Warning!
G
Getting out of your vehicle with the gear se-
lector lever not fully engaged in positionP is
dangerous. Also, when parked on an incline,
positionP alone may not prevent your vehi-
cle from moving, possibly hitting people or
objects.
Always set the parking brake in addition to
shifting to positionP.
When parked on an incline, turn front wheels
towards the road curb.
i
Always set the parking brake in addition to
shifting to positionP.
On slopes, turn the front wheels towards the
road curb.
i
The SmartKey can only be removed from the
starter switch with the gear selector lever in
positionP.
Page 66 of 522
.")
65 Getting started
Parking and locking
�
Exit the vehicle and close all doors and
the trunk.
Locking with the SmartKey
�
After exiting the vehicle, press lock
button‹ on the SmartKey
(�page 36).
�
All turn signal lamps flash three
times.
�
An acoustic signal sounds three
times.
�
The locking knobs in the doors
move down.
�
The anti-theft alarm system is
armed.
For more information, see the “Controls in
detail” section (
�page 110).Locking with KEYLESS-GO*
1Lock button
�
After exiting the vehicle, press lock
button1 on an outside door handle.�
All turn signal lamps flash three
times.
�
An acoustic signal sounds three
times.
�
The locking knobs in the doors
move down.
�
The anti-theft alarm system is
armed.
For more information, see “SmartKey with
KEYLESS-GO*” (
�page 113).
i
If you hear a warning signal you have forgot-
ten to switch off the headlamps before opening
the driver’s door.
In addition the message
Switch off lights
appears in the multifunction display.
Switch off the headlamps.
Page 121 of 522

120 Controls in detailLocking and unlocking
Front doors�
Pull on door handle2 on the respec-
tive front door to open door.
If door was locked, locking knob1 will
move up.
Rear doors
�
Pull up locking knob1 on the
respective rear door to unlock door.
�
Pull on door handle2 on the
respective rear door to open door.
Opening the trunk
You can open the trunk if the vehicle is sta-
tionary.
A minimum height clearance of 5.90 ft
(1.80 m) is required to open the trunk lid.
i
If the vehicle has previously been locked
with the SmartKey or KEYLESS-GO*, opening a
door from the inside will trigger the anti-theft
alarm system.
To cancel the alarm, do one of the following:
�
Press button Œ or ‹ on the SmartKey
or SmartKey with KEYLESS-GO*.
�
Insert the SmartKey or SmartKey with
KEYLESS-GO* in the starter switch.
In vehicles with KEYLESS-GO*
�
Press the KEYLESS-GO* start/stop button
(�page 39).
The SmartKey with KEYLESS-GO* must be
inside the vehicle.
�
Pull an outside door handle.
The SmartKey with KEYLESS-GO* must be
within 3 ft (1 m) of the vehicle.
i
If you hear a warning signal you have forgot-
ten to switch off the headlamps before opening
the driver’s door.
In addition the message
Switch off lights
appears in the multifunction display.
Switch off the headlamps.
Warning!
G
Make sure the trunk is closed when the en-
gine is running and while driving. Among
other dangers, such as blocked visibility, ex-
haust fumes may enter the vehicle interior.
These fumes are damaging to your health.!
The trunk lid swings open upwards automat-
ically. Always make sure there is sufficient over-
head clearance.
Page 138 of 522

and see “Turn signals” (
�page")
137 Controls in detail
Lighting
�Lighting
For information on how to switch on the
headlamps and use the turn signals, see
“Switching on headlamps” (
�page 56)
and see “Turn signals” (
�page 57).
Exterior lamp switchExterior lamp switch
i
If you drive in countries where vehicles drive
on the other side of the road than the country
where the vehicle is registered, you must have
the headlamps modified for symmetrical low
beams. Relevant information can be obtained at
your authorized Mercedes-Benz Center.
i
Vehicles equipped with active Bi-Xenon*
headlamps:
The active Bi-Xenon headlamps monitor your
steering angle and driving speed, then automati-
cally shift their beams to either side to better fol-
low the curvature of the road ahead, increasing
usable illumination over conventional head-
lamps.
1‚
Standing lamps, left (turn left two
stops)
2ˆ
Standing lamps, right (turn left
one stop)
3M
Off
Daytime running lamp mode
(�page 139)
4U
Automatic headlamp mode
Daytime running lamp mode
(�page 139)
5C
Parking lamps (also side marker
lamps, tail lamps, license plate
lamps, instrument panel lamps)
6B
Low beam headlamps or high
beam headlamps when the com-
bination switch is pushed for-
ward. The tail lamps, license
plate lamps, side marker lamps,
parking lamps and instrument
panel lamps also come on.
7‡
Front fog lamps
8†
Rear fog lamp