Page 194 of 522
1Left shift paddle: limiting gear range or
downshift (in program modeM)
2Right shift paddle: extending")
193 Controls in detail
Automatic transmission
Gearshift paddles
(example illustration E 63 AMG)1Left shift paddle: limiting gear range or
downshift (in program modeM)
2Right shift paddle: extending gear
range or upshift (in program modeM)
The following instructions describe opera-
tion of the steering wheel gearshift control
when driving in the automatic program
modeC orS.Limiting gear range
�
Briefly pull left shift paddle1.
The transmission will shift to the next
lower gear as permitted by the shift
program. This action simultaneously
limits the gear range of the transmis-
sion (
�page 189).
!
Allow engine to warm up under low load use.
Do not place full load on the engine until the
operating temperature has been reached.
Shift into reverse gearR or park positionP only
when the vehicle is stopped.
Avoid spinning of a drive wheel for an extended
period when driving off on slippery road
surfaces. This may cause serious damage to the
drivetrain which is not covered by the
Mercedes-Benz Limited Warranty.
i
You cannot shift with the steering wheel
gearshift paddles when the gear selector lever is
in positionP,N orR.
Warning!
G
On slippery road surfaces, never downshift
in order to obtain braking action. This could
result in drive wheel slip and reduced
vehicle control. Your vehicle’s ABS will not
prevent this type of loss of control.i
To avoid overrevving the engine when down-
shifting, the transmission will not shift to a lower
gear if the engine’s max. speed would be
exceeded.
Page 197 of 522

196 Controls in detailAutomatic transmissionIf you have selected the AMG menu in the
control system and you are driving in the
manual program modeM, upshift
indicator2 in the multifunction display
advises you to upshift before the engine
reaches the overspeed range. Thus you
can drive at the maximum engine speed for
each gear without overrevving the engine.
1Gear indicator
2Upshift indicator�
Shift to the next higher gear.
The fuel supply will otherwise be inter-
rupted to prevent the engine from over-
revving.Downshifting
�
Briefly press the gear selector lever to
the left in theD-direction.
or
�
Briefly pull left shift paddle1
(�page 193).
The transmission shifts to the next
lower gear.Kickdown
Using the kickdown when driving in the
manual program modeM is not possible.
Deactivating manual shift program
�
Press the program mode selector
switch (
�page 195) repeatedly
until
Cor
S appears in the multifunction
display.
or
�
Restart the engine.
The transmission will go to the
automatic program mode (C orS).
The manual program modeM is not
stored.
Warning!
G
On slippery road surfaces, never downshift
in order to obtain braking action. This could
result in drive wheel slip and reduced
vehicle control. Your vehicle’s ABS will not
prevent this type of loss of control.i
When you brake or stop, the transmission
shifts down to a gear from which you can easily
accelerate or take off.
Page 200 of 522

199 Controls in detail
Good visibility
Warning!
G
The auto-dimming function does not react if
incoming light is not aimed directly at the
sensors in the interior rear view mirror.
The interior rear view mirror and the exterior
rear view mirror on the driver’s side do not
react, for example, if the rear window sun-
shade* is in raised position.
Light hitting the mirror(s) at certain angles
(incident light) could blind you. As a result,
you may not be able to observe traffic con-
ditions and could cause an accident.
Warning!
G
In case of an accident, liquid electrolyte may
escape from the mirror housing if the mirror
glass breaks.
Electrolyte has an irritating effect. Do not al-
low the liquid to come into contact with
eyes, skin, clothing, or respiratory system.
In case it does, immediately flush affected
area with water, and seek medical help if
necessary.!
Electrolyte drops coming into contact with
the vehicle paint finish can be completely re-
moved only while in the liquid state by applying
plenty of water.
Warning!
G
Exercise care when using the
passenger-side exterior rear view mirror.
The mirror surface is convex (outwardly
curved surface for a wider field of view). Ob-
jects in mirror are closer than they appear.
Check your interior rear view mirror or
glance over your shoulder before changing
lanes.
Page 202 of 522
201 Controls in detail
Good visibility
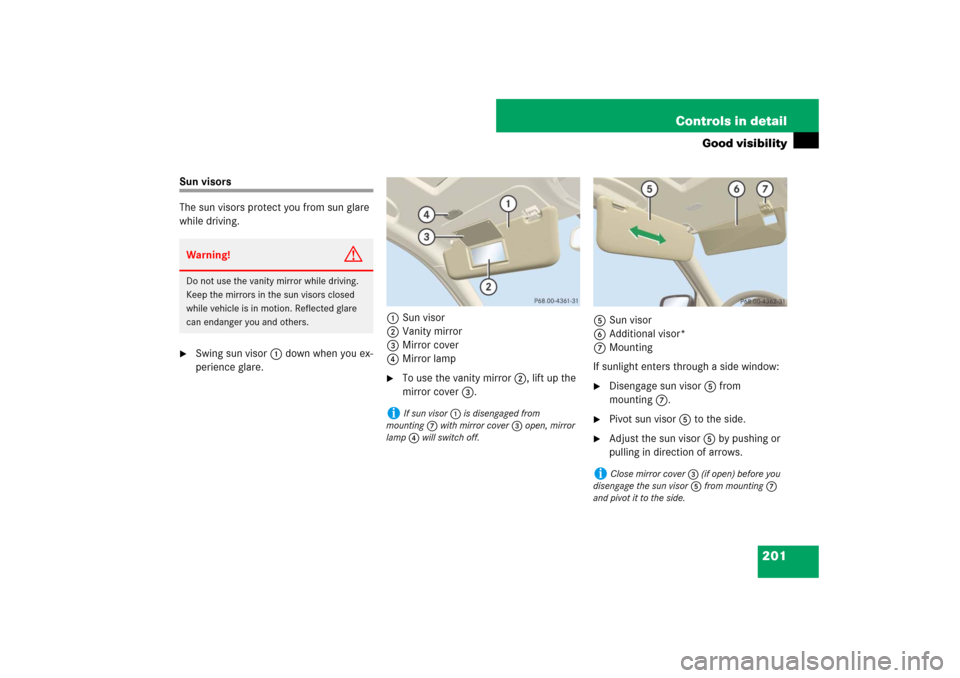
Sun visors
The sun visors protect you from sun glare
while driving.�
Swing sun visor1 down when you ex-
perience glare.1Sun visor
2Vanity mirror
3Mirror cover
4Mirror lamp
�
To use the vanity mirror2, lift up the
mirror cover3.5Sun visor
6Additional visor*
7Mounting
If sunlight enters through a side window:
�
Disengage sun visor5 from
mounting7.
�
Pivot sun visor5 to the side.
�
Adjust the sun visor5 by pushing or
pulling in direction of arrows.
Warning!
G
Do not use the vanity mirror while driving.
Keep the mirrors in the sun visors closed
while vehicle is in motion. Reflected glare
can endanger you and others.
i
If sun visor1 is disengaged from
mounting7 with mirror cover3 open, mirror
lamp4 will switch off.
i
Close mirror cover3 (if open) before you
disengage the sun visor5 from mounting7
and pivot it to the side.
Page 203 of 522
.
Always raise the sunshade full")
202 Controls in detailGood visibilityRear window sunshade*
The switch is located in the center console.
1Rear window sunshade switch�
Switch on the ignition (
�page 37).
Always raise the sunshade fully for its sup-
port against the window frame.
�
Press switch1 briefly to raise the sun-
shade.
�
Press switch1 briefly to lower the
sunshade.Roller sunblind* in the rear doors
(Canada only)�
Pull the roller sunblind out using the
hooks.
�
Attach the hooks at the top.
Warning!
G
When operating the rear window sunshade,
be sure that there is no danger of anyone be-
ing harmed by the raising or lowering proce-
dure.
The raising or lowering procedure can be im-
mediately halted by briefly pressing
switch1. To reverse direction of move-
ment, press switch1 again.Warning!
G
When leaving the vehicle, always remove the
SmartKey or the SmartKey with
KEYLESS-GO* from the starter switch, take
it with you, and lock the vehicle. Do not
leave children unattended in the vehicle, or
with access to an unlocked vehicle. A child’s
unsupervised access to a vehicle could re-
sult in an accident and/or serious personal
injury.
!
Always guide the sunblind by hand. Do not
let it snap back, as the retractor could be dam-
aged.
Page 204 of 522

203 Controls in detail
Good visibility
Rear window defroster
The rear window defroster uses a large
amount of power. To keep the battery
drain to a minimum, switch off the
defroster as soon as the rear window is
clear. The defroster is automatically
deactivated after approximately 6 to
17 minutes of operation depending on the
outside temperature.�
Switch on the ignition (
�page 37).Activating
�
Press button1 (
�page 206) or
(
�page 222) or buttonF
(�page 207) or (
�page 223) on the
respective climate control panel.
The indicator lamp on the button
comes on.Deactivating
�
Press buttonF or1 again.
The indicator lamp on the button goes
out.
Warning!
G
Any accumulation of snow and ice should be
removed from the rear window before
driving. Visibility could otherwise be
impaired, endangering you and others.
!
If the rear window defroster switches off too
soon and the indicator lamp starts flashing, this
means that too many electrical consumers are
operating simultaneously and there is insuffi-
cient voltage in the battery. The system re-
sponds automatically by deactivating the rear
window defroster.
As soon as the battery has sufficient voltage, the
rear window defroster automatically turns itself
back on.
Page 209 of 522

208 Controls in detailDual-zone automatic climate controlThe climate control is operational whenev-
er the engine is running. You can operate
the climate control system in either the au-
tomatic or manual mode. The system cools
or heats the interior depending on the se-
lected interior temperature and the cur-
rent outside temperature.Nearly all dust particles, pollutants and
odors are filtered out before outside air en-
ters the passenger compartment through
the air distribution system.
The air conditioning will not engage (no
cooling) if the A/Cmode is deactivated
(
�page 217).
Warning!
G
When operating the climate control, the air
that enters the passenger compartment
through the air vents can be very hot or very
cold (depending on the set temperature).
This may cause burns or frostbite to unpro-
tected skin in the immediate area of the air
vents. Always keep sufficient distance be-
tween unprotected parts of the body and the
air vents. If necessary, use the air distribu-
tion control (
�page 206) to direct the air to
air vents in the vehicle interior that are not
in the immediate area of unprotected skin.
Warning!
G
Follow the recommended settings for heat-
ing and cooling given on the following pag-
es. Otherwise the windows could fog up,
impairing visibility and endangering you and
others.
i
Severe conditions (e.g. strong air pollution)
may require replacement of the filter before its
scheduled interval. A clogged filter will reduce
the air volume to the interior.
If the vehicle interior is hot, ventilate the interior
before driving off, see “Summer opening fea-
ture” (�page 239). The climate control will then
adjust the interior temperature to the set value
much faster.
Keep the air intake grille in front of the wind-
shield free of snow and debris.
Do not obstruct air flow by placing objects on the
air flow-through exhaust slots below the rear
window.
Page 210 of 522
 or
(
�page 207).
Reactivating
�
Make sure the ignition is")
209 Controls in detail
Dual-zone automatic climate control
Deactivating the climate control system
Deactivating�
Press button ´ (
�page 206) or
(
�page 207).
Reactivating
�
Make sure the ignition is switched on.
�
Press button ´ (
�page 206) or
(
�page 207) again.
The previous settings are once again in
effect.Operating the climate control system
in automatic modeActivating
�
Press buttonU (
�page 206) or
(
�page 207) while the engine is run-
ning.
The indicators for automatic air volume
and air distribution in display4
(�page 206) or (
�page 207) come
on. Air volume and air distribution are
automatically controlled.
�
Use temperature controls1 and7
(�page 206) or (
�page 207) to sepa-
rately adjust the air temperature on
each side of the passenger compart-
ment.
The temperature of the vehicle interior
is adjusted automatically.
Warning!
G
When the climate control is switched off, the
outside air supply and circulation are also
switched off. Only choose this setting for a
short time. Otherwise the windows could
fog up, impairing visibility and endangering
you and others.
i
To switch the system on, you can also press
another button, with the exception of 1 or
F.
i
When operating the climate control system
in automatic mode, you will only rarely need to
adjust the temperature, air volume and air distri-
bution.
In automatic mode, cooling with dehumidify is
switched on. This function can be switched off.Warning!
G
If you switch off the cooling function the
windows can fog up more quickly. Window
fogging may impair visibility and endanger
you and others.