Page 154 of 187

POIs main menu
Selection of one of the following menu
items is possible:
�Current position
Selecting a POI in the local area
(
�page 153).
�Select city
Sel")
153 Navigation*
POIs (Points of Interest)
POIs main menu
Selection of one of the following menu
items is possible:
�Current position
Selecting a POI in the local area
(
�page 153).
�Select city
Selecting a POI in any city to be
selected(
�page 154).
�Global destinations
A POI from global categories can be se-
lected (
�page 154). The selection is
restricted to the region entered last;
however, the region selection can be
changed.
�In the POIs main menu, (�page 153)
select the
Current position menu item.
�Press '.
A list of POI categories appears for the
selection of a category.Selecting a POI category �Use% or & to select a category.
The
Page soft keys allow scrolling
through the list page by page.
�Press '.
If you have selected the Restaurant
category, another list will be displayed
from which you can select a sub-cate-
gory, e.g. Chinese food.
If you have selected any other catego-
ry, this will take you straight to the list
of POIs.
Selecting POI in the local area of the
current position
Page 155 of 187
154 Navigation*
POIs (Points of Interest)
Selecting a POI
�Use% or & t o s e l e c t a PO I . Th e Page
soft keys allow scrolling through the
list page by page.
�Press the Details soft key if you want to
see details of a selected POI.
The details disappear again after
approx. 3 seconds, or when pressing
the
Details soft key again.
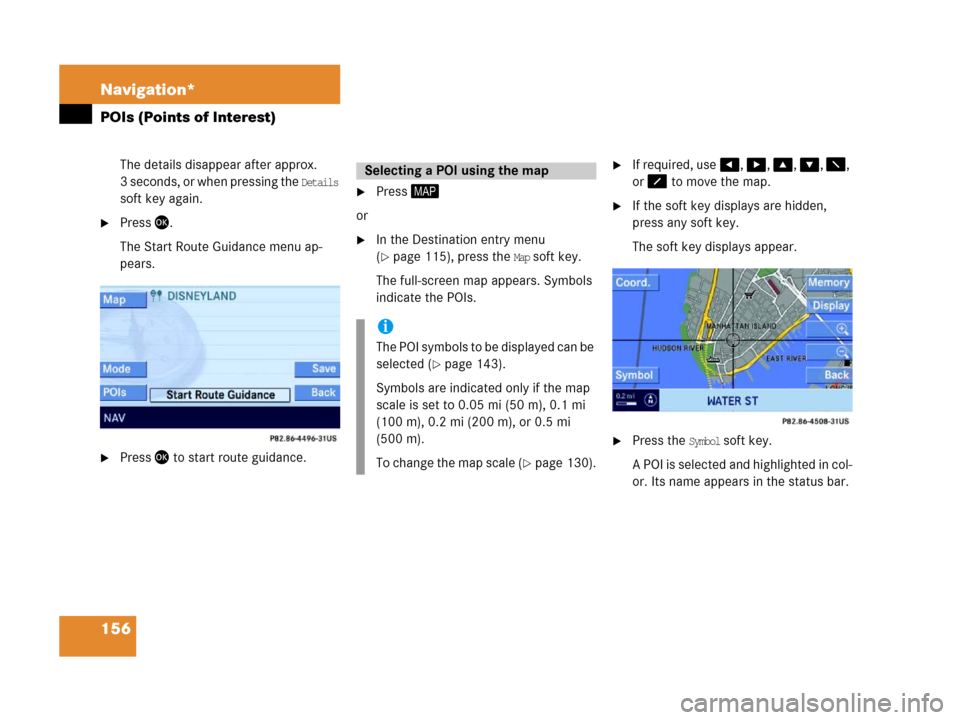
�Press '.
The Start Route Guidance menu ap-
pears.
�Press' to start route guidance.
�In the POIs main menu, (�page 153),
select the
Select city menu item.
�Enter a city as described in the Destina-
tion entry section (
�page 115).
.
�After entering the city, press '.
A list of POI categories appears for the
selection of a category.
�Proceed with “Selecting a POI catego-
ry” (
�page 153) and “Selecting a POI”
(
�page 154).
�In the POIs main menu (�page 153),
select the
Global destinations menu
item.
The list of long-distance POI categories
appears.
I
Selecting POI for a selected city
Selecting POI for a long-distance
destination
Page 156 of 187

The following options are now available:
�Selecting another region
�Selecting a POI category
Selecting another region
�Press the Region soft key.
The region")
155 Navigation*
POIs (Points of Interest)
The following options are now available:
�Selecting another region
�Selecting a POI category
Selecting another region
�Press the Region soft key.
The region list appears. Please see “Se-
lecting the region” (
�page 115).
Selecting a POI category
�Use% or & to select a category.
�Press '.
Depending on the number of POIs in
the selected category, a POI name can
be entered (
�page 155) or a POI can
be selected from a list (
�page 155).Entering POI names
I
�Proceed the same way as if you would
enter a city (
�page 116).
The entry can be bypassed if the POI
name is not known.
�Press and hold ' for more than
approx. 2 seconds.
After entering the POI name, or after
bypassing the entry, a POI can be se-
lected.Selecting a POI
�Use% o r & to select a POI. The Page
soft keys allow scrolling through the
list page by page.
�Press the Details soft key if you want to
see details of a selected POI.
i
The list also includes the distance “as
the crow flies” (as opposed to road dis-
tance), and the direction to the POI.
��
Page 157 of 187
156 Navigation*
POIs (Points of Interest)
The details disappear after approx.
3 seconds, or when pressing the
Details
soft key again.
�Press '.
The Start Route Guidance menu ap-
pears.
�Press' to start route guidance.
�Press 6
or
�In the Destination entry menu
(
�page 115), press the Map soft key.
The full-screen map appears. Symbols
indicate the POIs.
�I f r e qu i r ed , u s e#, $, %, &, 7,
or 8 to move the map.
�If the soft key displays are hidden,
press any soft key.
The soft key displays appear.
.
�Press the Symbol soft key.
A POI is selected and highlighted in col-
or. Its name appears in the status bar.
Selecting a POI using the map
i
Th e P O I s y m b o l s t o b e d i s p l a y e d c a n b e
selected (
�page 143).
Symbols are indicated only if the map
scale is set to 0.05 mi (50 m), 0.1 mi
(100 m), 0.2 mi (200 m), or 0.5 mi
(500 m).
To change the map scale (
�page 130).
Page 158 of 187
157 Navigation*
POIs (Points of Interest)
�Press the Prev. o r Next soft key to select
the desired POI.
�Press the Details sof t key if you w ant to
see details of a selected POI.
The details disappear again after
approx. 3 seconds, or when pressing
the
Details soft key again.
�Press '.
You are prompted to confirm the se-
lected POI as the destination.
�Use# to select the menu item Yes.
�Press'.
The Start Route Guidance menu ap-
pears.
�Press' to start route guidance.
Page 166 of 187

165 System
System settings
Setting the time
The UTC time transmitted by the GPS sat-
ellites has to be set to the local time zone.
This enhances
�correct navigation for routes with time-
dependent traffic guidance, and
�correct calculation of the estimated
time of arrival.
�Use# or $ to select the hours or
the minutes.
�Press% or &.
Depending on the selection, hours or
minutes are set.
Setting the minutes:
With GPS reception, each time you
press % o r & changes the time in in-
crements of 30 minutes. Without GPS
reception, the time is changed in 1
minute increments.
Setting the hours:
Each time you press % or &, the
hours change in increments of 1 hour.
�Press the Back soft key.
The new setting is stored.Setting the date
�Use# or $ to select the day, the
month or the year.
�Press% or &.
Depending on the selection, the day,
the month, or the year is set.
�Press the Back soft key.
The new setting is stored.
Setting the date/Time format
�Press the Format soft key.
You will see the date and time following
the currently selected format, as well
as a list of possible formats.
i
There is no automatic change from day-
light saving time to standard time.
This has to be changed manually.
When you change the time zone, the
clock time also changes automatically.
If you enter an incorrect time, the time
difference remains unchanged when
you change time zone.
i
The date can be set only if GPS recep-
tion is available.
��
Page 167 of 187
166 System
System settings
Setting the format:
�Use% or & to select a format.
�Press'.
The appropriate format is selected.
�Press the Back soft key or wait for the
screen to change.
The new setting is stored.
The language setting changes the display
language as well as the language used for
voice instructions in navigation announce-
ments.
�In the System menu (�page 164),
press the
Lang. soft key.
The language list is displayed.The following options are available:
�Instr. cluster settings:
The system switches to the lan-
guage already set in the vehicle in-
strument cluster (
�Vehicle
Operator’s manual).
�All other options:
The system switches to the re-
quested language.
i
List entry 1-3: Date formats
List entry 4 and 5: Time formats
(Entry 5 is not visible on the display ex-
ample below.)
Solid circle : format set
Empty circle : format not set
Setting the language
Page 172 of 187
171 System
System settings
Canceling individualization
You can cancel individualization at any
time during either the first or second
stage. All existing data remains un-
changed.
�During any individualization stage,
press the
Cancel soft key.
Individualization is cancelled.
Deleting individualization
�From the Individualization menu,
press& to select menu item
Delete
individualization
.
�Press'.
A prompt appears, which asks if you re-
ally want to delete the data.
�Press# to select Yes.
�Press'.
The individualization is deleted.Actuating the Reset function resets
COMAND to the factory settings.
In addition, it deletes:
�SMS: All SMS messages.
�Navigation*: All entries in the Destina-
tion memory and in the Last destina-
tion memory.
Reset activation
�Call up the System menu (�page 164).
�Press the Reset soft key.
i
This function is not available if no indi-
vidualization data has been saved.
Reset function
��