Page 181 of 505

180 Controls in detail
Automatic transmission
Limiting gear range
�Briefly pull left shift paddle1.
The transmission will shift to the next
lower gear as permitted by the shift
program. This action simultaneously
limits the gear range of the transmis-
sion (
�page 175).Extending gear range
�Briefly pull right shift paddle2.
The transmission will shift to the next
higher gear as permitted by the shift
program. This action simultaneously
extends the gear range of the transmis-
sion.Canceling gear range limit�Pull and hold right shift paddle2
until
D reappears in the multifunction
display (
�page 172).
The transmission will shift from the
current gear range directly to gear
rangeD.
Shifting into optimal gear range
�Pull and hold left shift paddle1.
The transmission will automatically
select the gear range suited for optimal
acceleration and deceleration. This will
involve shifting down one or more
gears.
Warning!G
On slippery road surfaces, never downshift
in order to obtain braking action. This could
result in drive wheel slip and reduced
vehicle control. Your vehicle’s ABS will not
prevent this type of loss of control.
iTo avoid overrevving the engine when down-
shifting, the transmission will not shift to a lower
gear if the engine’s max. speed would be
exceeded.
iIf you press on the accelerator when the en-
gine has reached its rpm limit, the transmission
will upshift beyond any gear range limit selected.
Page 182 of 505

181 Controls in detail
Automatic transmission
Manual shift program CLK 63 AMG
In addition to the automatic shift
programC orS, your vehicle is equipped
with the manual shift programM.
In the manual program modeM,
system-controlled automatic gearshifting
is switched off and you need to change the
gears by manually upshifting or downshift-
ing using the steering wheel gearshift
paddles (
�page 179) or the gear selector
lever.The program mode selector switch is
located on the lower part of the center
console.
Program mode selector switch
M Manual For manual gear shifting
C Comfort For standard driving
S Sport For sporty drivingThe selected program mode appears in the
multifunction display (
�page 176).
!Allow engine to warm up under low load use.
Do not place full load on the engine until the
operating temperature has been reached.
Shift into reverse gearR or park positionP only
when the vehicle is stopped.
Avoid spinning of a drive wheel when driving off
on slippery road surfaces. This may cause seri-
ous damage to the drivetrain which is not cov-
ered by the Mercedes-Benz Limited Warranty.
iFor information on automatic program
modesC orS, see “Automatic shift program”
(
�page 176), “Gear selector lever one-touch
gearshifting” (
�page 177), and “Steering wheel
gearshift control one-touch gearshifting*”
(
�page 179).
Page 184 of 505
.
The transmission sh")
183 Controls in detail
Automatic transmission
Downshifting
�Briefly press the gear selector lever to
the left in theD-direction.
or
�Briefly pull left shift paddle1
(
�page 179).
The transmission shifts to the next
lower gear.Kickdown
Using the kickdown when driving in the
manual program modeM is not possible.
Deactivating manual shift program
�Press the program mode selector
switch (
�page 181) repeatedly
until
CorS appears in the multifunction
display.
or
�Restart the engine.
The transmission will go to the
automatic program mode (C orS).
The manual program modeM is not
stored.Emergency operation
(Limp-Home Mode)
If vehicle acceleration becomes less re-
sponsive or sluggish or the transmission
no longer shifts, the transmission is most
likely operating in limp-home (emergency
operation) mode. In this mode only second
gear and reverse gear can be selected.
�Stop the vehicle in a safe location.
�Move the gear selector lever to park
positionP.
�Turn off the engine.
�Wait at least 10 seconds before
restarting.
�Restart the engine.
�Move the gear selector lever to
positionD (for second gear) or
positionR.
�Have the transmission checked at an
authorized Mercedes-Benz Center as
soon as possible.
Warning!G
On slippery road surfaces, never downshift
in order to obtain braking action. This could
result in drive wheel slip and reduced
vehicle control. Your vehicle’s ABS will not
prevent this type of loss of control.
iWhen you brake or stop, the transmission
shifts down to a gear from which you can easily
accelerate or take off.
Page 190 of 505
189 Controls in detail
Climate control
USA only (depending on vehicle production
date)
Canada only
Item
1Left side air vent, adjustable
2Thumbwheel for air volume control
for center air vents
3Right side air vent, adjustable
4Climate control panel
5Right center air vent, adjustable
6Thumbwheel for air volume control
for right side center air vent
7Thumbwheel for air volume control
for left side center air vent
8Left center air vent, adjustable
iFor draft-free ventilation, move the sliders
for the side air vents and center air vents to the
middle position.
Item
1Air volume control
2Left side temperature control
3Right side temperature control
4Air distribution control
5Rear window defroster
6AC cooling on/off
7Air distribution and air volume
(automatic mode)
8Air recirculation
9Front defroster
Page 194 of 505
.
The indicator lamp on the button goes
out. The automatic air distribution is
switched off. The air distribution is
controlled acco")
193 Controls in detail
Climate control
�Press buttonU (�page 189).
The indicator lamp on the button goes
out. The automatic air distribution is
switched off. The air distribution is
controlled according to the selected
control setting.
�Turn air distribution control 4
(
�page 189) to the desired symbol.
Opening center and side air vents
�Turn thumbwheels 2, 6and 7
(
�page 188) upward.
The side air vents1 and3 and cen-
ter air vents5 and 8 are open.
Closing center and side air vents
�Turn thumbwheels 2, 6and 7
(
�page 188) downward.
The side air vents1 and3 and cen-
ter air vents5 and 8 are closed.
Adjusting air volume
Six blower speeds are available.
�Press buttonU (�page 189).
The indicator lamp on the button goes
out. The automatic air volume control
is switched off. The air volume is con-
trolled according to the currently se-
lected control setting.
�Use the air volume control1
(
�page 189) to adjust the air volume.
Front defroster
You can use this setting to defrost the
windshield, for example if it is iced up.
You can also defog the windshield and the
side windows.
Activating
�Press buttonPor0
(
�page 189).
The indicator lamp on the button
comes on.
The air conditioning switches
automatically to the following functions:
�cooling on to dehumidify
�maximum blowing and heating
power
�air flows onto the windshield and
the front side windows
�the air recirculation mode is
switched off
iKeep this setting selected only until the
windshield or the side windows are clear again.
Page 198 of 505
197 Controls in detail
Climate control
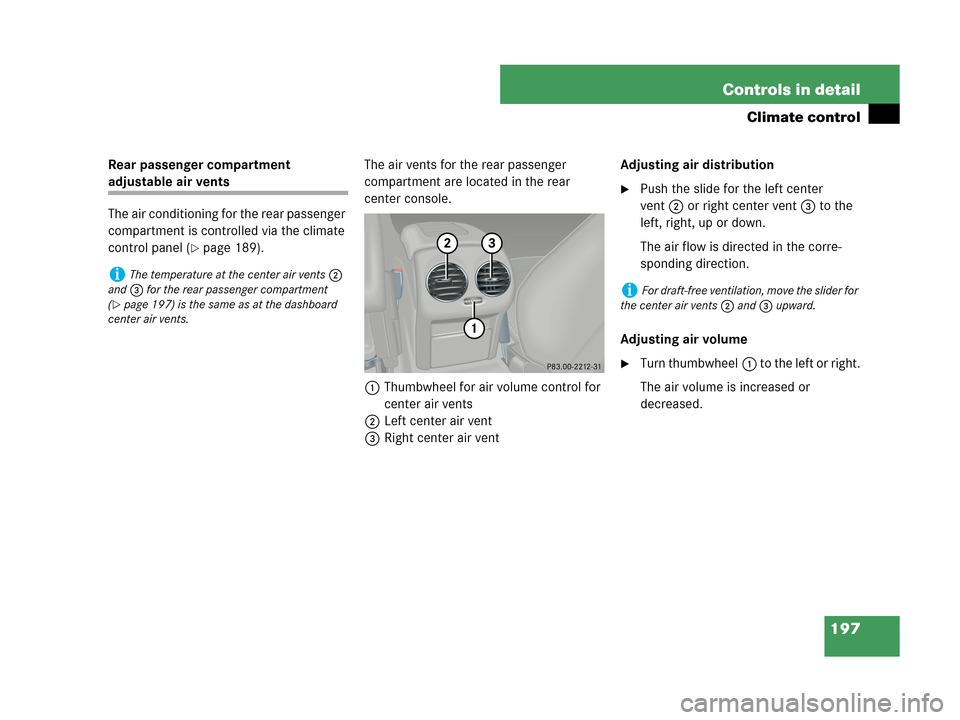
Rear passenger compartment
adjustable air vents
The air conditioning for the rear passenger
compartment is controlled via the climate
control panel (
�page 189).The air vents for the rear passenger
compartment are located in the rear
center console.
1Thumbwheel for air volume control for
center air vents
2Left center air vent
3Right center air ventAdjusting air distribution
�Push the slide for the left center
vent2 or right center vent3 to the
left, right, up or down.
The air flow is directed in the corre-
sponding direction.
Adjusting air volume
�Turn thumbwheel1 to the left or right.
The air volume is increased or
decreased.
iThe temperature at the center air vents2
and3 for the rear passenger compartment
(
�page 197) is the same as at the dashboard
center air vents.iFor draft-free ventilation, move the slider for
the center air vents2 and3 upward.
Page 200 of 505

199 Controls in detail
Automatic climate control
USA only
Canada only
Item
1Left side air vent, adjustable
2Thumbwheel for air volume control
for center air vents
3Right side air vent, adjustable
4Automatic climate control panel
5Right center air vent, adjustable
6Thumbwheel for air volume control
for right side center air vent
7Thumbwheel for air volume control
for left side center air vent
8Left center air vent, adjustable
iFor draft-free ventilation, move the sliders
for the center air vents and side air vents to the
middle position.
Item
1Left side air distribution control
2Front defroster
3Temperature control, left, raising
4Display
5Air volume control, raising
6Temperature control, right, raising
7Rear window defroster
8Right side air distribution control
9Charcoal filter
aAC cooling on/off
Residual heat/ventilation
(Canada only)
bTemperature control, right, lowering
cAir volume control, lowering
dTemperature control, left, lowering
eAir recirculation
fAutomatic climate control on/off
(complete system)
gAir distribution and air volume
(automatic mode)
Item
Page 204 of 505
 to separately adjust the air
distribution on each side of the passeng")
203 Controls in detail
Automatic climate control
Adjusting air distribution
Use the air distribution controls1 and8
(
�page 199) to separately adjust the air
distribution on each side of the passenger
compartment. The following symbols are
located on the controls:
�Turn air distribution control1 or8
(
�page 199) to the desired symbol.
The indicator lamp on the buttonU
goes out.
The automatic air distribution is
switched off. The air distribution is
controlled according to the selected
control setting.Opening center and side air vents�Turn thumbwheels 2, 6 and 7
(
�page 198) upward.
The center air vents 5 and 8 and side
air vents 1 and 3 (
�page 198) are
open.
Closing center and side air vents
�Turn thumbwheels 2, 6 and 7
(
�page 198) downward.
The center air vents 5 and 8 and side
air vents 1 and 3 (
�page 198) are
closed.
SymbolFunction
ZDirects air to the windshield
and the side defroster vents
bDirects air into the entire
vehicle interior
YDirects air to the footwells
aDirects air through the center,
side and rear passenger
compartment air vents
iYou can also turn the air distribution control
to a position between two symbols.

Canada only
Item
1Left side air vent, adjustable
2Thumbwheel for air volume control
for center air vents
3Right")