Page 270 of 505

269 Controls in detail
Driving systems
Warning indicators
Visual signals indicate to the driver the rel-
ative distance between the sensors and an
obstacle. The warning indicator for the
front area is located above the center air
vents in the dashboard. The warning indi-
cator for the rear area is integrated be-
tween the rear backrests.
1Left side of the vehicle
2Right side of the vehicle
Each warning indicator is divided into six
yellow and two red distance segments for
either side of the vehicle. The Parktronic
system is ready when the border around
the indicator is illuminated.The position of the gear selector lever de-
termines which warning indicators will be
activated.As your vehicle approaches an object, one
or more distance segments will illuminate,
depending on the distance. When the
eighth distance segment illuminates, you
have reached the minimum distance.
�Front area: An intermittent acoustic
warning will sound as the first red dis-
tance segment illuminates and a con-
stant acoustic warning lasting a
maximum of two seconds will sound for
the second red distance segment. The
signal is canceled when the gear selec-
tor lever is placed in positionP.
�Rear area: An intermittent acoustic
warning will sound as the first red dis-
tance segment illuminates and a con-
stant acoustic warning lasting a
maximum of two seconds will sound for
the second red distance segment. The
signal is canceled when the gear selec-
tor lever is placed in position DorP.
Gear selector le-
ver positionWarning indicator
DFront area activated
R or NFront and rear area
activated
PNeither activated
Page 271 of 505

270 Controls in detail
Driving systems
Switching the Parktronic system
on/off
The Parktronic system can be switched off
manually.
The Parktronic switch is located in the up-
per part of the center console.
1Parktronic switch
2Indicator lamp
Switching off the Parktronic system
�Press Parktronic switch1.
Indicator lamp2 comes on.Switching on the Parktronic system
�Press Parktronic switch1 again.
Indicator lamp2 goes out.
Parktronic system malfunction
If only the red distance segments illumi-
nate and a acoustic warning sounds,
there is a malfunction in the Parktronic
system. The Parktronic system will auto-
matically switch off after 20 seconds and
the indicator lamp in the Parktronic switch
comes on.
�Have the Parktronic system checked
by an authorized Mercedes-Benz
Center as soon as possible.If only the red distance segments illumi-
nate and no acoustic warning sounds, the
Parktronic system sensors are dirty or
there is an interference from other radio or
ultrasonic signals. The Parktronic system
will automatically switch off after 20 sec-
onds and the indicator lamp in the Park-
tronic switch comes on.
�Switch off the ignition (�page 36).
�Clean the Parktronic system sensors
(
�page 361).
�Switch on the ignition.
or
�Check the Parktronic system operation
at another location to rule out interfer-
ence from outside radio or ultrasonic
signals.
iThe Parktronic system is automatically
switched on when the ignition is switched on
(
�page 36).
Page 273 of 505
272 Controls in detail
Loading
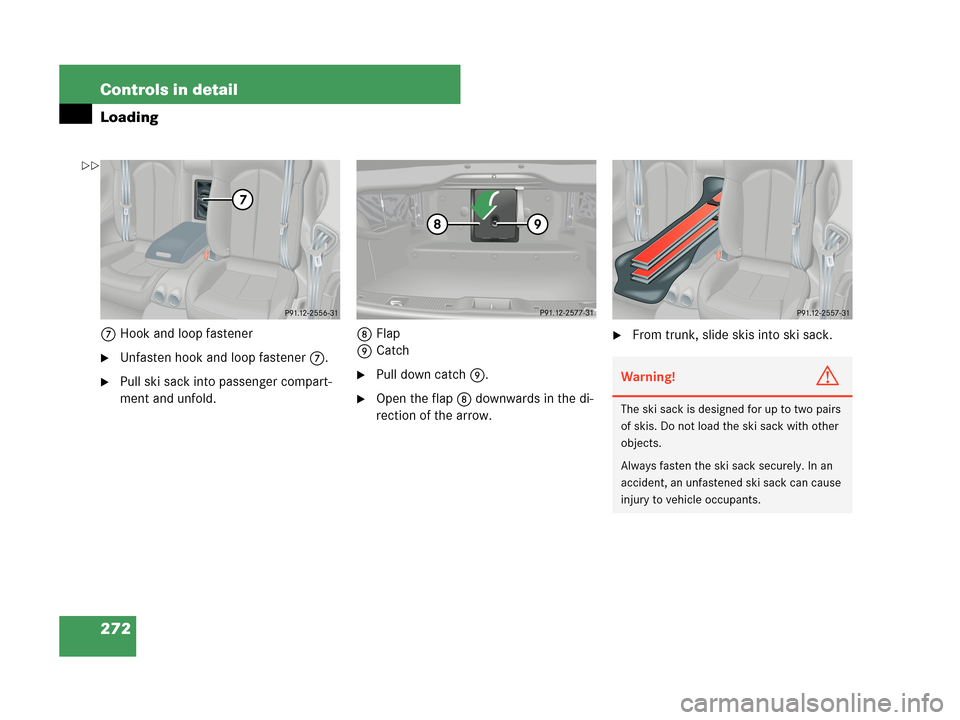
7Hook and loop fastener
�Unfasten hook and loop fastener7.
�Pull ski sack into passenger compart-
ment and unfold.8Flap
9Catch�Pull down catch9.
�Open the flap8 downwards in the di-
rection of the arrow.
�From trunk, slide skis into ski sack.
Warning!G
The ski sack is designed for up to two pairs
of skis. Do not load the ski sack with other
objects.
Always fasten the ski sack securely. In an
accident, an unfastened ski sack can cause
injury to vehicle occupants.
��
Page 275 of 505
274 Controls in detail
Loading
Closing ski sack roller blind
1Left hinge
2Right hinge
3Pull strap
�Pull ski sack roller blind downward us-
ing pull strap3.
�Manually fold left1 and right
hinges2 of ski sack roller blind all the
way down.
�To snap ski sack roller blind into place,
press left and right hinges where the
word PRESS can be seen.
�Fold luggage cover back and close it
securely (
�page 260).Removing the ski sack
For ski sack removal, we recommend that
you contact an authorized Mercedes-Benz
Center.
Warning!G
Never drive vehicle with trunk open while
the ski sack is removed. Deadly carbon
monoxide (CO) gases may enter vehicle in-
terior, resulting in unconsciousness and
death.
iTo prevent unauthorized persons from ac-
cess to the trunk, always close the flap.
Page 276 of 505

275 Controls in detail
Loading
Loading instructions
The total load weight including vehicle oc-
cupants and luggage/cargo should not ex-
ceed the load limit indicated on the
corresponding placard located on the driv-
er’s door B-pillar (
�page 326).
The handling characteristics of a fully load-
ed vehicle depend greatly on the load dis-
tribution. It is therefore recommended to
load the heaviest items being placed to-
wards the front of the vehicle.
Always place items being carried against
rear seat backrests, and fasten them as se-
curely as possible.
The heaviest portion of the cargo should al-
ways be kept as low as possible since it in-
fluences the handling characteristics of
the vehicle.
!To prevent damage to the soft top or lug-
gage/cargo when lowering the roof:
�load trunk only to the height of the luggage
cover
�do not permit luggage/cargo to push up the
closed luggage cover
�do not place anything on the shelf behind the
roll bar
�do not place anything on the soft top com-
partment cover
Warning!G
Always fasten items being carried as secure-
ly as possible using fastening materials ap-
propriate for the weight and size of the load.
In an accident, during hard braking or sud-
den maneuvers, loose items will be thrown
around inside the vehicle and can cause in-
jury to vehicle occupants unless the items
are securely fastened in the vehicle.
To help avoid personal injury during a colli-
sion or sudden maneuver, exercise care
when transporting cargo. Put luggage or car-
go in the trunk if possible.
Never drive vehicle with trunk open. Deadly
carbon monoxide (CO) gases may enter ve-
hicle interior resulting in unconsciousness
and death.
Page 277 of 505

276 Controls in detail
Useful features
Storage compartments Glove box
1Glove box lid
2Glove box lid release
Opening the glove box
�Pull glove box lid release2.
The glove box lid1 opens downward.
Closing the glove box
�Push glove box lid1 up to close.Storage compartment in the dashboard
Depending on your vehicle’s production
date, your vehicle is equipped with either a
cup holder (
�page 280) or a storage com-
partment.
1Cover
Opening storage box
�Push cover1.
The storage box opens automatically.
Closing storage box
�Push the storage box back until it
engages.
Warning!G
Do not store any flammable substances in-
side the vehicle or in the trunk. Otherwise
the flammable substances could ignite and
start a fire inside the vehicle.
To help avoid personal injury during a colli-
sion or sudden maneuver, exercise care
when storing objects in the vehicle. Put lug-
gage or cargo in the trunk if possible. Do not
pile luggage or cargo higher than the seat
backs.
Parcel nets cannot secure hard or heavy ob-
jects.
Keep compartment lids closed. This will help
to prevent stored objects from being thrown
about and injuring vehicle occupants during
an accident.
iAudio system/COMAND* with CD chang-
er*: The CD changer* is located in the glove box.
Page 278 of 505
277 Controls in detail
Useful features
Ruffled storage bags
Storage bags are located on the rear side
of the front seats.Parcel net in front passenger footwell
A small convenience parcel net is located
in the front passenger footwell. It is for
small and light items, such as road maps,
mail, etc.
Warning!G
The ruffled storage bag is intended for stor-
ing light-weight items only.
Heavy objects, objects with sharp edges or
fragile objects may not be transported in the
ruffled storage bag. In an accident, during
hard braking, or sudden maneuvers, they
could be thrown around inside the vehicle
and cause injury to vehicle occupants.
The ruffled storage bag cannot protect
transported goods in the event of an
accident.
Page 279 of 505
278 Controls in detail
Useful features
Center armrest
The compartment in the center armrest
contains a cup holder and the telephone*
compartment.
1Cover
2Telephone* compartment
3Cup holder1Cover
Opening compartment
�Slide cover1 in direction of arrow.
Closing compartment
�Slide cover1 back.
Opening telephone compartment
�Slide cover1 in direction of arrow and
open it fully.
Closing telephone compartment
�Slide cover1 back.
Warning!G
The parcel net is intended for storing
light-weight items only.
Heavy objects, objects with sharp edges or
fragile objects may not be transported in the
parcel net. In an accident, during hard brak-
ing, or sudden maneuvers, they could be
thrown around inside the vehicle and cause
injury to vehicle occupants.
The parcel net cannot protect transported
goods in the event of an accident.
iThe Roadside Assistance button •
(
�page 290) and the Information button¡
(
�page 291) are located below the cover1.