Page 405 of 505

404 Practical hints
Where will I find...?
First aid kit
The first aid kit is located in the trunk on
the right side secured by a hook and loop
fastener.
1First aid kit
2Hook and loop fastener
�Loosen hook and loop fastener2.
�Remove first aid kit1.
TIREFIT (CLK 63 AMG only)
The TIREFIT kit is located under the trunk
floor.
�Lift the trunk floor and engage the han-
dle in the upper edge of trunk.
1Straps for soft top emergency opera-
tion, a pair of gloves
2Electric air pump
3Towing eye bolt
4Vehicle jack
5TIREFIT kit
6Fuse extractor
7Wheel wrench
8Collapsible wheel chock
Vehicle tool kit
The vehicle tool kit is stored in the com-
partment underneath the trunk floor.
The following is included:
�Towing eye bolt
�Wheel wrench
�Alignment bolt
�Vehicle jack
�Collapsible wheel chock
�Spare fuses
�Fuse extractor
�Straps for soft top emergency opera-
tion
�A pair of gloves
The spare wheel bolts are fixed at the
Minispare wheel.
iCheck expiration dates and contents for
completeness at least once a year and replace
missing/expired items.
Page 442 of 505
.
�Take the wheel wrench, alignment bolt,
collapsible wheel chock, an")
441 Practical hints
Flat tire
Mounting the Minispare wheel Preparing the vehicle
Prepare the vehicle as described on
(
�page 436).
�Take the wheel wrench, alignment bolt,
collapsible wheel chock, and the jack
out of the trunk (
�page 407).
�Take the Minispare wheel and wheel
bolts out of the trunk (
�page 407).Lifting the vehicle
�Prevent the vehicle from rolling away
by blocking wheels with wheel chocks
or other sizeable objects.
One wheel chock is included with the
vehicle tool kit (
�page 404).
When changing wheel on a level surface:
�Place the wheel chock in front of and
another sizeable object behind the
wheel that is diagonally opposite to the
wheel being changed.
Always try lifting the vehicle using the jack
on a level surface. However, should cir-
cumstances require you to do so on a hill,
place the wheel chock and the other size-
able object as follows:
�Place the wheel chock and another
sizeable object on the downhill side
blocking both wheels of the axle not
being worked on.
Warning!G
The dimensions of the Minispare wheel are
different from those of the road wheels. As
a result, the vehicle handling characteristics
change when driving with a Minispare wheel
mounted. Adapt your driving style
accordingly.
The spare wheel is for temporary use only.
When driving with spare wheel mounted,
ensure proper tire inflation pressure and do
not exceed a vehicle speed of 50 mph
(80 km/h).
Drive to the nearest Mercedes-Benz Center
as soon as possible to have the spare wheel
replaced with a regular road wheel.
Never operate the vehicle with more than
one Minispare wheel mounted.
Do not switch off the ESP
® when a Minis-
pare wheel is mounted.
Page 444 of 505
443 Practical hints
Flat tire
�Jack up the vehicle until the wheel is a
maximum of 1.2 in (3 cm) from the
ground. Never start engine while
vehicle is raised.Removing the wheel
1Alignment bolt
�Unscrew upper-most wheel bolt and
remove.
�Replace this wheel bolt with alignment
bolt1 supplied in the tool kit.
�Remove the remaining bolts.
�Remove the wheel.
Warning!G
The jack is intended only for lifting the vehi-
cle briefly for wheel changes. It is not suited
for performing maintenance work under the
vehicle.
�Never start the engine when the vehicle
is raised.
�Never lie down under the raised vehicle.
!Do not place wheel bolts in sand or dirt. This
could result in damage to the bolt and wheel hub
threads.
Page 445 of 505
�Clean contact surfaces of wheel and
wh")
444 Practical hints
Flat tire
Mounting the spare wheel
1Wheel bolt for light alloy rims
2Wheel bolt for Minispare wheel
(located in trunk with Minispare wheel)�Clean contact surfaces of wheel and
wheel hub.
1Alignment bolt
�Guide the spare wheel onto the align-
ment bolt and push it on.
�Insert wheel bolts and tighten them
slightly.!Wheel bolts2 must be used when mount-
ing the Minispare wheel. The use of any wheel
bolts other than wheel bolts2 for the Minispare
wheel will physically damage the vehicle’s
brakes.
!To avoid paint damage, place wheel flat
against hub and hold it there while installing first
wheel bolt.
Warning!G
Always replace wheel bolts that are dam-
aged or rusted.
Never apply oil or grease to wheel bolts.
Damaged wheel hub threads should be re-
paired immediately. Do not continue to drive
under these circumstances! Contact an au-
thorized Mercedes-Benz Center or call
Roadside Assistance.
Incorrect wheel bolts or improperly tight-
ened wheel bolts can cause the wheel to
come off. This could cause an accident.
Make sure to use the correct wheel bolts.
Page 446 of 505
445 Practical hints
Flat tire
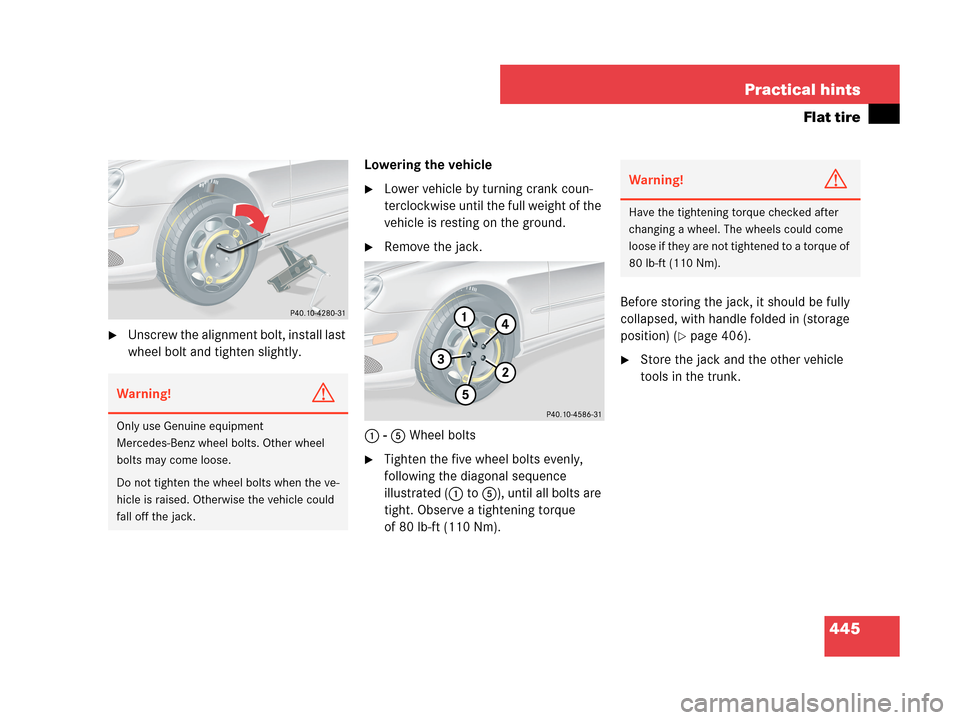
�Unscrew the alignment bolt, install last
wheel bolt and tighten slightly.Lowering the vehicle
�Lower vehicle by turning crank coun-
terclockwise until the full weight of the
vehicle is resting on the ground.
�Remove the jack.
1 - 5 Wheel bolts
�Tighten the five wheel bolts evenly,
following the diagonal sequence
illustrated (1 to 5), until all bolts are
tight. Observe a tightening torque
of 80 lb-ft (110 Nm).Before storing the jack, it should be fully
collapsed, with handle folded in (storage
position) (
�page 406).
�Store the jack and the other vehicle
tools in the trunk.
Warning!G
Only use Genuine equipment
Mercedes-Benz wheel bolts. Other wheel
bolts may come loose.
Do not tighten the wheel bolts when the ve-
hicle is raised. Otherwise the vehicle could
fall off the jack.
Warning!G
Have the tightening torque checked after
changing a wheel. The wheels could come
loose if they are not tightened to a torque of
80 lb-ft (110 Nm).