Page 130 of 505

129 Controls in detail
Lighting
USA only
By default, the daytime running lamp mode
is deactivated. Activate the daytime
running lamp mode using the control
system, see “Setting daytime running lamp
mode (USA only)” (
�page 160).
When the engine is running, and you turn
the exterior lamp switch to positionC
orB, the manual headlamp mode has
priority over the daytime running lamp
mode.
The corresponding exterior lamps switch
on (
�page 126).Locator lighting and night security
illumination
The locator lighting and the night security
illumination are described in the “Control
system” section, see “Setting locator light-
ing” (
�page 161) and “Setting night secu-
rity illumination” (
�page 162).Fog lampsiWith the daytime running lamp mode
activated and the exterior lamp switch in
positionM, you cannot switch on the high
beam headlamps.
The high beam flasher is available at all times.
For nighttime driving turn the exterior lamp
switch to positionB or U to permit
activation of the high beam headlamps.
Warning!G
In low ambient lighting or foggy conditions,
only switch from position U to B with
the vehicle at a standstill in a safe location.
Switching fromU to B will briefly
switch off the headlamps. Doing so while
driving in low ambient lighting conditions
may result in an accident.
iFog lamps will operate with the parking
lamps and/or the low beam headlamps on. Fog
lamps should only be used in conjunction with
low beam headlamps. Consult your State or
Province Motor Vehicle Regulations regarding
permissible lamp operation.
iFog lamps cannot be switched on with the
exterior lamp switch in positionU. To switch
on the fog lamps, turn the exterior lamp switch to
positionB first.
Page 131 of 505
130 Controls in detail
Lighting
Front fog lamps
�Switch on the low beam
headlampsB (
�page 54).
�Pull out the exterior lamp switch to first
stop.
The front fog lamps switch on.
The green indicator lamp‡ in the
exterior lamp switch comes on
(
�page 126).
�Push in the exterior lamp switch.
The front fog lamps switch off.
The green indicator lamp‡ in the
exterior lamp switch goes out.Rear fog lamp (driver’s side only)
�Switch on the low beam
headlampsB (
�page 54).
�Pull out the exterior lamp switch to
second stop.
The front fog lamps and the rear fog
lamp switch on.
The yellow indicator lamp† in the
exterior lamp switch comes on
(
�page 126).
�Push in the exterior lamp switch to first
stop.
The rear fog lamp switches off.
The yellow indicator lamp† in the
exterior lamp switch goes out.
The front fog lamps remain lit.
Combination switch
Combination switch
1High beam
2High beam flasher
Page 132 of 505

131 Controls in detail
Lighting
High beam
�Turn the exterior lamp switch to
positionB (
�page 126).
�Push the combination switch in
direction of arrow1 to switch on the
high beam.
The high beam headlamp indicator
lampA in the instrument cluster
comes on (
�page 26).
�Pull the combination switch in direction
of arrow2 to its original position to
switch off the high beam.
The high beam headlamp indicator
lampA in the instrument cluster
goes out.
High beam flasher
�Pull the combination switch briefly in
direction of arrow2.Corner-illuminating front fog lamps*
(With Bi-Xenon* headlamps only)
The corner-illuminating front fog lamps
improve illumination of the area in the
direction into which you are turning.
The corner-illuminating front fog lamps will
operate with the engine running and with
�the exterior lamp switch in
positionB (
�page 126)
or
�the exterior lamp switch in
positionU (
�page 126)
or
�the daytime running lamp mode
activated (
�page 128)Driving forward
Switching on corner-illuminating front
fog lamps
�Switch on the left or right turn signal
(
�page 55), depending on whether
you are turning left or right.
The respective front fog lamp comes on
and illuminates the area in the
direction into which you are turning.
or
�Turning steering wheel in desired
direction.
The front fog lamp on the side of your
steering direction comes on.
iWith the automatic headlamp mode activat-
ed: The corner-illuminating front fog lamps will
only come on in low ambient lighting conditions.
iIf you are driving faster than 25 mph
(40 km/h) or have the front fog lamps switched
on, the corner-illuminating front fog lamps
function is not available.
��
Page 380 of 505

379 Practical hints
What to do if …?
On the pages that follow, you will find a
compilation of the most important warning
and malfunction messages that may
appear in the display.
For your convenience the messages are
divided into two sections:
�Text messages (�page 380)
�Symbol messages (�page 388)
Warning!G
No messages will be displayed if either the
instrument cluster or the multifunction
display is inoperative.
As a result, you will not be able to see infor-
mation about your driving conditions, such
as speed or outside temperature, warn-
ing/indicator lamps, malfunction/warning
messages or the failure of any systems.
Driving characteristics may be impaired.
If you must continue to drive, please do so
with added caution. Visit an authorized
Mercedes-Benz Center as soon as possible.
iSwitching on the ignition causes all
instrument cluster lamps (except low beam
headlamp indicator lamp, high beam headlamp
indicator lamp, and turn signal indicator lamps
unless activated) as well as the multifunction dis-
play to come on. Make sure the lamps and the
multifunction display are in working order before
starting your journey.
Page 398 of 505

397 Practical hints
What to do if …?
Display symbolDisplay messagePossible cause/consequencePossible solution
. 3rd brake lampThe high mounted brake lamp is malfunc-
tioning.�Contact an authorized Mercedes-Benz
Center as soon as possible.
Brake lamp
left sideThe left brake lamp is malfunctioning.�Replace the bulb as soon as possible
(
�page 432).
Brake lamp
right sideThe right brake lamp is malfunctioning.�Replace the bulb as soon as possible
(
�page 432).
Front foglamp
left sideThe left front fog lamp is malfunctioning.�Contact an authorized Mercedes-Benz
Center as soon as possible.
Front foglamp
right sideThe right front fog lamp is malfunctioning.�Contact an authorized Mercedes-Benz
Center as soon as possible.
Front left
turn signalThe left front turn signal lamp is malfunc-
tioning.�Replace the bulb as soon as possible
(
�page 431).
Front right
turn signalThe right front turn signal lamp is malfunc-
tioning.�Replace the bulb as soon as possible
(
�page 431).
High beam
left sideThe left high beam lamp is malfunction-
ing.�Replace the bulb as soon as possible
(
�page 430).
High beam
right sideThe right high beam lamp is malfunction-
ing.�Replace the bulb as soon as possible
(
�page 430).
Page 429 of 505
428 Practical hints
Replacing bulbs
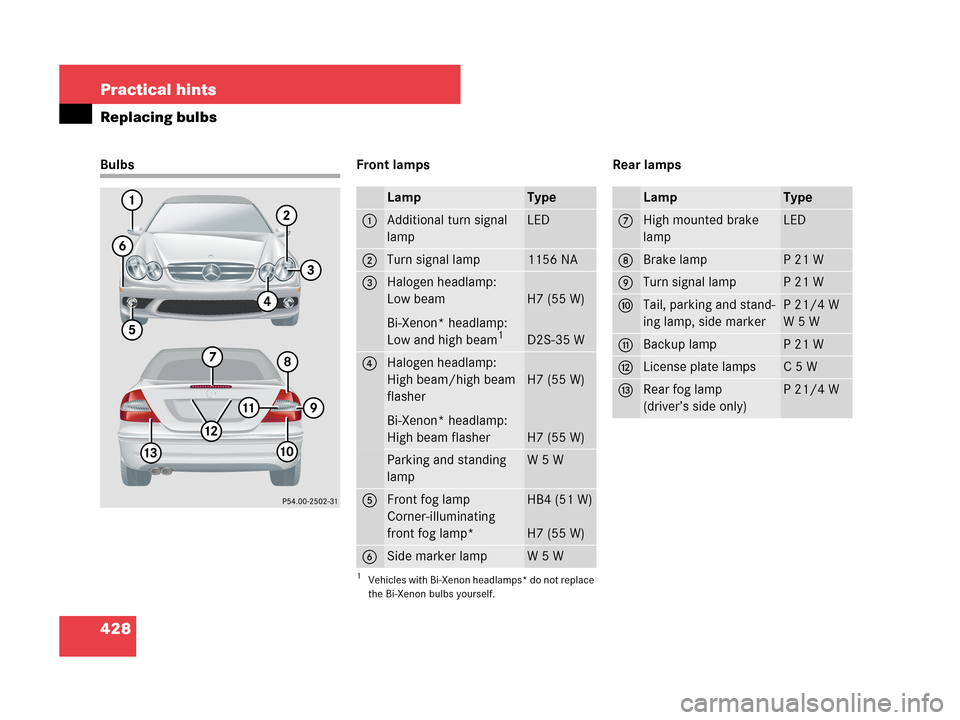
Bulbs Front lamps Rear lamps
LampType
1Additional turn signal
lampLED
2Turn signal lamp1156 NA
3Halogen headlamp:
Low beam
Bi-Xenon* headlamp:
Low and high beam
1
1Vehicles with Bi-Xenon headlamps* do not replace
the Bi-Xenon bulbs yourself.
H7 (55 W)
D2S-35 W
4Halogen headlamp:
High beam/high beam
flasher
Bi-Xenon* headlamp:
High beam flasher
H7 (55 W)
H7 (55 W)
Parking and standing
lampW 5 W
5Front fog lamp
Corner-illuminating
front fog lamp*HB4 (51 W)
H7 (55 W)
6Side marker lampW 5 W
LampType
7High mounted brake
lampLED
8Brake lampP 21 W
9Turn signal lampP 21 W
aTail, parking and stand-
ing lamp, side markerP 21/4 W
W 5 W
bBackup lampP 21 W
cLicense plate lampsC 5 W
dRear fog lamp
(driver’s side only)P 21/4 W
Page 431 of 505

430 Practical hints
Replacing bulbs
Replacing bulbs for front lamps
Before you start to replace a bulb for a
front lamp, do the following first:
�Turn the exterior lamp switch to
positionM (
�page 126).
�Open the hood (�page 315).
Front lamps halogen-type
1Housing cover for low beam headlamp
2Housing cover for high beam head-
lamp, parking and standing lamp3Bulb socket for turn signal lamp bulb
4Bulb holder of low beam bulb
5Bulb holder of high beam bulb
6Bulb socket for parking and standing
lamp bulb
Low beam bulb
�Turn housing cover1 counterclock-
wise and remove it.
�Turn bulb holder4 with the bulb coun-
terclockwise and remove it.
�Pull the bulb at its socket out of bulb
holder4.
�Insert the new bulb so that its socket
locates in the recess of bulb holder4
and is level to it.
�Reinsert bulb holder4 with the bulb in
the lamp and turn clockwise.
�Align housing cover1 and turn it
clockwise.
High beam bulb
�Turn housing cover2 counterclock-
wise and remove it.
�Turn bulb holder5 with the bulb coun-
terclockwise and remove it.
�Pull the bulb at its socket out of bulb
holder5.
�Insert the new bulb so that its socket
locates in the recess of bulb holder5
and is level to it.
�Reinsert bulb holder5 with the bulb in
the lamp and turn clockwise.
�Align housing cover2 and turn it
clockwise.
Page 432 of 505
431 Practical hints
Replacing bulbs
Front turn signal lamp bulb
�Turn bulb socket3 counterclockwise
and remove it.
�Press gently onto the bulb and turn
counterclockwise out of bulb
socket3.
�Press the new bulb gently into bulb
socket3 and turn clockwise until it
engages.
�Place bulb socket3 back into the
lamp and turn it clockwise.
Parking and standing lamp bulb
�Turn housing cover2 counterclock-
wise and remove it.
�Pull out bulb socket6 with the bulb.
�Pull the bulb out of the bulb socket6.
�Press the new bulb into bulb socket6.
�Press bulb socket6 back into the
lamp.
�Align housing cover2 and turn it
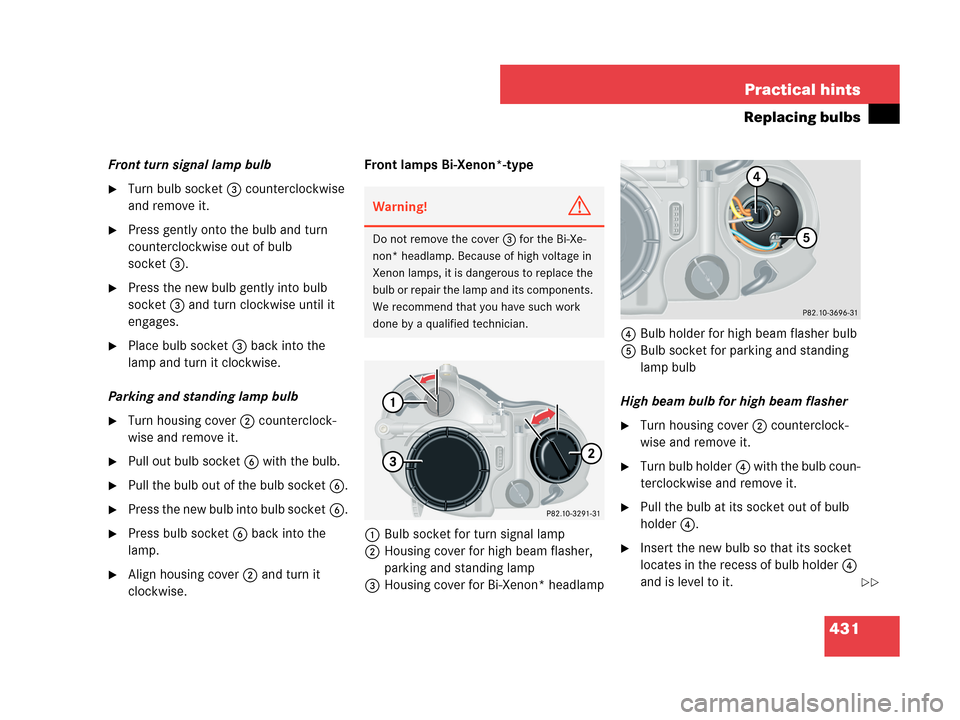
clockwise.Front lamps Bi-Xenon*-type
1Bulb socket for turn signal lamp
2Housing cover for high beam flasher,
parking and standing lamp
3Housing cover for Bi-Xenon* headlamp4Bulb holder for high beam flasher bulb
5Bulb socket for parking and standing
lamp bulb
High beam bulb for high beam flasher
�Turn housing cover2 counterclock-
wise and remove it.
�Turn bulb holder4 with the bulb coun-
terclockwise and remove it.
�Pull the bulb at its socket out of bulb
holder4.
�Insert the new bulb so that its socket
locates in the recess of bulb holder4
and is level to it.
Warning!G
Do not remove the cover 3 for the Bi-Xe-
non* headlamp. Because of high voltage in
Xenon lamps, it is dangerous to replace the
bulb or repair the lamp and its components.
We recommend that you have such work
done by a qualified technician.
��