Page 413 of 505
412 Practical hints
Unlocking/locking in an emergency
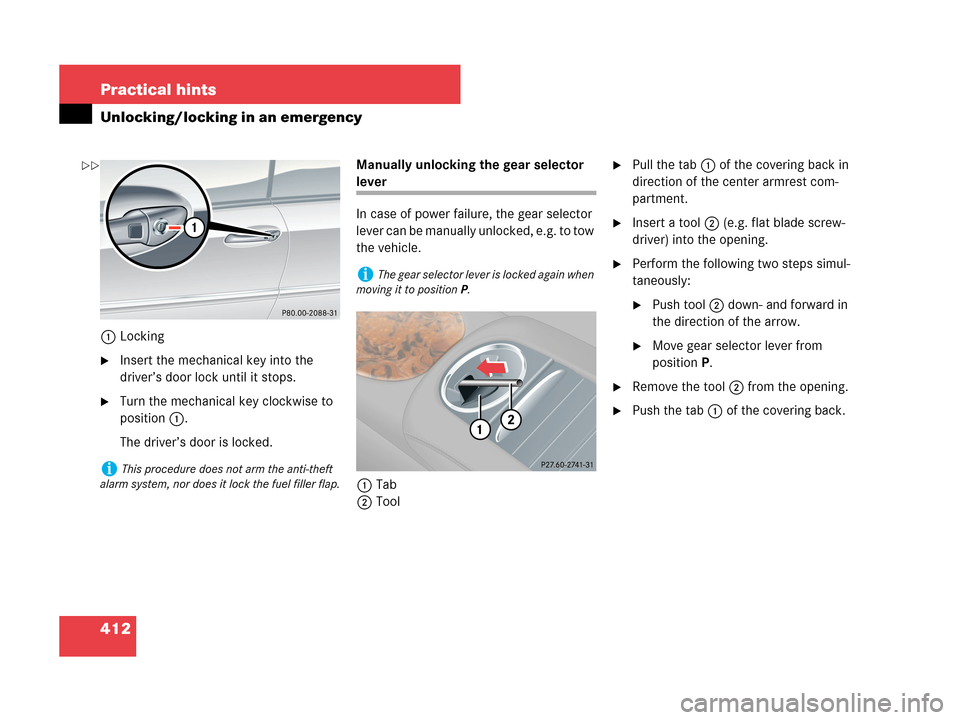
1Locking
�Insert the mechanical key into the
driver’s door lock until it stops.
�Turn the mechanical key clockwise to
position1.
The driver’s door is locked.Manually unlocking the gear selector
lever
In case of power failure, the gear selector
lever can be manually unlocked, e.g. to tow
the vehicle.
1Tab
2Tool
�Pull the tab1 of the covering back in
direction of the center armrest com-
partment.
�Insert a tool2 (e.g. flat blade screw-
driver) into the opening.
�Perform the following two steps simul-
taneously:
�Push tool2 down- and forward in
the direction of the arrow.
�Move gear selector lever from
positionP.
�Remove the tool2 from the opening.
�Push the tab1 of the covering back.
iThis procedure does not arm the anti-theft
alarm system, nor does it lock the fuel filler flap.
iThe gear selector lever is locked again when
moving it to positionP.
��
Page 417 of 505
416 Practical hints
Opening/closing in an emergency
�Lower rear head restraints
(
�page 120).
�For safety reasons, remove SmartKey
from starter switch.
�Open the trunk.
�Remove the trunk floor cover.
�Take the two straps for soft top emer-
gency operation out of vehicle tool kit
(
�page 404).
�Take hex wrench out of its storage
location in the storage well casing
(
�page 405).
�Open the left side trim panel in the
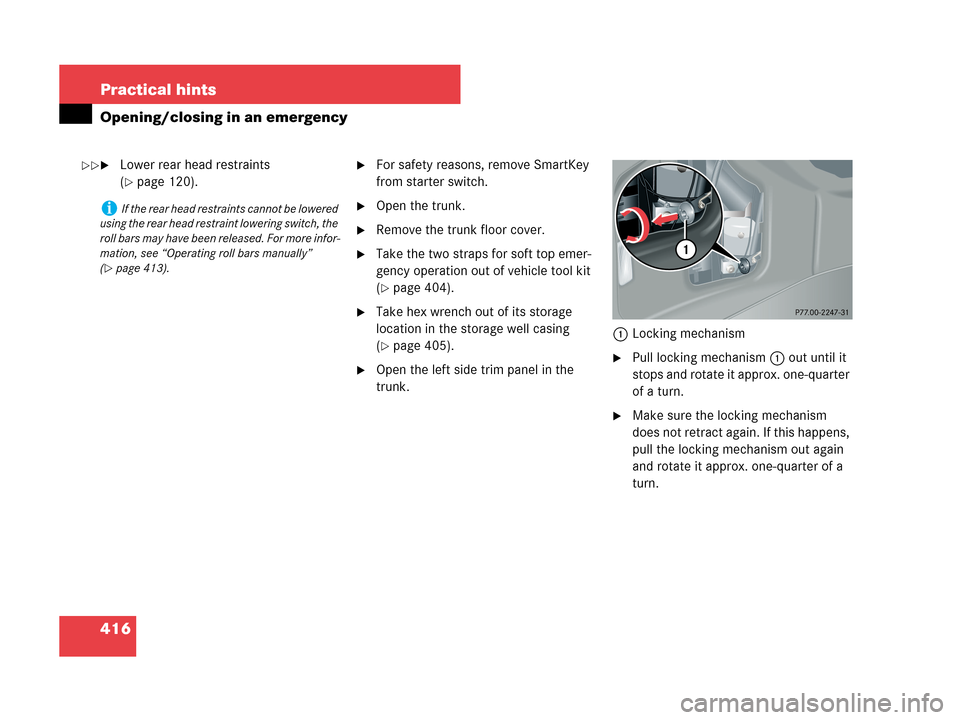
trunk.1Locking mechanism�Pull locking mechanism1 out until it
stops and rotate it approx. one-quarter
of a turn.
�Make sure the locking mechanism
does not retract again. If this happens,
pull the locking mechanism out again
and rotate it approx. one-quarter of a
turn.
iIf the rear head restraints cannot be lowered
using the rear head restraint lowering switch, the
roll bars may have been released. For more infor-
mation, see “Operating roll bars manually”
(
�page 413).
��
Page 420 of 505

419 Practical hints
Opening/closing in an emergency
�Place both straps on soft top compart-
ment cover.
�Take hex wrench out of trunk.
�Close trunk lid.
You will only have access to the trunk
again when the emergency operation
has been completed.
�You and your assistant should each
take one of the straps by the handle.
�With a strong, simultaneous tug on the
loops, pull soft top compartment cover
upward and out to the rear.
iDo not place the SmartKey in the open
trunk. You may lock yourself out.
Vehicles with KEYLESS-GO*: To prevent a possi-
ble inadvertent lockout, the trunk lid will open
automatically if a SmartKey with KEYLESS-GO*
is recognized in the area of the rear shelf or in-
side the trunk.
!The trunk lid must remain closed during the
next steps in the procedure. Otherwise the trunk
lid and the soft top compartment cover may
come into contact with one another and be dam-
aged.
Warning!G
At this point, the remaining procedure
needs to be done by two people. Otherwise
you could be injured.��
Page 424 of 505

423 Practical hints
Opening/closing in an emergency
hLocking
�Insert hex wrench into soft top locking
mechanism screw.
�Turn the soft top locking mechanism
screw with hex wrench counterclock-
wise in direction of arrowh as far as it
will go.
The soft top is locked onto the wind-
shield frame.
�Have the soft top operation checked at
an authorized Mercedes-Benz Center
as soon as possible.
Warning!G
Position hands as indicated by arrows so
that when you press soft top compartment
coverf forward and lower material ten-
sioning framee, your hands cannot be-
come trapped.
!Make sure you turn the hex wrench counter-
clockwise as far as it will go. Otherwise the soft
top may not lock properly.
!If, after completing the soft top emergency
operation, the trunk cannot be opened using the
remote trunk lid release switch in the driver’s
door, theŠ button on the SmartKey, or the
trunk lid release handle in the license plate re-
cess, press the soft top compartment cover
down again as described above.
Do not open the trunk with the emergency key,
as this could otherwise damage the trunk lid and
the soft top compartment cover.
Page 426 of 505
425 Practical hints
Replacing SmartKey batteries
�Replacing SmartKey batteries
If the batteries in the SmartKey or the
SmartKey with KEYLESS-GO* are dis-
charged, the vehicle can no longer be
locked or unlocked. It is recommended to
have the batteries replaced at an
authorized Mercedes-Benz Center.Batteries contain materials that can harm
the environment if disposed of improperly.
Recycling of batteries is the preferred
method of disposal. Many states require
sellers of batteries to accept old batteries
for recycling.
Warning!G
Keep the batteries out of reach of children.
If a battery is swallowed, seek medical help
immediately.
iWhen inserting the batteries, make sure
they are clean and free of lint.
iWhen changing batteries, always replace
both batteries.
The required replacement batteries are available
at any Mercedes-Benz Center.
Page 427 of 505
426 Practical hints
Replacing SmartKey batteries
SmartKey / SmartKey with
KEYLESS-GO*
Replacement batteries: Lithium, type
CR 2025 or equivalent.
�Remove the mechanical key from the
SmartKey or SmartKey with
KEYLESS-GO* (
�page 410).
1Mechanical key
2Battery compartment
�Insert mechanical key1 into the
opening.
�Press mechanical key1 in direction of
arrow.
The battery compartment2 is un-
latched.
�Pull battery compartment2 out of the
housing.
3Batteries
4Contact spring
�Remove the batteries3.
�Using a lint-free cloth, insert new
batteries3 under the contact
springs4 with the positive terminal
(+) side facing up.
�Return battery compartment2 into
housing until it locks into place.
�Slide mechanical key 1 back into the
SmartKey.
�Check the operation of the SmartKey.
Page 435 of 505

434 Practical hints
Replacing wiper blades
Removing and installing wiper blades
�Remove SmartKey from starter switch
(vehicles with KEYLESS-GO*: make
sure the vehicle's on board electronics
have status 0).
Removing wiper blades
1Unlocking
2Tab
�Pull the tab2 in the direction of
arrow1.
The wiper blade is unlocked.
�Lift up the wiper arm as far as you need
to remove the wiper blade.
�Carefully fold the wiper arm back to
rest on the windshield.
Warning!G
For safety reasons, switch off wipers and
remove SmartKey from starter switch
(vehicles with KEYLESS-GO*: make sure the
vehicle’s on-board electronics have
status0) before replacing a wiper blade.
Otherwise, the wiper motor could suddenly
turn on and cause injury.
Warning!G
Wiper blades are components that are sub-
ject to wear and tear. Change the wiper
blades twice a year, preferably in the spring
and fall. Otherwise the windows will not be
properly wiped. As a result, you may not be
able to observe surrounding traffic condi-
tions and could cause an accident.
!Never open the hood when the wiper arms
are folded forward.
For your convenience, we recommend that you
have this work carried out by an authorized
Mercedes-Benz Center.
!Do not pull on the wiper blade inserts. They
could tear.
!Hold on to the wiper arm. If released, the
force of the impact from the tensioning spring
could crack the windshield.
Page 437 of 505

436 Practical hints
Flat tire
The CLK 63 AMG is equipped with a
TIREFIT kit
Preparing the vehicle
�Park the vehicle in a safe distance from
moving traffic on a hard, flat surface
when possible.
�Turn on the hazard warning flashers
(
�page 133).
�Turn the steering wheel so that the
front wheels are in a straight ahead
position.
�Set the parking brake (�page 58).
�Move the gear selector lever toP.
Vehicles with SmartKey:
�Turn off the engine (�page 60).
�Remove the SmartKey from the starter
switch.Vehicles with SmartKey with
KEYLESS-GO*:
�Turn off the engine by pressing the
KEYLESS-GO* start/stop button on the
gear selector lever once (
�page 60).
�Open the driver’s door (this puts the ig-
nition in position0 (
�page 38), same
as with the SmartKey removed from
the starter switch). The driver’s door
then can be closed again.
�Have any passenger exit the vehicle at
a safe distance from the roadway.Sealing tires with TIREFIT
(CLK 63 AMG only)
Small tire punctures, particularly those in
the tread, can be sealed with TIREFIT.
TIREFIT can be used in ambient tempera-
tures down to -4°F (-20°C).
iOpen door only when conditions are safe to
do so.
Warning!G
Keep TIREFIT away from sparks, open flame
or heat source.
Do not smoke.