Page 26 of 481
25 At a glance
Cockpit
ItemPage
1Steering wheel gearshift
paddles*177
2Combination switch
�Turn signals
�Windshield wipers
�High beam
55
56
55
3Cruise control lever253
4Multifunction steering
wheel28,
142
5Instrument cluster26,
138
6Starter switch36
7Front Parktronic* warning
indicator (Canada only)257
8Overhead control panel31
9Glove box268
ItemPage
aDepending on vehicle pro-
duction date:
Storage box
Cup holder
268
272
bCenter console29, 30
cHood lock release307
dHorn
eSteering wheel adjustment
stalk43
fParking brake pedal53
gDoor control panel32
hParking brake release53
jExterior lamp switch55,
128
kExterior rear view mirror ad-
justment45
lHeadlamp washer switch*179
Page 307 of 481
306 Operation
Engine compartment
Hood Opening
Warning!G
Do not pull the release lever while the vehi-
cle is in motion. Otherwise the hood could
be forced open by passing air flow.
This could cause the hood to come loose
and injure you and/or others.
Warning!G
If you see flames or smoke coming from the
engine compartment, or if the coolant tem-
perature indicator indicates that the engine
is overheated, do not open the hood. Move
away from vehicle and do not open the hood
until the engine has cooled. If necessary,
call the fire department.
Warning!G
You could be injured when the hood is open
- even when the engine is turned off.
Parts of the engine can become very hot. To
prevent burns, only touch owner serviceable
components described in the Operator’s
Manual and comply with all relevant safety
precautions.
Warning!G
To help prevent personal injury, stay clear of
moving parts when the hood is open and the
engine is running.
The radiator fan may continue to run for
approximately 30 seconds or even restart
after the engine has been turned off. Stay
clear of fan blades.
Warning!G
The engine is equipped with a transistorized
ignition system. Because of the high voltage
it is dangerous to touch any components
(ignition coils, spark plug sockets, diagnos-
tic socket) of the ignition system
�with the engine running
�while starting the engine
�if the ignition is “on” and the engine is
turned manually.
Page 308 of 481
307 Operation
Engine compartment
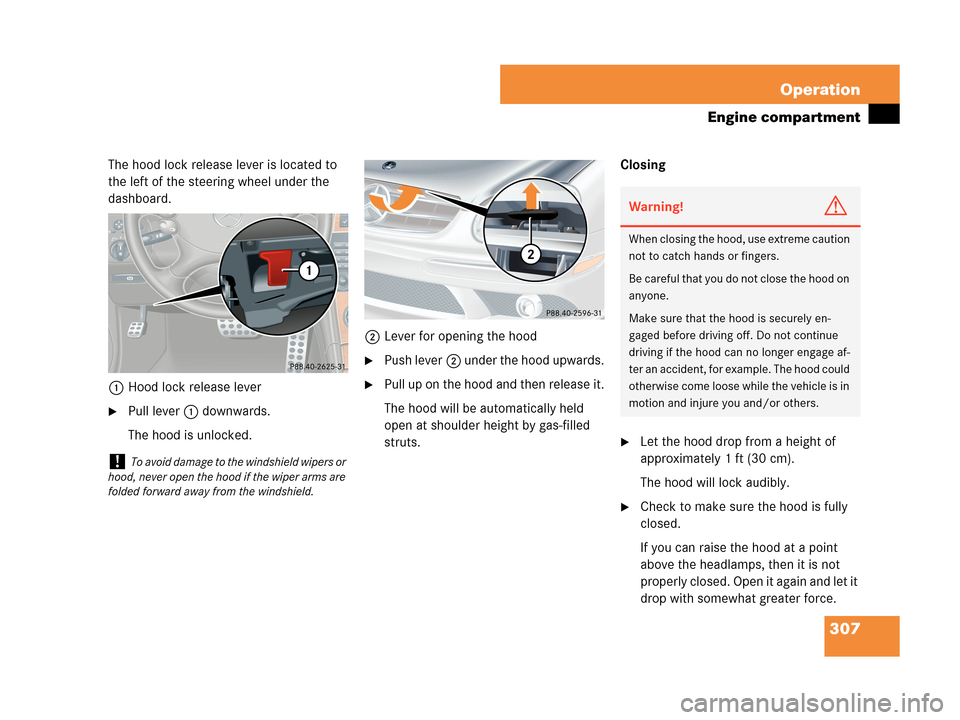
The hood lock release lever is located to
the left of the steering wheel under the
dashboard.
1Hood lock release lever
�Pull lever 1 downwards.
The hood is unlocked.2Lever for opening the hood
�Push lever2 under the hood upwards.
�Pull up on the hood and then release it.
The hood will be automatically held
open at shoulder height by gas-filled
struts.Closing
�Let the hood drop from a height of
approximately 1 ft (30 cm).
The hood will lock audibly.
�Check to make sure the hood is fully
closed.
If you can raise the hood at a point
above the headlamps, then it is not
properly closed. Open it again and let it
drop with somewhat greater force.
!To avoid damage to the windshield wipers or
hood, never open the hood if the wiper arms are
folded forward away from the windshield.
Warning!G
When closing the hood, use extreme caution
not to catch hands or fingers.
Be careful that you do not close the hood on
anyone.
Make sure that the hood is securely en-
gaged before driving off. Do not continue
driving if the hood can no longer engage af-
ter an accident, for example. The hood could
otherwise come loose while the vehicle is in
motion and injure you and/or others.
Page 311 of 481
310 Operation
Engine compartment
Coolant
The engine coolant is a mixture of water
and anticorrosion/antifreeze. To check
the coolant level, the vehicle must be
parked on level ground and the engine
must be cool.
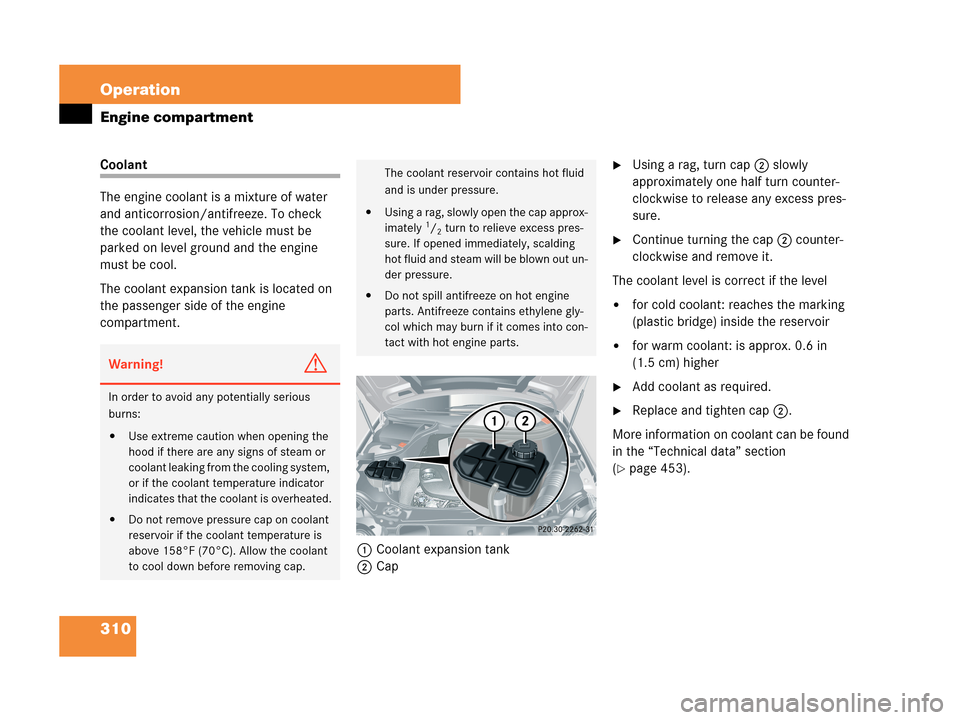
The coolant expansion tank is located on
the passenger side of the engine
compartment.
1Coolant expansion tank
2Cap�Using a rag, turn cap 2 slowly
approximately one half turn counter-
clockwise to release any excess pres-
sure.
�Continue turning the cap 2 counter-
clockwise and remove it.
The coolant level is correct if the level
�for cold coolant: reaches the marking
(plastic bridge) inside the reservoir
�for warm coolant: is approx. 0.6 in
(1.5 cm) higher
�Add coolant as required.
�Replace and tighten cap 2.
More information on coolant can be found
in the “Technical data” section
(
�page 453).
Warning!G
In order to avoid any potentially serious
burns:
�Use extreme caution when opening the
hood if there are any signs of steam or
coolant leaking from the cooling system,
or if the coolant temperature indicator
indicates that the coolant is overheated.
�Do not remove pressure cap on coolant
reservoir if the coolant temperature is
above 158°F (70°C). Allow the coolant
to cool down before removing cap.
The coolant reservoir contains hot fluid
and is under pressure.
�Using a rag, slowly open the cap approx-
imately 1/2 turn to relieve excess pres-
sure. If opened immediately, scalding
hot fluid and steam will be blown out un-
der pressure.
�Do not spill antifreeze on hot engine
parts. Antifreeze contains ethylene gly-
col which may burn if it comes into con-
tact with hot engine parts.
Page 352 of 481
351 Operation
Vehicle care
Cleaning the windows and the wiper
blades
�Make sure the hood is fully closed.
�Make sure the vehicle’s on-board
electronics have status0 (
�page 36).
�Fold the wiper arms forward until they
snap into place.
�Clean the wiper blade inserts with a
clean cloth and detergent solution.
�Use a soft, clean cloth and a mild
window cleaning solution on all outside
and inside glass surfaces.
An automotive glass cleaner is
recommended.
!Never open the hood when the wiper arms
are folded forward.
Warning!G
For safety reasons, switch off wipers and
remove SmartKey from starter switch
(vehicles with KEYLESS-GO*: Make sure the
vehicle's on-board electronics have
status0) before cleaning the windshield
and/or the wiper blades. Otherwise, the
wiper motor could suddenly turn on and
cause injury.
!Do not pull on the wiper blade inserts. They
could tear.
!Fold the windshield wiper arms back onto
the windshield before turning the SmartKey in
the starter switch or pressing the KEYLESS-GO
start/stop button (vehicles with KEYLESS-GO*).
Hold on to the wiper when folding the wiper arm
back. If released, the force of the impact from
the tensioning spring could crack the windshield.
!To clean the window interior, do not use a
dry cloth, abrasives, solvents or cleaners
containing solvents. Do not touch the inside of
th e f ron t, re ar o r s ide w indo ws w it h h ard ob jec ts
such as an ice scraper or ring. Doing so may
damage the windows.
Page 414 of 481
413 Practical hints
Replacing wiper blades
�Replacing wiper blades
Removing and installing wiper blades
�Remove SmartKey from starter switch
(vehicles with KEYLESS-GO*: make
sure the vehicle's on board electronics
have status 0).
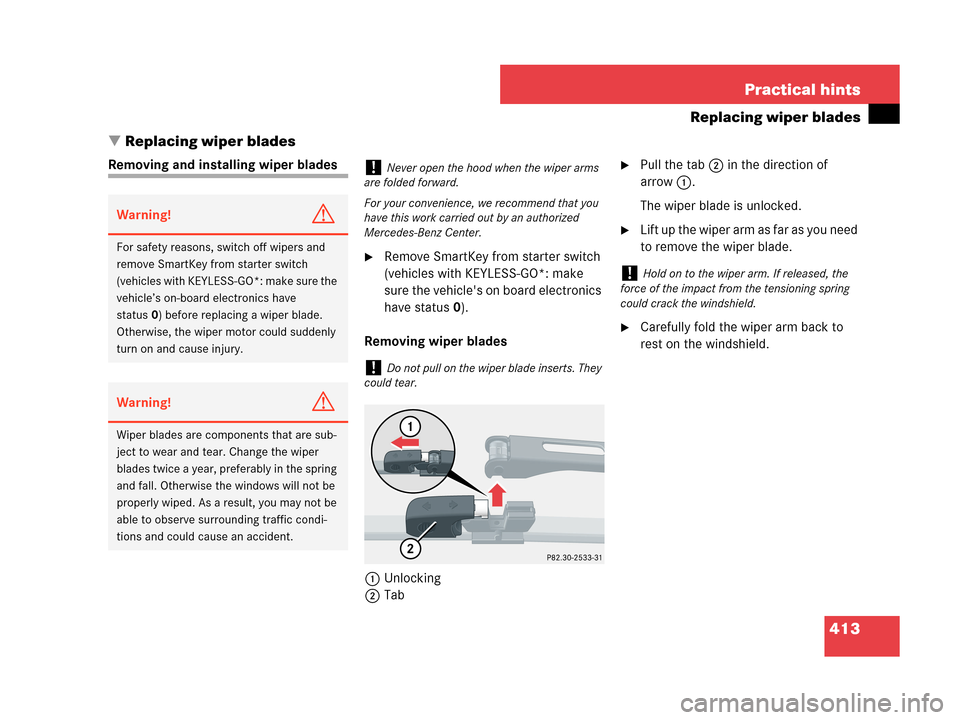
Removing wiper blades
1Unlocking
2Tab
�Pull the tab2 in the direction of
arrow1.
The wiper blade is unlocked.
�Lift up the wiper arm as far as you need
to remove the wiper blade.
�Carefully fold the wiper arm back to
rest on the windshield.
Warning!G
For safety reasons, switch off wipers and
remove SmartKey from starter switch
(vehicles with KEYLESS-GO*: make sure the
vehicle’s on-board electronics have
status0) before replacing a wiper blade.
Otherwise, the wiper motor could suddenly
turn on and cause injury.
Warning!G
Wiper blades are components that are sub-
ject to wear and tear. Change the wiper
blades twice a year, preferably in the spring
and fall. Otherwise the windows will not be
properly wiped. As a result, you may not be
able to observe surrounding traffic condi-
tions and could cause an accident.
!Never open the hood when the wiper arms
are folded forward.
For your convenience, we recommend that you
have this work carried out by an authorized
Mercedes-Benz Center.
!Do not pull on the wiper blade inserts. They
could tear.
!Hold on to the wiper arm. If released, the
force of the impact from the tensioning spring
could crack the windshield.