Page 613 of 723
.
Display Possible cause/consequencePos")
610 Practical hints
What to do if …?
During severe operating conditions,
e.g. stop-and-go traffic, the coolant tem-
perature may rise close to 248°F (120°C).
Display Possible cause/consequencePossible solution
Coolant level
Stop vehicle!
Switch engine offThe coolant is too hot. �Stop the vehicle in a safe location or as soon
as it is safe to do so and immediately turn off
the engine.
�Only start the engine again after the message
disappears. You could otherwise damage the
engine.
�Observe the coolant temperature gauge in
the instrument cluster (
�page 30).
Warning!G
�Driving when your engine is overheated
can cause some fluids which may have
leaked into the engine compartment to
catch fire. You could be seriously
burned.
�Steam from an overheated engine can
cause serious burns which can occur
just by opening the engine hood. Stay
away from the engine if you see or hear
steam coming from it.
Stop the vehicle in a safe location away from
other traffic. Turn off the engine, get out of
the vehicle and do not stand near the vehicle
until the engine has cooled down.!The engine should not be operated with the
coolant temperature above 248°F (120°C). Do-
ing so may cause serious engine damage which
is not covered by the Mercedes-Benz Limited
Warranty.
Page 627 of 723
 or “Add 1.0 qts.
(Canada:1.0 l) engine oil at next refueling”
(CL 600) appears wh")
624 Practical hints
What to do if …?
When the message “Check engine oil level
at next refueling” (CL 550) or “Add 1.0 qts.
(Canada:1.0 l) engine oil at next refueling”
(CL 600) appears while the engine is run-
ning and at operating temperature, the en-
gine oil level has dropped to approximately
the minimum level.When this occurs, the warning will first
come on intermittently and then stay on if
the oil level drops further.
If no oil leaks are noted, continue to drive
to the nearest service station where the
engine oil should be topped to the required
level with an approved engine oil.
For information on approved engine oils,
refer to the Factory Approved Service
Products pamphlet (USA only) or contact
an authorized Mercedes-Benz Center.
Display Possible cause/consequencePossible solution
USA only:
Add 1.0 qts. engine oil
at next refueling
(USA only)
Add 1.0 l engine oil
at next refueling
(Canada only)CL 600 only:
The engine oil level is too low.�Check the engine oil level (�page 513) and
add engine oil as required (
�page 516).
�If you must add engine oil frequently, have
the engine checked for possible leaks.
Check engine oil level
at next refuelingCL 550 only:
The engine oil level has dropped to approx-
imately the minimum level.�Check the engine oil level (�page 513) and
add engine oil as required (
�page 516).
�If you must add engine oil frequently, have
the engine checked for possible leaks.
!The engine oil level warnings should not be
ignored. Extended driving with the symbol dis-
played could result in serious engine damage
that is not covered by the Mercedes-Benz Limit-
ed Warranty.
Page 629 of 723

626 Practical hints
What to do if …?
Display Possible cause/consequencePossible solution
Restraint system
malfunction
Visit workshopThere is a malfunction in the supplemental
restraint systems. The air bags or emergen-
cy tensioning devices (ETDs) could deploy
unexpectedly or fail to activate in an
accident.�Drive with added caution to the nearest
authorized Mercedes-Benz Center.
Malfunction
on front left side
Visit workshopComponents of the driver’s supplemental
restraint system may not work properly.�Drive with added caution to the nearest
authorized Mercedes-Benz Center.
Malfunction
on Front Right side
Visit workshopComponents of the front passenger’s sup-
plemental restraint system may not work
properly.�Drive with added caution to the nearest
authorized Mercedes-Benz Center.
Malfunction
on Rear Left side
Visit workshopComponents of the left rear passenger’s
supplemental restraint system may not
work properly.�Drive with added caution to the nearest
authorized Mercedes-Benz Center.
Warning!G
In the event that a malfunction of the SRS is
indicated as outlined above, the SRS may
not be operational. For your safety, we
strongly recommend that you contact an au-
thorized Mercedes-Benz Center immediate-
ly to have the system checked; otherwise
the SRS may not be deployed when needed
in anaccident, which could result in serious or fa-
tal injury, or it might deploy unexpectedly
and unnecessarily which could result in an
accident and/or injury to you or to others.
Page 630 of 723

627 Practical hints
What to do if …?
Display Possible cause/consequencePossible solution
Malfunction
in Rear Center
Visit workshopComponents of the center rear passenger’s
supplemental restraint system may not
work properly.�Drive with added caution to the nearest au-
thorized Mercedes-Benz Center.
Malfunction
on Rear Right side
Visit workshopComponents of the right rear passenger’s
supplemental restraint system may not
work properly.�Drive with added caution to the nearest au-
thorized Mercedes-Benz Center.
Left window curtain
airbag malfunction
Visit workshopThe left side window curtain air bag may not
work properly.�Drive with added caution to the nearest au-
thorized Mercedes-Benz Center.
Right window curtain
airbag malfunction
Visit workshopThe right side window curtain air bag may
not work properly.�Drive with added caution to the nearest au-
thorized Mercedes-Benz Center.
Warning!G
In the event a malfunction of the SRS is indi-
cated as outlined above, the SRS may not be
operational. For your safety, we strongly
recommend that you contact an authorized
Mercedes-Benz Center immediately to have
the system checked; otherwise the SRS may
not be deployed when needed in anaccident, which could result in serious or fa-
tal injury, or it might deploy unexpectedly
and unnecessarily which could result in an
accident and/or injury to you or to others.
Page 631 of 723
628 Practical hints
What to do if …?
Display Possible cause/consequencePossible solution
Tele Aid
inoperativeOne or more main functions of the Tele Aid
system are malfunctioning.�Have the Tele Aid system checked by an
authorized Mercedes-Benz Center.
Tire pressure
Caution, tire defectAdvanced TPMS:
One or more tires are deflating.�Carefully bring the vehicle to a halt, avoiding
abrupt steering and braking maneuvers.
�If necessary, change the wheel (�page 649).
Caution
Tire defectAdvanced TPMS:
One or more tires are deflating. The respec-
tive tire is shown in the multifunction
display.�Carefully bring the vehicle to a halt, avoiding
abrupt steering and braking maneuvers.
�If necessary, change the wheel (�page 649).
Warning!G
Do not drive with a flat tire. A flat tire affects
the ability to steer or brake the vehicle. You
may lose control of the vehicle. Continued
driving with a flat tire will cause excessive
heat build-up and possibly a fire.
Page 632 of 723
629 Practical hints
What to do if …?
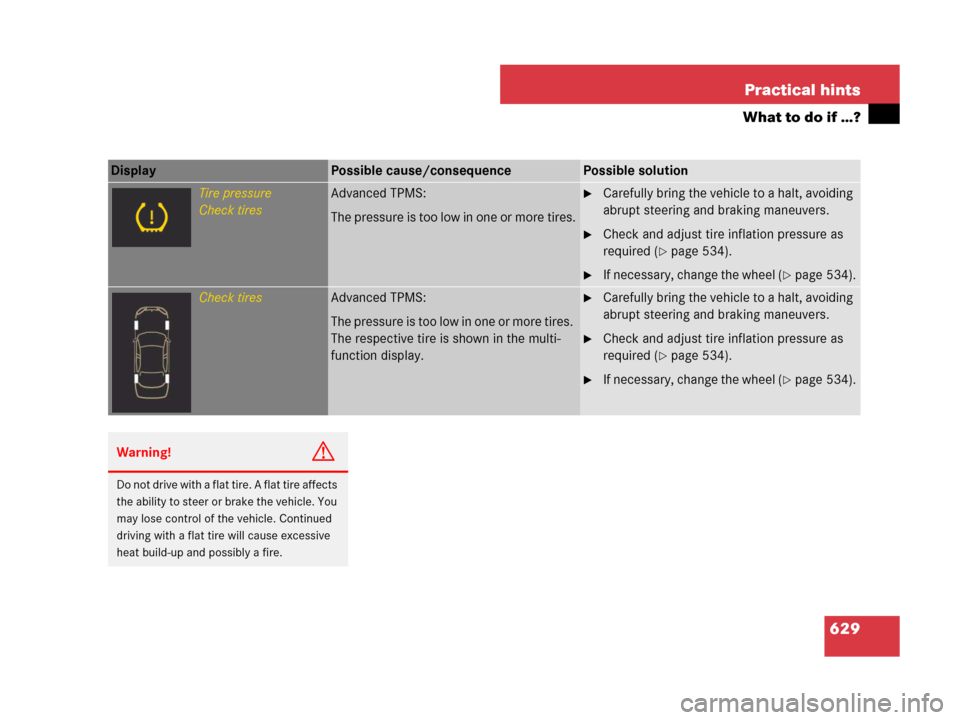
Display Possible cause/consequencePossible solution
Tire pressure
Check tiresAdvanced TPMS:
The pressure is too low in one or more tires.�Carefully bring the vehicle to a halt, avoiding
abrupt steering and braking maneuvers.
�Check and adjust tire inflation pressure as
required (
�page 534).
�If necessary, change the wheel (�page 534).
Check tiresAdvanced TPMS:
The pressure is too low in one or more tires.
The respective tire is shown in the multi-
function display.�Carefully bring the vehicle to a halt, avoiding
abrupt steering and braking maneuvers.
�Check and adjust tire inflation pressure as
required (
�page 534).
�If necessary, change the wheel (�page 534).
Warning!G
Do not drive with a flat tire. A flat tire affects
the ability to steer or brake the vehicle. You
may lose control of the vehicle. Continued
driving with a flat tire will cause excessive
heat build-up and possibly a fire.
Page 636 of 723

633 Practical hints
Where will I find ...?
Vehicle jack
Storage position
�Remove vehicle jack from its
compartment.
�Turn crank handle in direction of arrow
as far as it will go.
Operational position
�Turn crank handle clockwise.
Before storing the vehicle jack in its
compartment:
�It should be fully collapsed.
�The handle must be folded in (storage
position).
Warning!G
The jack is designed exclusively for jacking
up the vehicle at the jack take-up brackets
built into both sides of the vehicle. To help
avoid personal injury, use the jack only to lift
the vehicle during a wheel change. Never
get beneath the vehicle while it is supported
by the jack. Keep hands and feet away from
the area under the lifted vehicle. Always
firmly engage the electronic parking brake
and block wheels before raising vehicle with
jack.
Do not disengage electronic parking brake
while the vehicle is raised. Be certain that
the jack is always vertical (plumb line) when
in use, especially on hills. Always try to use
the jack on level surface. Make sure the jack
arm is fully seated in the jack take-up brack-
et. Always lower the vehicle onto sufficient
capacity jackstands before working under
the vehicle.
Page 640 of 723

637 Practical hints
Unlocking/locking in an emergency
Mechanically releasing the electronic
parking brake
The mechanical release device for the
electronic parking brake is behind the fuel
filler flap next to the fuel cap.
1Protective cap
2Release tool
3Pulling
�Shift the automatic transmission to P
(
�page 389).
�Prevent the vehicle from rolling away
by blocking a rear wheel with the wheel
chock. A wheel chock is included with
the vehicle tool kit (
�page 632).
�Open the fuel filler flap (�page 509).
�Remove protective cap1.
�Screw release tool2 from vehicle tool
kit clockwise 2 to 3 rotations onto re-
lease cable.
�Pull release tool2 in direction of
arrow3.
The electronic parking brake is re-
leased. The red indicator lamp 0
(USA only) or ! (Canada only) flash-
es. The message “Parking brake See
Oper. Manual” appears in the multi-
function display.
�Unscrew release tool2 from release
cable.
�Reattach protective cap1.
�Store release tool2 in vehicle tool kit.
After the electronic parking brake has
been released, you can engage it again.
�Press the electronic parking brake
handle (
�page 384).
Warning!G
If you mechanically release the electronic
parking brake, the vehicle may start to move
on its own. Make sure that no one is in front
of or behind the vehicle. Otherwise, an acci-
dent could occur resulting in injury or fatali-
ty. Before releasing the electronic parking
brake, shift the automatic transmission to P
(
�page 389) and secure your vehicle in
place using the chock from the vehicle tool
kit.
iIf the electronic parking brake is not re-
leased, pull the release tool again with more
force.