Page 640 of 723

637 Practical hints
Unlocking/locking in an emergency
Mechanically releasing the electronic
parking brake
The mechanical release device for the
electronic parking brake is behind the fuel
filler flap next to the fuel cap.
1Protective cap
2Release tool
3Pulling
�Shift the automatic transmission to P
(
�page 389).
�Prevent the vehicle from rolling away
by blocking a rear wheel with the wheel
chock. A wheel chock is included with
the vehicle tool kit (
�page 632).
�Open the fuel filler flap (�page 509).
�Remove protective cap1.
�Screw release tool2 from vehicle tool
kit clockwise 2 to 3 rotations onto re-
lease cable.
�Pull release tool2 in direction of
arrow3.
The electronic parking brake is re-
leased. The red indicator lamp 0
(USA only) or ! (Canada only) flash-
es. The message “Parking brake See
Oper. Manual” appears in the multi-
function display.
�Unscrew release tool2 from release
cable.
�Reattach protective cap1.
�Store release tool2 in vehicle tool kit.
After the electronic parking brake has
been released, you can engage it again.
�Press the electronic parking brake
handle (
�page 384).
Warning!G
If you mechanically release the electronic
parking brake, the vehicle may start to move
on its own. Make sure that no one is in front
of or behind the vehicle. Otherwise, an acci-
dent could occur resulting in injury or fatali-
ty. Before releasing the electronic parking
brake, shift the automatic transmission to P
(
�page 389) and secure your vehicle in
place using the chock from the vehicle tool
kit.
iIf the electronic parking brake is not re-
leased, pull the release tool again with more
force.
Page 641 of 723
638 Practical hints
Opening/closing in an emergency
Power tilt/sliding sunroof
You can open or close the tilt/sliding sun-
roof manually should an electrical malfunc-
tion occur.
The drive mechanism is behind the left sun
visor.
1Cover
�Remove cover1.2Crank
�Take crank2 from the Operator’s
Manual pouch.
�Switch on the ignition (�page 336).
�Insert crank2 through the hole.
�Turn crank2 clockwise to:
�slide roof panel closed
�raise roof panel at the rear
�Turn crank2 counterclockwise to:
�slide roof panel open
�lower roof panel at the rear
iTurn crank2 slowly and smoothly.
The tilt/sliding sunroof (
�page 468) must be
synchronized after being operated manually.
Page 648 of 723

645 Practical hints
Replacing bulbs
1Installation device
2Bulb
�Pull bulb2 out of the socket.
�Insert new bulb2 into the socket.
�Insert installation device1 into the
headlamp so that the handle of the in-
stallation device points up (left head-
lamp) or down (right headlamp).
�Pull installation device1 down (left
headlamp) or up (right headlamp) until
it engages.
�Attach cover (�page 644) and let it au-
dibly engage to close.
Corner-illuminating lamp
1Bulb holder
2Wire position
�Turn bulb holder1 counterclockwise
until it disengages.
�Take out bulb holder1.
�Take bulb out of holder.
�Insert new bulb into holder and press it
all the way down.
�Insert bulb holder1 into guide in
headlamp.
The tab of the bulb holder must be po-
sitioned on the upper left-hand side
and wire2 must point downward and
to the left for the left headlamp, up-
ward and to the right for the right head-
lamp.
�Turn bulb holder1 clockwise until it
engages.
iMake sure to insert the bulb in the right di-
rection. The bulb must fit plane on the socket.
Page 649 of 723

646 Practical hints
Replacing bulbs
IR emitter*
1Bulb holder
2Wire position
�Turn bulb holder1 counterclockwise
until it disengages.
�Take out bulb holder1.
�Press both catches on left and right
sides of bulb holder1 and take bulb
out of holder.
�Insert new bulb into holder until it en-
gages.
�Insert bulb holder1 into guide in
headlamp. Wire2 must point down-
ward and to the right.
�Turn bulb holder1 clockwise until it
engages and wire2 points downward
and to the left.
Additional turn signal lamp bulbs
The additional turn signal lamps in the ex-
terior rear view mirrors have LEDs.
If a malfunction occurs or LEDs fail to func-
tion, the entire turn signal unit must be re-
placed. Have the turn signal unit replaced
by an authorized Mercedes-Benz Center.
Front side marker lamp bulbs
Since replacing the side marker lamp bulbs
is a technically highly demanding process,
we recommend you have the side marker
lamp bulbs replaced by an authorized
Mercedes-Benz Center.Replacing bulbs for the rear lamps
Tail lamp unit
The tail lamp unit is equipped with HiP
bulbs and LED’s.
Warning!G
The bulbs in the tail lamp unit cannot be re-
placed individually. The tail lamp bulbs are
under pressure and could explode during an
attempt to replace them.
If the tail lamps (HiP bulbs and/or LED’S)
are malfunctioning, have them replaced at
an authorized Mercedes-Benz Center.
Page 657 of 723
654 Practical hints
Flat tire
Lowering the vehicle
�Lower vehicle by turning crank coun-
terclockwise until vehicle is resting ful-
ly on its own weight.
�Remove the jack.
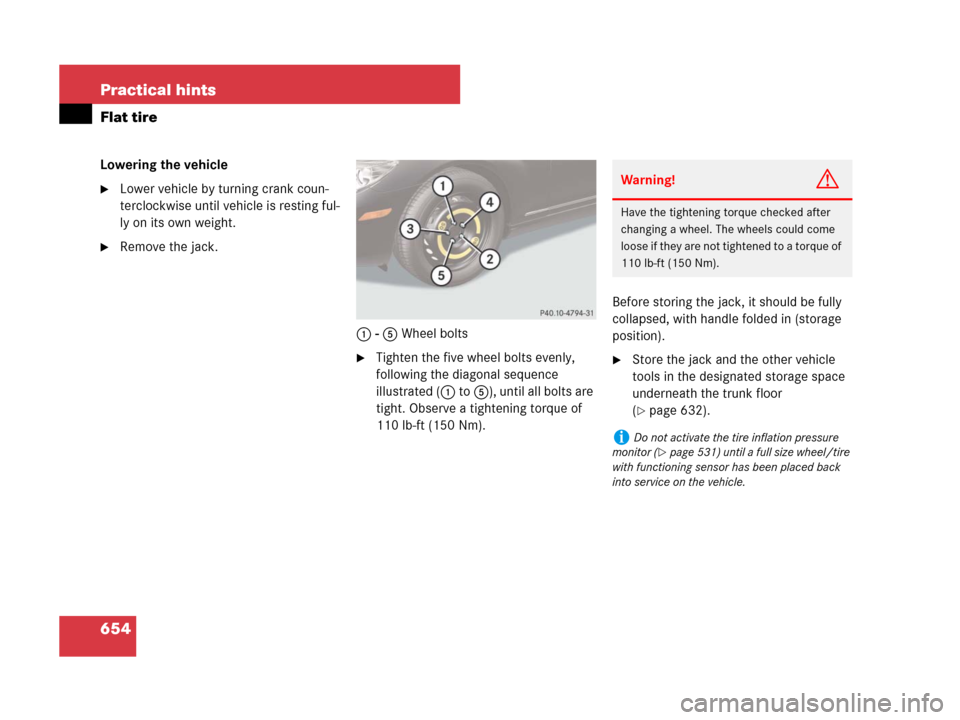
1 - 5 Wheel bolts
�Tighten the five wheel bolts evenly,
following the diagonal sequence
illustrated (1 to 5), until all bolts are
tight. Observe a tightening torque of
110 lb-ft (150 Nm).Before storing the jack, it should be fully
collapsed, with handle folded in (storage
position).�Store the jack and the other vehicle
tools in the designated storage space
underneath the trunk floor
(
�page 632).
Warning!G
Have the tightening torque checked after
changing a wheel. The wheels could come
loose if they are not tightened to a torque of
110 lb-ft (150 Nm).
iDo not activate the tire inflation pressure
monitor (
�page 531) until a full size wheel/tire
with functioning sensor has been placed back
into service on the vehicle.
Page 669 of 723
666 Practical hints
Towing the vehicle
Installing towing eye bolt
1Cover on right side of front bumper
1Cover on right side of rear bumperRemoving cover
�Press mark on cover1 in the direction
of arrow.
�Lift cover off to reveal the threaded
hole for towing eye bolt.
Installing towing eye bolt
�Take towing eye bolt and wheel wrench
out of the vehicle tool kit in the trunk
(
�page 632).
�Screw towing eye bolt clockwise into
its stop and tighten with wheel wrench.Removing towing eye bolt
�Loosen towing eye bolt counterclock-
wise with wheel wrench.
�Unscrew towing eye bolt.
�Store towing eye bolt and wheel
wrench in the vehicle tool kit in the
trunk.
Installing cover
�Fit cover1 and snap into place.
Page:
< prev 1-8 9-16 17-24