Page 452 of 723

451 Controls in detail
Air vents
Please comply with the following instruc-
tions in order for the automatic climate
control to function optimally:
�Keep the air intake grille in front of the
windshield free of snow, leaves, sticks,
and any other debris.
�Always keep all air vents and grilles in
the passenger compartment free from
obstruction.
Item
1Left side defroster vent, fixed
2Left side air vent, adjustable
3Left center air vent, adjustable
4Thumbwheel for air volume control
for left center air vent
5Thumbwheel for air volume control
for right center air vent
6Right center air vent, adjustable
7Right side air vent, adjustable
8Right side defroster vent, fixed
9Automatic climate control panel
aLeft rear center air vent, adjustable
bRight rear center air vent, adjustable
cThumbwheel for right rear center air
vents
dThumbwheel for left rear center air
vents
Warning!G
When operating the automatic climate con-
trol, the air that enters the passenger com-
partment through the air vents can be very
hot or very cold (depending on the set tem-
perature). This may cause burns or frostbite
to unprotected skin in the immediate area of
the air vents.
Always keep sufficient distance between un-
protected parts of the body and the air
vents. If necessary, use the air distribution
adjustment (
�page 246) to direct the air to
air vents in the vehicle interior that are not
in the immediate area of unprotected skin.
Page 454 of 723
453 Controls in detail
Automatic climate control
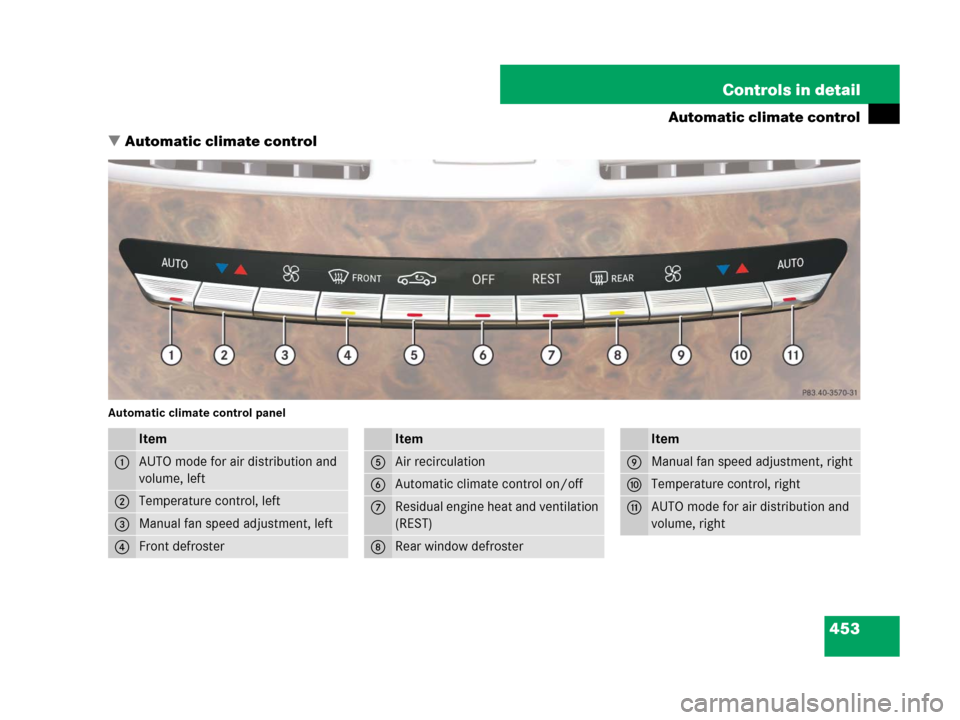
�Automatic climate control
Automatic climate control panel
Item
1AUTO mode for air distribution and
volume, left
2Temperature control, left
3Manual fan speed adjustment, left
4Front defroster
Item
5Air recirculation
6Automatic climate control on/off
7Residual engine heat and ventilation
(REST)
8Rear window defroster
Item
9Manual fan speed adjustment, right
aTemperature control, right
bAUTO mode for air distribution and
volume, right
Page 460 of 723
 up or down.
The indicator lamp on the button goes
out.Air recirculation mode with conve-
nience closing or")
459 Controls in detail
Automatic climate control
�Deactivating: Press button,
(
�page 453) up or down.
The indicator lamp on the button goes
out.Air recirculation mode with conve-
nience closing or opening feature
�Convenience closing: Press
button
, for approximately
2 seconds.
The side windows and/or tilt/sliding
sunroof will close. You can release
button
, once the closing proce-
dure has begun. The windows and
tilt/sliding sunroof continue closing
until they are fully closed. The indicator
lamp on the button comes on. The air
recirculation mode is activated.
iThe manually selected air recirculation
mode is deactivated automatically:
�after 5 minutes if the outside temperature is
below approximately 41°F (5°C)
�after 5 minutes if the air conditioning is
turned off
�after 30 minutes if the outside temperature
is above approximately 41°F (5°C)
Warning!G
Never operate the side windows and the
tilt/sliding sunroof if there is the possibility
of anyone being harmed by the closing pro-
cedure.
When using the air recirculation mode with
convenience closing feature, should the up-
ward movement of a window be blocked by
some obstruction including but not limited
to arms, hands, fingers, etc., the automatic
reversal feature will not operate.
In the event that the procedure causes po-
tential danger, the closing of the side win-
dows can be immediately halted by pressing
the respective window switch. The closing of
the tilt/sliding sunroof can be immediately
halted by moving the tilt/sliding sunroof
switch in the overhead control panel in any
direction.
The closing of the side windows and the
tilt/sliding sunroof can be reversed by again
pressing and holding button,.
��
Page 485 of 723
, vehicle model, identificat")
484 Controls in detail
Useful features
All information relevant to the emergency,
such as the location of the vehicle (deter-
mined by the GPS satellite location sys-
tem), vehicle model, identification number
and color are generated.
A voice connection between the Response
Center and the occupants of the vehicle
will be established automatically soon af-
ter the emergency call has been initiated.
The Response Center will attempt to deter-
mine more precisely the nature of the acci-
dent provided they can speak to an
occupant of the vehicle.The Tele Aid system is available if
�it has been activated and is operation-
al. Activation requires a subscription
for monitoring services, connection,
and cellular air time
�the relevant monitoring service and
GPS coverage are available and pass
the information on to the Response
Center
�there is sufficient voltage in the vehicle
batteries
iDuring the emergency call message “Emer-
gency Call Activated” is displayed, operation
from COMAND is not possible. The automatic cli-
mate control can be still adjusted using the
switches on the climate control panel.
iIf no vehicle occupant responds, an ambu-
lance will be sent to the vehicle immediately.
iLocation of the vehicle on a map is only pos-
sible if the vehicle is able to receive signals from
the GPS satellite network and pass the informa-
tion on to the Response Center.
Warning!G
If the indicator lamp in the SOS button is
flashing continuously and there was no
voice connection to the Response Center
established, then the Tele Aid system could
not initiate an emergency call (e.g. the rele-
vant mobile phone network is not available).
The message:
�“Call failed” appears in the multifunction
display for approximately 10 seconds
�A pop-up window with the message:
“Call could not be connected! Please dial
911 directly using the mobile telephone
keypad.” appears in the COMAND dis-
play. Confirm the message pressing
n
(
�page 84).
Should this occur, assistance must be sum-
moned by other means.
iDuring the emergency call the mobile phone
is switched off automatically and must be
switched back on to make a call.
iThe “911” emergency call system is a public
service. Using it without due cause is a criminal
offense.
Page 641 of 723
638 Practical hints
Opening/closing in an emergency
Power tilt/sliding sunroof
You can open or close the tilt/sliding sun-
roof manually should an electrical malfunc-
tion occur.
The drive mechanism is behind the left sun
visor.
1Cover
�Remove cover1.2Crank
�Take crank2 from the Operator’s
Manual pouch.
�Switch on the ignition (�page 336).
�Insert crank2 through the hole.
�Turn crank2 clockwise to:
�slide roof panel closed
�raise roof panel at the rear
�Turn crank2 counterclockwise to:
�slide roof panel open
�lower roof panel at the rear
iTurn crank2 slowly and smoothly.
The tilt/sliding sunroof (
�page 468) must be
synchronized after being operated manually.
Page 701 of 723

698 Index
Distance warning lamp 31, 572
Driving hints 426
Increasing distance 425
Increasing time interval 425
Intermittent signal tone 414
Lever 417
Menu 416
Messages in display 583
Sensor cover 558
Setting a higher speed 421
Setting a slower speed 422
Setting following distance 425
Setting the current speed 421
Setting to last stored speed
(“Resume” function) 423
Warning and indicator lamps 414
Document holder 476Door
Control panel 38
Entry lamps 371
Inside door handle 333
Locking 324, 330
Locking with Tele Aid 489
Messages in display 585, 612
Opening from inside vehicle 333
Opening from outside 324, 330
Power closing assist 334
Unlocking 324, 329
Unlocking with Tele Aid 489
DOT 545
Downhill driving
Cruise control 407
Drink holder see Cup holder
Drinking and driving 499
Drive-dynamic multicontour seats*
Adjusting (COMAND) 252
Drive-dynamic function
(COMAND) 255
Multicontour adjustments
(COMAND) 252Driving 378
Abroad 506
Hydroplaning 503
In winter 504
Instructions 378, 499
Problems 383
Safety systems 64
Through standing water 505
With DISTRONIC Plus* 426
Driving maneuver (COMAND) 196
Driving off 501
Driving safety systems
ABS 64
Adaptive Brake Lights
(CL 600 and USA only) 66
BAS 66
BAS Plus 67
EBP 69
Electronic traction system 71
ESP
®69
Page 710 of 723
 155
Navigation system (COMAND) 149
Basic settings 159
Destination entry 162
Destination memory 206
Detour function (COMAND) 205
Driving maneuver 19")
707 Index
N
Navigation system
Menu overview (COMAND) 155
Navigation system (COMAND) 149
Basic settings 159
Destination entry 162
Destination memory 206
Detour function (COMAND) 205
Driving maneuver 196
Hiding/showing
the menu system 157
Last destinations 213
Map display 156
Operation 156
POI entry 188
Route guidance 196
Navigation system (Instrument
cluster control system) 261
Driving maneuver 262
Navigation system (Voice Control) 285
Neutral gear position,
Automatic transmission 389, 393
New vehicle break-in 498Night View Assist* 446
Cleaning the windshield
in front of the camera 561
Dirty or fogged-up windshield 448
Image on multifunction display 447
Malfunction 449
Messages in display 622
Removing condensation 448
Switching on or off 447
Normal occupant weight 546
Number, Vehicle Identification (VIN) 675O
Occupant Classification System see OCS
Occupant distribution 546
Occupant safety 40
Air bags 42
Children and air bags 57
Children in the vehicle 57
Fastening the seat belt 360
Front passenger front
air bag off indicator lamp 50
Infant and child restraint systems 57
LATCH-type child seat anchors 61
Seat belts 44, 360
OCS 47
Self-test 51
Odometer 260
Oil
Filler neck 517
Oil level see Engine oil
One-touch gearshifting 400
Operating safety 20
Voice Control 273
Ornamental moldings, Cleaning 557
Outside temperature indicator 31, 404
Overdue maintenance service 552
Overhead control panel 37
Page:
< prev 1-8 9-16 17-24