Page 467 of 723

466 Controls in detail
Power tilt/sliding sunroof
Opening and closing power tilt/sliding
sunroof
Warning!G
When closing the tilt/sliding sunroof, make
sure that there is no danger of anyone being
harmed by the closing procedure.
If the tilt/sliding sunroof encounters an ob-
struction that blocks its path in a circum-
stance where you are closing the tilt/sliding
sunroof by moving the tilt/sliding sunroof
switch past the resistance point, or by
pressing and holding button‹on the
SmartKey, by pressing and holding the sen-
sor surface (vehicles with KEYLESS-GO*) on
the outside door handle, the automatic re-
versal function will not operate.
The opening/closing procedure of the
tilt/sliding sunroof can be immediately halt-
ed by releasing the switch or, if the switch
was moved past the resistance point and re-
leased, by moving the switch in any direc-
tion.
The tilt/sliding sunroof is made out of glass.
In the event of an accident, the glass may
shatter. This may result in an opening in the
roof.
In a vehicle rollover, occupants not wearing
their seat belts or not wearing them properly
may be thrown out of the opening. Such an
opening also presents a potential for injury
for occupants wearing their seat belts
properly as entire body parts or portions of
them may protrude from the passenger
compartment.
When leaving the vehicle, always remove the
SmartKey or SmartKey with KEYLESS-GO*
from the starter switch, take it with you, and
lock the vehicle. Do not leave children unat-
tended in the vehicle, or with access to an
unlocked vehicle. A child’s unsupervised ac-
cess to a vehicle could result in an accident
and/or serious personal injury.
!To avoid damaging the seals, do not trans-
port any objects with sharp edges which can
stick out of the tilt/sliding sunroof.Do not open the tilt/sliding sunroof if there is
snow or ice on the roof, as this could result in
malfunctions.
The tilt/sliding sunroof can be opened or closed
manually should an electrical malfunction occur
(
�page 638).
!Please keep in mind that weather conditions
can sometimes change rapidly. Make sure to
close the tilt/sliding sunroof when leaving the
vehicle. If water enters the vehicle interior, vehi-
cle electronics could be damaged which is not
covered by the Mercedes-Benz Limited
Warranty.
iWhen the tilt/sliding sunroof is open, reso-
nance noises may result in addition to the usual
wind noises. They are caused by minimal pres-
sure changes in the passenger compartment. To
reduce or eliminate these noises, change the po-
sition of the tilt/sliding sunroof or open a side
window slightly.
Page 470 of 723

469 Controls in detail
Loading and storing
�Loading and storing
Loading instructions
The total load weight including vehicle oc-
cupants and luggage/cargo should not ex-
ceed the load limit or vehicle capacity
weight as indicated on the corresponding
placard located on the driver’s door B-pillar
(
�page 523).
Storage compartments
Warning!G
Always fasten items being carried as secure-
ly as possible using cargo tie-down hooks
and fastening materials appropriate for the
weight and size of the load.
In an accident, during hard braking or sud-
den maneuvers, loose items will be thrown
around inside the vehicle and can cause in-
jury to vehicle occupants unless the items
are securely fastened in the vehicle.
To help avoid personal injury during a colli-
sion or sudden maneuver, exercise care
when transporting cargo. Put luggage or car-
go in the trunk if possible.
Do not pile luggage or cargo higher than the
seat backs. Do not place anything on the
rear-window shelf.
Never drive vehicle with trunk open. Deadly
carbon monoxide (CO) gases may enter ve-
hicle interior resulting in unconsciousness
and death.
Warning!G
To help avoid personal injury during a colli-
sion or sudden maneuver, exercise care
when storing objects in the vehicle. Put lug-
g a g e o r c a r g o i n t h e t r u n k i f p o s s i b l e . D o n o t
pile luggage or cargo higher than the seat
backs.
Parcel nets cannot secure hard or heavy ob-
jects.
Keep compartment lids closed. This will help
to prevent stored objects from being thrown
about and injuring vehicle occupants during
�braking
�vehicle maneuvers or
�an accident.
iAn overview of the storage compartments
can be found on (
�page 32).
Page 472 of 723
471 Controls in detail
Loading and storing
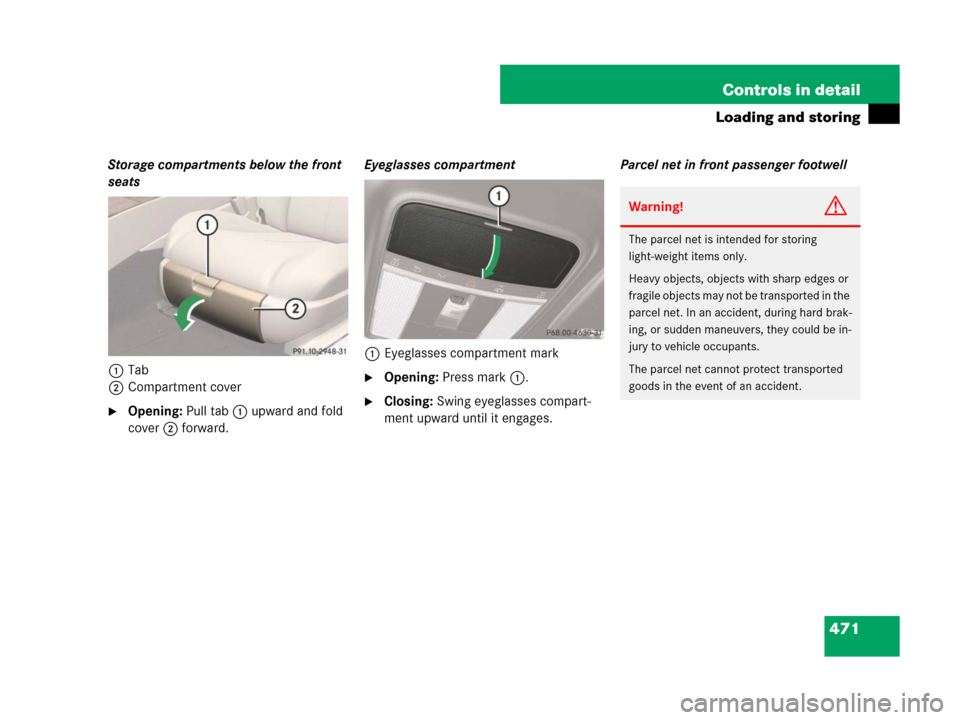
Storage compartments below the front
seats
1Tab
2Compartment cover
�Opening: Pull tab1 upward and fold
cover2 forward.Eyeglasses compartment
1Eyeglasses compartment mark
�Opening: Press mark1.
�Closing: Swing eyeglasses compart-
ment upward until it engages.Parcel net in front passenger footwell
Warning!G
The parcel net is intended for storing
light-weight items only.
Heavy objects, objects with sharp edges or
fragile objects may not be transported in the
parcel net. In an accident, during hard brak-
ing, or sudden maneuvers, they could be in-
jury to vehicle occupants.
The parcel net cannot protect transported
goods in the event of an accident.
Page 474 of 723

473 Controls in detail
Loading and storing
Rear storage box
1Handle
2Cover
�Fold down rear center armrest.
�Pull handle1 upward in the direction
of arrow.
�Swing down cover2.
Cup holders
Cup holder in front center console
1Mark
2Handle
�Opening: Press mark1 on the front.
�Closing: Fold cover in until it engages.
!Do not sit on or lean your body weight
against the armrest when it is folded down, as
you could otherwise damage it.
Warning!G
In order to help prevent spilling liquids on
vehicle occupants and/or vehicle equip-
ment, only use containers that fit into the
cup holder. Use lids on open containers and
do not fill containers to a height where the
contents, especially hot liquids, could spill
during braking, vehicle maneuvers, or in an
accident. Liquids spilled on vehicle occu-
pants may cause serious personal injury.
Liquids spilled on vehicle equipment may
cause damage not covered by the
Mercedes-Benz Limited Warranty.
When not in use, keep the cup holders
closed. An open cup holder may cause injury
to you or others when contacted during
braking, vehicle maneuvers, or in an acci-
dent.
Keep in mind that objects placed in the cup
holder may come loose during braking, vehi-
cle maneuvers, or in an accident and be
thrown around in the vehicle interior.
Objects thrown around in the vehicle interi-
or may cause an accident and/or serious
personal injury.
��
Page 476 of 723
475 Controls in detail
Loading and storing
Retainer for Operator’s Manual pouch
1Velcro strap
2Operator’s Manual pouch
Use Velcro strap1 to fasten Operator’s
Manual pouch2 in place.Umbrella holder
Depending on vehicle production date your
vehicle may equipped with an umbrella
holder. If equipped, you can attach an um-
brella to the trunk lid.
1Umbrella holder
2Umbrella
�Swing down holder1 in direction of
arrow.
�Take umbrella2 out of holder 1.
Warning!G
Do not pull on the umbrella holder when you
are closing the trunk lid. You could other-
wise injure yourself on the trunk lid.
iYou can purchase a suitable umbrella at any
authorized Mercedes-Benz Center.
Page 477 of 723

476 Controls in detail
Useful features
Sun visors
1Sun visor
2Vanity mirror cover
3Vanity mirror lamp
4Document holderGlare from front
�Swing sun visor1 down.
Glare from front and sides
�Disengage sun visor1 from the
mounting.
�Pivot sun visor1 to the side.
Vanity mirror in sun visor
�To use vanity mirror, lift up cover2.
Vanity mirror lamp3 comes on.
Document holder
You can use the plastic tab of document
holder4 to hold admission tickets, park-
ing passes, or similar items in place.
Ashtray
1Button for disengaging ashtray
2Cover plate
Warning!G
Do not use the vanity mirror while driving.
Keep the vanity mirrors in the sun visors
closed while vehicle is in motion. Reflected
glare can endanger you and others.!Close vanity mirror cover2 (if open) before
you disengage sun visor1 from the mounting
and pivot it to the side.
iIf you disengage sun visor1 from the
mounting, vanity mirror lamp2 will switch off.
Warning!G
Remove ashtray only with vehicle standing
still. Engage the electronic parking brake to
secure vehicle from movement. Set auto-
matic transmission toP. With the automatic
transmission set toP, turn off the engine.
Page 478 of 723

477 Controls in detail
Useful features
Opening ashtray
�Press mark on cover plate2 forward.
Removing ashtray insert
�Push sliding button1 to the left.
The ashtray is disengaged and slides
out a short way.
�Remove the insert from the ashtray
frame.
Reinstalling ashtray insert
�Install the insert by pushing it back into
the frame until it engages.
Closing ashtray
�Briefly press mark on cover plate2
forward.
Cigarette lighter
1Cigarette lighter
�Open the cover plate (�page 476).
�Switch on the ignition (�page 336).
�Push in cigarette lighter1.
The lighter will pop out automatically
when hot.
Warning!G
Never touch the heating element or sides of
the lighter; they are extremely hot. Hold the
knob only.
Make sure that any children traveling with
you do not injure themselves or start a fire
with the hot cigarette lighter.
When leaving the vehicle, always remove the
SmartKey or SmartKey with KEYLESS-GO*
from the starter switch, take it with you, and
lock the vehicle. Do not leave children unat-
tended in the vehicle, or with access to an
unlocked vehicle. A child’s unsupervised ac-
cess to a vehicle could result in an accident
and/or serious personal injury.
Page 479 of 723

478 Controls in detail
Useful features
Floormats*
1Retainer pin
2Eyelet
Removing
�Pull floormat off of retainer pins1.
�Remove the floormat.
Installing
�Lay down the floormat in the respective
footwell.
�Press the floormat eyelets2 onto re-
tainer pins1.
!The lighter socket can be used to accommo-
date 12V DC electrical accessories (up to a max-
imum of 85 W) designed for use with the
standard “cigarette lighter” plug type. Keep in
mind, however, that connecting accessories to
the lighter socket (for example extensive con-
necting and disconnecting, or using plugs that do
not fit properly) can damage the lighter socket.
With the socket damaged, the lighter may no
longer be able to be placed in the heating
(pushed-in) position, or the lighter may pop out
too early with the lighter not hot enough.
iIf the engine is off and the cigarette lighter is
being used extensively, the vehicle battery may
become discharged.
Warning!G
Whenever you are using floormats, make
sure there is enough clearance and that the
floormats are securely fastened.
Floormats should always be securely fas-
tened using the eyelets and the retainer
pins.
Before driving off, check that the floormats
are securely in place and adjust them if nec-
essary. A loose floormat could slip and
hinder proper functioning of the pedals.
Do not place several floormats on top of
each other as this may impair pedal
movement.
iTo install or remove the floormat more easi-
ly, move the driver’s seat or front passenger seat
as far to the rear as possible (
�page 339).