Page 83 of 723
82 Control systems
COMAND introduction
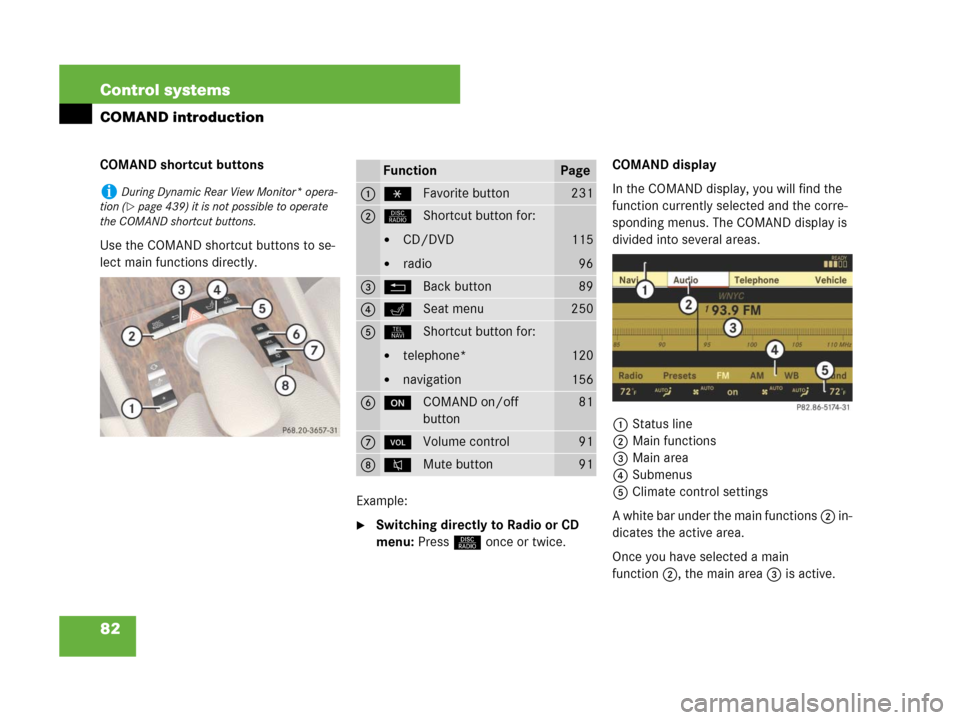
COMAND shortcut buttons
Use the COMAND shortcut buttons to se-
lect main functions directly.
Example:
�Switching directly to Radio or CD
menu: Press M once or twice.COMAND display
In the COMAND display, you will find the
function currently selected and the corre-
sponding menus. The COMAND display is
divided into several areas.
1Status line
2Main functions
3Main area
4Submenus
5Climate control settings
A white bar under the main functions 2 in-
dicates the active area.
Once you have selected a main
function2, the main area 3 is active.
iDuring Dynamic Rear View Monitor* opera-
tion (
�page 439) it is not possible to operate
the COMAND shortcut buttons.
FunctionPage
1PFavorite button231
2MShortcut button for:
�CD/DVD
�radio
115
96
3LBack button89
4OSeat menu250
5NShortcut button for:
�telephone*
�navigation
120
156
6oCOMAND on/off
button81
7,Volume control91
8FMute button91
Page 87 of 723
86 Control systems
COMAND introduction
Operating COMAND
Menu overview
The illustration below shows the structure
of the main functions and their main
menus.Each main function has a main menu. Each
menu item in turn has several submenu
items.
NaviPageAudioPageTelephone*PageVehiclePage
Commands/menus
Map Display159FM/AM Radio95Telephone*120Exterior Lighting Delayed Switch-off235
Mode161Sat Radio
(USA only)100Address Book*214Locator Lighting236
CD107Telephone OFF*122Exterior Mirror Convenience Settings237
DVD-Audio107Automatic Locking238
MP3107Easy Entry/Exit Feature239
Audio OFF94Interior Lighting Delayed Switch-off241
Interior Ambient Light240
Rear Window Sunshade*242
Trunk Opening-height Restriction*242
Tow-away Alarm243
Page 90 of 723

89 Control systems
COMAND introduction
Back button
1Back button
�Switching to the next highest menu:
Press L briefly.
COMAND switches to the next highest
menu level within the currently active
operating mode.
�Switching to the main menu: Press
and hold L.
You will hear a signal, and COMAND
switches to the main menu of the cur-
rently active operating mode.Example of how to use COMAND
In the descriptions below, the main func-
tions always serve as the starting point for
locating the individual menu items.
Example:
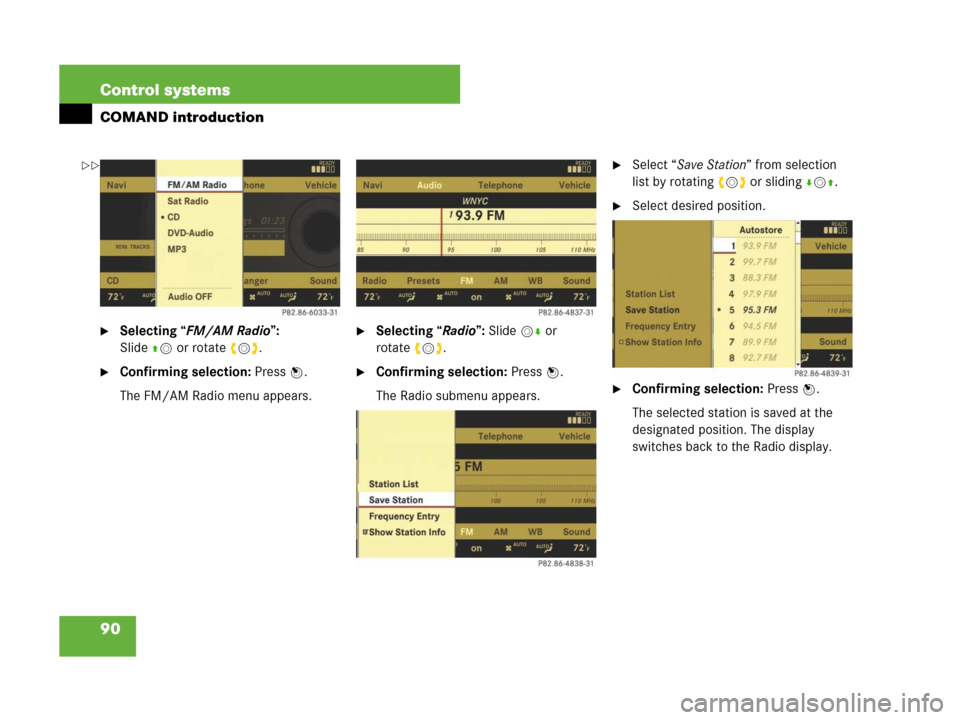
“Audio” � “Audio” � “FM/AM Radio” �
“Radio” � “Save Station”
If you already see one of the submenus on
the screen (e.g. the “Audio” � “Audio” �
“Radio” submenu), it is not necessary to
perform the first steps.
The individual steps for the above-men-
tioned example are described below.
�Switching to the main function line:
Slide qm.
�Selecting “Audio” main function:
Slideompor rotate ymz.
�Confirming selection: Press n.
The audio operating mode last selected
appears.
�Selecting “Audio” in the main menu:
Slide qm.
�Confirming selection: Press n.
A selection list with the functions of the
“Audio” main menu appears.
iIn the COMAND display, you will see the
submenu previously called up for each main
menu.
��
Page 91 of 723
90 Control systems
COMAND introduction
�Selecting “FM/AM Radio”:
Slideqmor rotate ymz.
�Confirming selection: Press n.
The FM/AM Radio menu appears.
�Selecting “Radio”: Slide mror
rotateymz.
�Confirming selection: Press n.
The Radio submenu appears.
�Select “Save Station” from selection
list by rotating ymz or sliding rmq.
�Select desired position.
�Confirming selection: Press n.
The selected station is saved at the
designated position. The display
switches back to the Radio display.
��
Page 93 of 723

92 Control systems
COMAND introduction
Volume of navigation announcements
You can adjust the volume of the naviga-
tion announcements independently from
the volume of the respective audio source.
During a navigation announcement:
�turn thumbwheel,
or
�pressæ or ç on the multifunc-
tion steering wheel.
Adjusting volume for telephone calls
In hands-free mode, you can adjust the vol-
ume of a telephone call while the call is
currently active.
During a telephone call:
�turn thumbwheel,
or
�pressæ or ç on the multifunc-
tion steering wheel.Selecting sound settings
You can select different sound settings for
each individual audio source. The respec-
tive sound menu can be found via the sub-
menu for which you wish to make settings.
Example:
“Audio” � “Audio” � “FM/AM Radio” �
“Sound” Adjusting treble or bass
�Select “Sound” � “Treble” or “Bass”.
The setting last selected is indicated by
an outlined bar.
Adjusting treble and bass
1Setting last selected
2Current setting
�Changing setting: Slide rmq or
rotateymz until desired treble or bass
setting is reached.
�Exiting menu: Press n, L or
slideomp.
The setting is saved.
Page 94 of 723

93 Control systems
COMAND introduction
Adjusting balance or fader
Balance is used to determine whether the
sound focus should be shifted toward the
driver’s side or the passenger’s side.
Fader is used to determine whether the
sound focus should be shifted toward the
front or rear of the vehicle
�Select “Sound” � “Balance/Fader”.
The setting last selected is indicated by
an outlined bar.
Adjusting balance and fader
1Current setting indicated by orange
cross-hair symbol
�Changing setting: Slide rmq or omp
until desired balance/fader setting is
reached.
�Exiting menu: Press n or L.
The setting is saved.
Surround sound
With surround sound, you can choose be-
tween “LOGIC7
® ON” and “LOGIC7® OFF”.
Harman/kardon LOGIC7
® surround sound
is available for the following operating
modes:
�Audio DVD (MLP, DTS, PCM, and Dolby
Digital audio formats)
�Audio CD
�MP3
�Radio (FM, AM, WB,
Satellite (USA only))
�PCMCIA
iSince some DVDs contain both stereo as
well as multi-channel audio formats, it may be
necessary to adapt the audio format
(
�page 119).
iThe “LOGIC7® ON” function of the har-
man/kardon LOGIC7® surround sound system
makes it possible to play discrete 5.1 and stereo
recordings with optimal surround sound for ev-
ery passenger. Music on CDs or audio DVDs with
high-resolution surround formats such as MLP,
DTS or Dolby Digital is played back optimally.
For an ideal sound experience on all seats,
LOGIC7
® distributes 5.1 surround information
via the 13-channel system architecture. The re-
sult is a sound as intended by the sound engi-
neers during the original recording.
harman/kardon LOGIC7
® converts all two-chan-
nel stereo sound material into multi-channel sur-
round sound. With the help of LOGIC7
®,
surround information stored during the original
recording are read out and distributed through
the 13 channels. No effects are created during
this process; only that which was already there
becomes audible.
In addition, harman/kardon LOGIC7
® moves the
perceived sound source away from the individual
loudspeakers, thus generating a natural 360°
sound experience for every passenger.
Page 95 of 723

94 Control systems
COMAND introduction
Adjusting surround sound
With surround sound, you can choose be-
tween “LOGIC7
® ON” and “LOGIC7® OFF”.
�Select “Sound” � “3D Sound”.
Adjusting surround sound
1Current setting
�Selecting a setting: Slidermq or
rotateymz.
�Saving setting: Press n.
The setting is saved and the menu is
closed.
�Exiting menu without saving chang-
es: Press L or slide omp.Switching off/on the audio source
�Switching off: Select “Audio” � “Au-
dio” � “Audio OFF”.
The audio source is switched off; “Au-
dio OFF” appears in the display.
�Switching on: Select “Audio”, then the
desired audio source.
or
�Load CD/DVD (�page 111) or a
PCMCIA card (
�page 112).
iBy selecting “LOGIC7® OFF”, all compatible
formats as they are present on the medium are
played back. Due to the vehicle’s spatial charac-
teristics, an optimal sound experience is not en-
sured on all seats.
iPlease note the following:
�For an ideal sound experience at all seats,
the balance and fader should be adjusted to
the center of the passenger compartment
with LOGIC7
® switched on.
�The best sound results are achieved by play-
ing high-quality audio CDs and audio DVDs.
�For MP3 tracks, the bit rate should be at
least 128 kbit/s.
�Surround sound does not function for
mono-signal sources.
�In the event of poor radio reception quality,
e.g. inside a tunnel, you should switch off
LOGIC7
®, as a dynamic switch from Stereo
to Mono could occur, resulting in temporary
sound distortion.
�With some stereo recordings, the resulting
sound may deviate from conventional stereo
playback.
iWhen you insert an audio CD or audio DVD,
it automatically becomes the active audio
source.
Page 96 of 723
95 Control systems
COMAND FM/AM radio
�COMAND FM/AM radio
Submenu overview
Warning!G
Please devote your attention first and fore-
most to the traffic situation you are in.
Before your journey, please familiarize your-
self with the radio functions.
Only use the COMAND when road and traffic
conditions permit you to do so. Otherwise
you could be involved in an accident in
which you or others could be injured.
iThe components and operating principles of
COMAND can be found on (
�page 81).
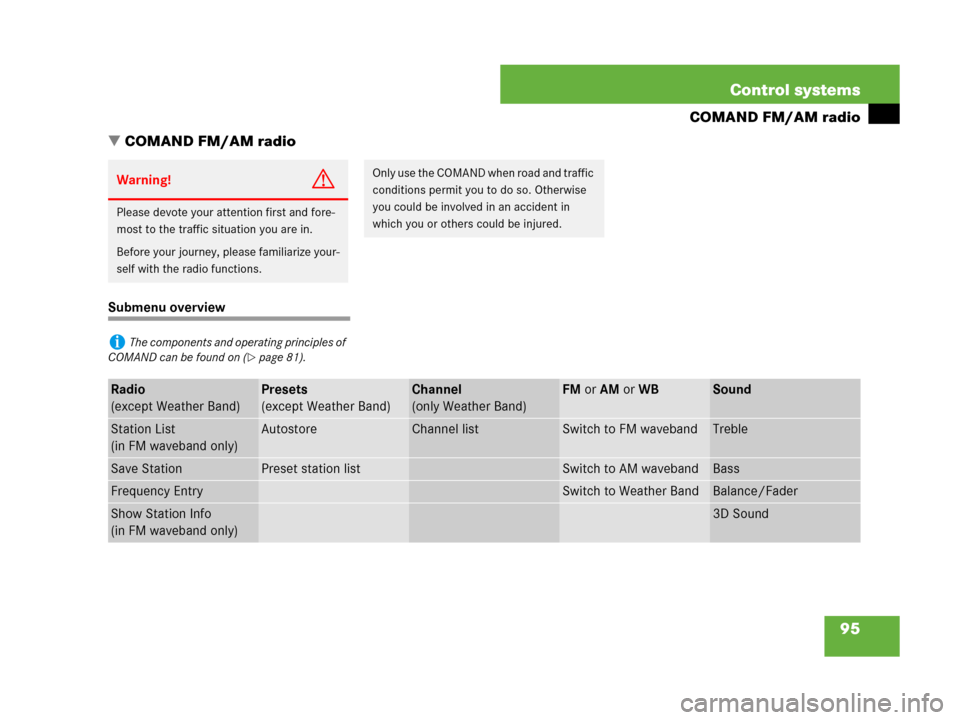
Radio
(except Weather Band)Presets
(except Weather Band)Channel
(only Weather Band)FM or AM or WBSound
Station List
(in FM waveband only)AutostoreChannel listSwitch to FM wavebandTreble
Save StationPreset station listSwitch to AM wavebandBass
Frequency EntrySwitch to Weather BandBalance/Fader
Show Station Info
(in FM waveband only)3D Sound