Page 633 of 723
630 Practical hints
What to do if …?
Display Possible cause/consequencePossible solution
Wheel sensor(s)
missingOne or more sensors malfunction (e.g. bat-
tery in one or more wheel sensor is empty).
One or more wheels without wheel sensors
mounted (e.g. spare tire).
No pressure value is shown on the multi-
function display for the tire in question.�Have the Advanced TPMS checked by an
authorized Mercedes-Benz Center.
�Have the wheel sensors installed by an
authorized Mercedes-Benz Center.
The tire pressure for the respective tire is
shown in the multifunction display after a few
minutes driving.
Tire pressure
Please rectifyAdvanced TPMS:
The pressure is too low in one or more tires.
Or the tire pressures of the individual
wheels differ too radically from one
another.�Check and adjust tire inflation pressure as
required (
�page 534).
Page 635 of 723

632 Practical hints
Where will I find ...?
First aid kit
The first aid kit is located in the storage
compartment under the front passenger
seat.
1Tab
2Cover
�Pull tab1 upward.
�Fold the covering forward in the direc-
tion of arrow.
�Remove the first aid kit.
Vehicle jack, vehicle tool kit, luggage
bowl, Minispare wheel
The vehicle jack, Minispare wheel, the ve-
hicle tools, and the luggage bowl are
stored in the compartment underneath the
trunk floor.
�Lift up trunk floor cover and engage
trunk floor handle in upper edge of
trunk.
You can now remove the tools and ac-
cessories.The vehicle tool kit includes:
�One towing eye bolt
�One wheel wrench
�One alignment bolt
�One pair of gloves
�One fuse extractor
�One fuse chart
�Spare fuses
�One collapsible wheel chock
�Release tool for mechanically releasing
the electronic parking brake
The spare wheel bolts are fixed at the
Minispare wheel.
!Always keep the storage compartment un-
der the front passenger seat closed while the ve-
hicle is in motion.
iCheck expiration dates and contents for
completeness at least once a year and replace
missing/expired items.
!To prevent damage, always disengage trunk
floor handle from trunk lid and lower trunk floor
before closing the trunk.
Page 636 of 723

633 Practical hints
Where will I find ...?
Vehicle jack
Storage position
�Remove vehicle jack from its
compartment.
�Turn crank handle in direction of arrow
as far as it will go.
Operational position
�Turn crank handle clockwise.
Before storing the vehicle jack in its
compartment:
�It should be fully collapsed.
�The handle must be folded in (storage
position).
Warning!G
The jack is designed exclusively for jacking
up the vehicle at the jack take-up brackets
built into both sides of the vehicle. To help
avoid personal injury, use the jack only to lift
the vehicle during a wheel change. Never
get beneath the vehicle while it is supported
by the jack. Keep hands and feet away from
the area under the lifted vehicle. Always
firmly engage the electronic parking brake
and block wheels before raising vehicle with
jack.
Do not disengage electronic parking brake
while the vehicle is raised. Be certain that
the jack is always vertical (plumb line) when
in use, especially on hills. Always try to use
the jack on level surface. Make sure the jack
arm is fully seated in the jack take-up brack-
et. Always lower the vehicle onto sufficient
capacity jackstands before working under
the vehicle.
Page 637 of 723
634 Practical hints
Where will I find ...?
Minispare wheel
The Minispare wheel is stored in the com-
partment underneath the trunk floor.
1Minispare wheel with spare wheel bolts
in container on wheel rim
2Luggage bowl
3Vehicle tool kit, jack and collapsible
wheel chock
Removing the Minispare wheel
�Turn luggage bowl2 counterclock-
wise.
�Remove luggage bowl2 and vehicle
tool kit3.
�Remove Minispare wheel1.
Setting up the collapsible wheel chock
The collapsible wheel chock serves to
additionally secure the vehicle, e.g. while
changing the wheel.
1Tilt the plates upward
2Fold the lower plate outward
3Insert the plate�Tilt both plates upward1.
�Fold the lower plate outward2.
�Guide the tabs of the lower plate all the
way into the openings of the base
plate3.
For information on where to place wheel
chocks when changing a wheel, see “Lift-
ing the vehicle” (
�page 650).
Page 640 of 723

637 Practical hints
Unlocking/locking in an emergency
Mechanically releasing the electronic
parking brake
The mechanical release device for the
electronic parking brake is behind the fuel
filler flap next to the fuel cap.
1Protective cap
2Release tool
3Pulling
�Shift the automatic transmission to P
(
�page 389).
�Prevent the vehicle from rolling away
by blocking a rear wheel with the wheel
chock. A wheel chock is included with
the vehicle tool kit (
�page 632).
�Open the fuel filler flap (�page 509).
�Remove protective cap1.
�Screw release tool2 from vehicle tool
kit clockwise 2 to 3 rotations onto re-
lease cable.
�Pull release tool2 in direction of
arrow3.
The electronic parking brake is re-
leased. The red indicator lamp 0
(USA only) or ! (Canada only) flash-
es. The message “Parking brake See
Oper. Manual” appears in the multi-
function display.
�Unscrew release tool2 from release
cable.
�Reattach protective cap1.
�Store release tool2 in vehicle tool kit.
After the electronic parking brake has
been released, you can engage it again.
�Press the electronic parking brake
handle (
�page 384).
Warning!G
If you mechanically release the electronic
parking brake, the vehicle may start to move
on its own. Make sure that no one is in front
of or behind the vehicle. Otherwise, an acci-
dent could occur resulting in injury or fatali-
ty. Before releasing the electronic parking
brake, shift the automatic transmission to P
(
�page 389) and secure your vehicle in
place using the chock from the vehicle tool
kit.
iIf the electronic parking brake is not re-
leased, pull the release tool again with more
force.
Page 652 of 723

649 Practical hints
Flat tire
�Flat tire
Preparing the vehicle
�Park the vehicle in a safe distance from
moving traffic on a hard, flat surface
when possible.
�Turn on the hazard warning flashers.
�Turn the steering wheel so that the
front wheels are in a straight ahead
position.
�Shift the automatic transmission toP
(
�page 389).
�Turn off the engine (�page 387).
�Remove the SmartKey from the starter
switch.
Vehicles with SmartKey with
KEYLESS-GO*:
�Turn off the engine by pressing the
KEYLESS-GO* button once
(
�page 388).
�Open the driver’s door (this puts
the starter switch in position0,
same as with the SmartKey re-
moved from the starter switch). The
driver’s door then can be closed
again.
�Have any passenger exit the vehicle at
a safe distance from the roadway.
Mounting the Minispare wheel
iOpen the door only when conditions are safe
to do so.
Warning!G
The dimensions of the Minispare wheel are
different from those of the road wheels. As
a result, the vehicle handling characteristics
change when driving with a Minispare wheel
mounted. Adapt your driving style accord-
ingly.
The Minispare wheel is for temporary use
only. When driving with Minispare wheel
mounted, ensure proper tire inflation
pressure and do not exceed a vehicle speed
of 50 mph (80 km/h).
Contact the nearest Mercedes-Benz Center
as soon as possible to have the Minispare
wheel replaced with a regular road wheel.
Never operate the vehicle with more than
one Minispare wheel mounted.
Do not switch off the ESP
® when a Minis-
pare wheel is mounted.
Page 653 of 723
.
�Take vehicle tool kit and vehicle jack
out of trunk (
�page 632).
�Take the Minispare wheel and w")
650 Practical hints
Flat tire
Preparing the vehicle
�Prepare the vehicle as described
(
�page 649).
�Take vehicle tool kit and vehicle jack
out of trunk (
�page 632).
�Take the Minispare wheel and wheel
bolts out of the trunk (
�page 634).Lifting the vehicle
�Prevent the vehicle from rolling away
by blocking wheels with wheel chocks
or other sizeable objects.
One wheel chock is included with the
vehicle tool kit (
�page 634).
When changing wheel on a level surface:
�Place the wheel chock in front of and
another sizeable suitable object behind
the wheel that is diagonally opposite to
the wheel being changed.
Always try lifting the vehicle using the jack
on a level surface. However, should cir-
cumstances require you to do so on a hill,
place the wheel chock and another size-
able suitable object as follows:
�Place the wheel chock and another
sizeable suitable object on the downhill
side blocking both wheels of the axle
not being worked on.
Warning!G
The jack is designed exclusively for jacking
up the vehicle at the jack take-up brackets
built into both sides of the vehicle. To help
avoid personal injury, use the jack only to lift
the vehicle during a wheel change. Never
get beneath the vehicle while it is supported
by the jack. Keep hands and feet away from
the area under the lifted vehicle. Always en-
gage the electronic parking brake and block
wheels before raising vehicle with jack.
Do not disengage electronic parking brake
while the vehicle is raised. Be certain that
the jack is always vertical (plumb line) when
in use, especially on hills. Always try to use
the jack on level surface. Make sure the jack
arm is fully seated in the jack take-up brack-
et. Always lower the vehicle onto sufficient
capacity jackstands before working under
the vehicle.
Page 654 of 723
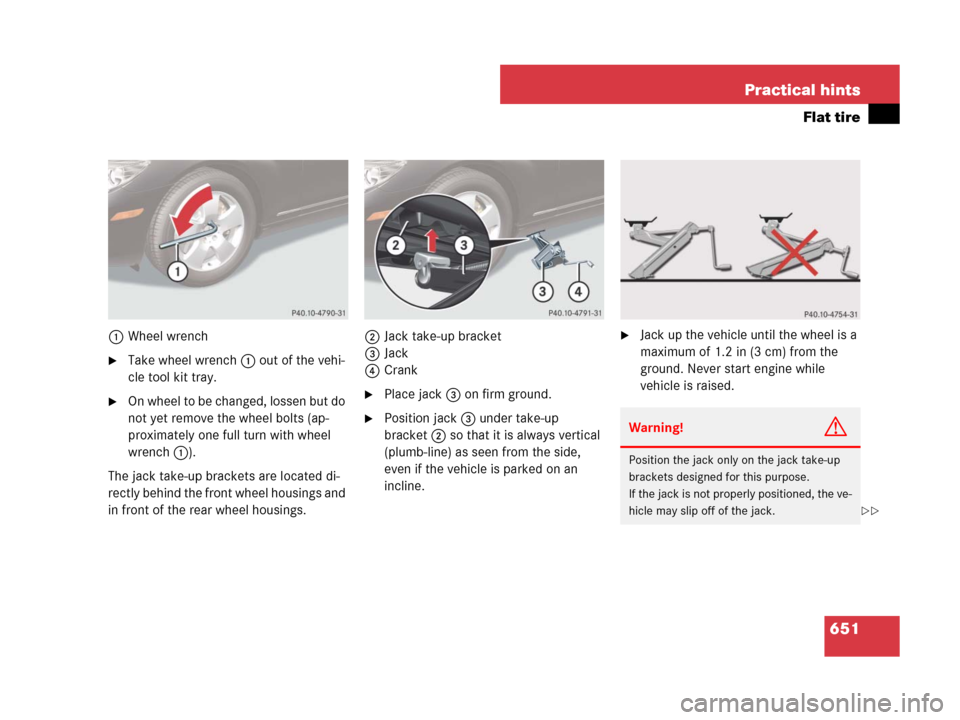
651 Practical hints
Flat tire
1Wheel wrench
�Take wheel wrench 1 out of the vehi-
cle tool kit tray.
�On wheel to be changed, lossen but do
not yet remove the wheel bolts (ap-
proximately one full turn with wheel
wrench1).
The jack take-up brackets are located di-
rectly behind the front wheel housings and
in front of the rear wheel housings.2Jack take-up bracket
3Jack
4Crank�Place jack3 on firm ground.
�Position jack3 under take-up
bracket2 so that it is always vertical
(plumb-line) as seen from the side,
even if the vehicle is parked on an
incline.
�Jack up the vehicle until the wheel is a
maximum of 1.2 in (3 cm) from the
ground. Never start engine while
vehicle is raised.
Warning!G
Position the jack only on the jack take-up
brackets designed for this purpose.
If the jack is not properly positioned, the ve-
hicle may slip off of the jack.
��

missingOne or more sensors malfunction (e.g. bat-
tery in one or more wheel sensor is empty).")