Page 237 of 723

236 Control systems
COMAND vehicle menu
�Selecting length of time: Slide qmr
or rotate ymz.
�Confirming selection: Press n.
To activate night security illumination:
�Select delayed switch-off period (see
above).
�Turn the exterior lamp switch to
position* before turning off the en-
gine.
Locator lighting on/off
With the locator lighting feature activated
and the exterior lamp switch in position
*(
�page 363), the following lamps will
switch on during darkness when the vehi-
cle is unlocked from the outside:
�Parking lamps
�Tail lamps
�License plate lamps
�Front fog lamps
�Door entry lamps in the mirror
�Side marker lamps
The locator lighting switches off when the
driver’s door is opened.
If you do not open a door after unlocking
the vehicle with the SmartKey, the lamps
will switch off automatically after approxi-
mately 40 seconds.
�Select “Vehicle”.
The main area is active.
�Selecting “Locator Lighting” func-
tion: Slide omp or rotate ymz.
�Confirming selection: Press n.
�Switching locator lighting on or off:
Press n.
or
�Select “Vehicle” � “Vehicle” � “Loca-
tor Lighting”.
A checkmark appears when the locator
lighting is switched on.
iThe components and operating principles of
COMAND can be found on (
�page 81).
��
Page 238 of 723

237 Control systems
COMAND vehicle menu
�Confirming selection: Press n.
To activate locator lighting:
�Make sure the function “Locator Light-
ing” is set.
�Turn the exterior lamp switch to
position* when exiting the vehicle.
Exterior mirror convenience settings
In the “Exterior Mirror Convenience Set-
tings” menu, you can switch the following
exterior mirror functions on or off:
�Exterior mirrors automatically fold in
when the vehicle is locked
�Exterior mirror on front passenger’s
side automatically tilts downward
when the vehicle is reversing
�Select “Vehicle”.
The main area is active.
�Selecting “Exterior Mirror Conve-
nience Settings” menu: Slide omp or
rotate ymz.
�Confirming selection: Press n.
�Selecting “Fold in automatically
when locking” or “Lower mirror
when reversing”: Rotateymz.
�Confirming selection: Press n.
�Slide omp to exit.
or
�Select “Vehicle” � “Vehicle” � “Exte-
rior mirror Convenience Settings”.
A selection list appears.
iThe components and operating principles of
COMAND can be found on (
�page 81).
��
Page 241 of 723
240 Control systems
COMAND vehicle menu
�Confirming selection: Press n.
A selection list appears.
The current setting is indicated by a
dotR.
�Selecting a setting: Slide qmr or
rotateymz.
�Confirming selection: Press n.
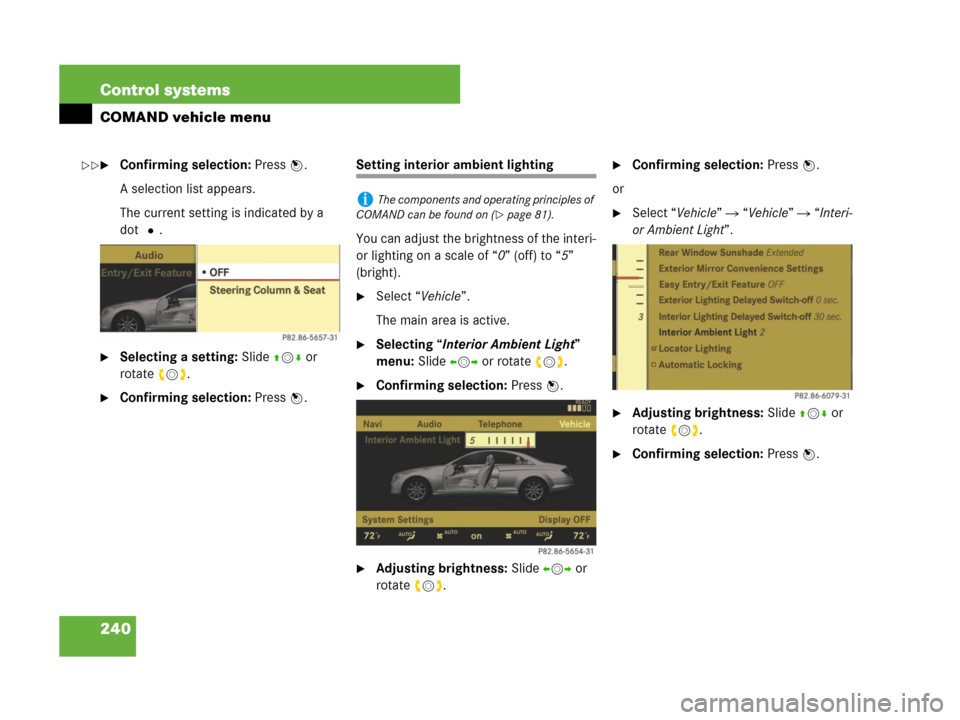
Setting interior ambient lighting
You can adjust the brightness of the interi-
or lighting on a scale of “0” (off) to “5”
(bright).
�Select “Vehicle”.
The main area is active.
�Selecting “Interior Ambient Light”
menu: Slide omp or rotate ymz.
�Confirming selection: Press n.
�Adjusting brightness: Slide omp or
rotate ymz.
�Confirming selection: Press n.
or
�Select “Vehicle” � “Vehicle” � “Interi-
or Ambient Light”.
�Adjusting brightness: Slide qmr or
rotate ymz.
�Confirming selection: Press n.
iThe components and operating principles of
COMAND can be found on (
�page 81).
��
Page 242 of 723

241 Control systems
COMAND vehicle menu
Setting interior lighting delayed
switch-off
Use this function to set whether and how
long you would like the interior lighting to
remain lit during darkness after you have
removed the SmartKey from the starter
switch.
You can select:
�“0 sec.”, the delayed switch-off feature
is deactivated
�“15 sec.”, “30 sec.”, “45 sec.”, or
“60 sec.”, the delayed switch-off fea-
ture is activated
�Select “Vehicle”.
The main area is active.
�Selecting “Interior Lighting Delayed
Switch-off” menu: Slide omp or
rotateymz.
�Confirming selection: Press n.
A selection list appears.
The current setting is indicated by a
dotR.
�Selecting length of time: Slide qmr
or rotate ymz.
�Confirming selection: Press n.
or
�Select “Vehicle” � “Vehicle” � “Interi-
or Lighting Delayed Switch-off”.
A selection list appears.
The current setting is indicated by a
dotR.
�Selecting length of time: Slide qmr
or rotate ymz.
�Confirming selection: Press n.
iThe components and operating principles of
COMAND can be found on (
�page 81).
Page 272 of 723

�switch the additional speedometer on")
271 Control systems
Instrument cluster control system
Settings menu
In the “Settings” menu, you can:
�switch the daytime running lamps on or
off (USA only)
�switch the additional speedometer on
or off
�switch the radar sensors* on or off
(USA only)
Setting daytime running lamp mode
(USA only)
�Press ( or & to select the “Set-
tings” menu.
�Press % or $ to select the “Day-
time driving lamps” function.
�Press #.
�Press # again if you would like to
change the current status.
Depending on the previous status, the
daytime running lamps will be switched
on or off.
With “Daytime driving lamps” mode select-
ed and the exterior lamp switch at position
M or *, the low beam headlamps
are switched on when the engine is run-
ning.
In low ambient light conditions the follow-
ing lamps will switch on additionally:
�Parking lamps
�Tail lamps
�License plate lamps
�Side marker lamps
For more information on the daytime run-
ning lamp mode (
�page 365).Showing or hiding additional speedom-
eter
You can have an additional digital speed-
ometer shown on the multifunction dis-
play. The speed is shown in the unit of
kilometers/hour (USA) or miles/hour
(Canada).
�Press ( or & to select the “Set-
tings” menu.
�Press % or $ to select the “Add.
speedometer” function.
�Press #.
�Press # again if you would like to
change the current status.
Depending on the previous status, the
additional speedometer will be
switched on or off.
iThe menu overview can be found on
(
�page 258).
iThis function is not available in countries
where the daytime running lamp mode is manda-
tory and therefore in a constant mode.
iIf you turn the exterior lamp switch to anoth-
er position, the corresponding lamp(s) will
switch on.
iMake sure that the light switch is set
toB or * when you switch off the day-
time running lamps while driving at night.
Page 286 of 723

285 Control systems
Voice Control navigation
�Voice Control navigation
Important notes
Warning!G
For safety reasons, you should only select a
destination when the vehicle is stationary.
While the navigation system provides direc-
tional assistance, the driver must remain fo-
cused on safe driving behavior, especially
attention to traffic and street signs, and
should utilize the system’s audio cues while
driving.
The navigation system does not supply any
information on stop signs, yield signs, traffic
regulations or traffic safety rules. Their ob-
servance always remains in the driver’ per-
sonal responsibility. DVD maps do not cover
all areas nor all routes within an area.
Traffic regulations always have priority over
any route recommendations given.
Bear in mind that at a speed of just 30 mph
(approximately 50 km/h), your vehicle is
covering a distance of 44 feet
(approximately 13.5 m) every second.
During route guidance, you will not receive
information on:
�traffic lights
�stop and yield signs
�parking or stopping zones
�one-way streets
�narrow bridges, or
�other traffic regulation data.
You should therefore always strictly observe
traffic regulations while driving. Drive care-
fully and always obey traffic laws and road
signs, even if they contradict navigation sys-
tem instructions.
Warning!G
Please do not use the Voice Control System
in an emergency, as the tone of your voice
may change in a stressful situation. This
could cause a delay in completing your
phone call in a timely manner. This could
distract you in an emergency situation and
cause you to be involved in an accident.
Warning!G
Navigation announcements are intended to
direct you while driving without diverting
your attention from the road and driving.
Please always use this feature instead of
consulting the map display for directions.
Consulting the symbols or map display for
directions may cause you to divert your at-
tention from driving and increase your risk
of an accident.
Page 322 of 723
321 Controls in detail
Locking and unlocking
Starter switch positions
Seats
Steering wheel
Mirrors
Memory function
Fastening the seat belts
Lighting
Windshield wipers
Power windowsDriving and parking
Automatic transmission
Instrument cluster
Driving systems
Air vents
Automatic climate control
Trunk
Power tilt/sliding sunroof
Loading and storing
Useful features
Page 324 of 723

323 Controls in detail
Locking and unlocking
iWhen you open a door, the side windows on
that side lowers slightly. Once you close the
door, the window moves up again.
!The side windows will not open or close if
the battery is discharged or the windows are cov-
ered with ice. As a result, you may no longer be
able to properly close the door. Do not attempt
to force the door shut. Doing so may damage the
door or the side window. Correct the condition
that prevents the windows from operating before
attempting to close the door.
iUSA only:
This device complies with Part 15 of the FCC
Rules. Operation is subject to the following two
conditions:
(1) This device may not cause harmful interfer-
ence, and
(2) this device must accept any interference
received, including interference that may
cause undesired operation.
Any unauthorized modification to this device
could void the user’s authority to operate the
equipment.
iCanada only:
This device complies with RSS-210 of Industry
Canada. Operation is subject to the following
two conditions:
(1) This device may not cause interference, and
(2) this device must accept any interference
received, including interference that may
cause undesired operation of the device.
Any unauthorized modification to this device
could void the user’s authority to operate the
equipment.
iYou can also open and close the side
windows and tilt/sliding sunroof using the
SmartKey, see “Summer opening feature”
(
�page 376) and see “Convenience closing fea-
ture” (
�page 376).
!If you cannot lock or unlock the vehicle with
the SmartKey, then either the batteries in the
SmartKey are discharged, the SmartKey is mal-
functioning or the vehicle batteries are drained.
�Check the batteries in the SmartKey and re-
place them if necessary (
�page 639).
�Use the mechanical key to unlock the driv-
er’s door (
�page 635) and trunk
(
�page 636).
�Have the vehicle batteries and their connec-
tions checked (
�page 655).
If the SmartKey is malfunctioning, contact
Roadside Assistance or an authorized
Mercedes-Benz Center.