Page 350 of 723

349 Controls in detail
Seats
Rear seat head restraintsFolding head restraints back
The rear seat head restraints can be folded
backward for increased visibility.
1Switch in the front center console
�Switch on the ignition (�page 336).
�Press switch1 in the front center con-
sole briefly.
The rear seat head restraints will fold
backward.
Warning!G
For safety reasons, always drive with the
rear head restraints in the upright position
when the rear seats are occupied.
Otherwise, the back of the head will not be
supported in the event of a collision. That
could cause serious or even fatal injuries.
Rear seat occupants can be seriously in-
jured or killed.
Warning!G
Keep the area around head restraints clear
of articles (e.g. clothing) to not obstruct the
folding operation of the head restraints.
iYou can fold back the rear seat head
restraints,
�with the switch in front center console.
When the rear seat head restraint is in folded
position and a rear seat belt will be fastened,
the respective rear head restraint automati-
cally places upright.
�with fastened rear seat belt and rear seat
head restraint automatically placed upright,
by pressing the switch in the center console
again.
Page 351 of 723
350 Controls in detail
Seats
Placing head restraints upright
�Switch on the ignition (�page 336).
�Press and hold switch1 in the front
center console (
�page 349).
The rear seat head restraints will place
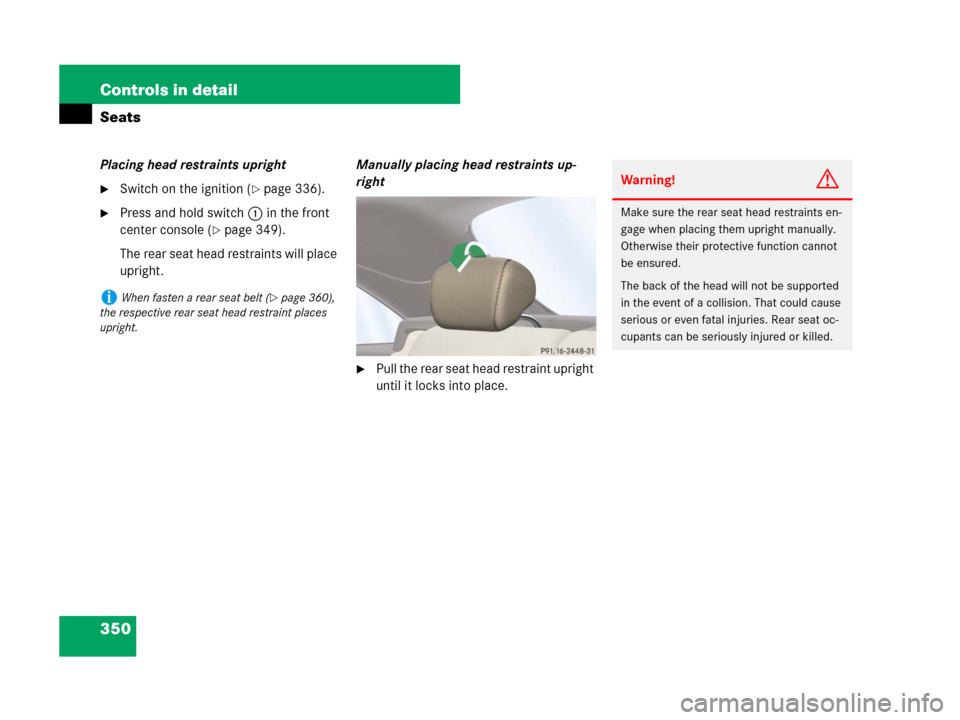
upright.Manually placing head restraints up-
right
�Pull the rear seat head restraint upright
until it locks into place.
iWhen fasten a rear seat belt (�page 360),
the respective rear seat head restraint places
upright.
Warning!G
Make sure the rear seat head restraints en-
gage when placing them upright manually.
Otherwise their protective function cannot
be ensured.
The back of the head will not be supported
in the event of a collision. That could cause
serious or even fatal injuries. Rear seat oc-
cupants can be seriously injured or killed.
Page 372 of 723

371 Controls in detail
Lighting
Courtesy lighting
For better orientation in the dark, courtesy
lamps will illuminate the interior of your ve-
hicle as follows:
With parking lamps switched on:
�the door handles
�the driver and passenger footwells
With the SmartKey in the starter switch
position1:
�the door handles
�the center console
Door entry lamps
For better orientation in the dark, the cor-
responding door entry lamps will switch on
in darkness when you open a door and the
automatic control is activated.
The door entry lamps switch off when the
corresponding door is closed.Trunk lamp
The trunk lamp switches on if the trunk is
opened.
If the trunk remains open, the trunk light-
ing switches off automatically after ap-
proximately 10 minutes.
iIf you turn the SmartKey in the starter
switch to position0 and switch off the exterior
headlamps, the door handle lamps will remain lit
for approximately 5 minutes.
iIf you turn the SmartKey in the starter
switch to position0 and switch off the exterior
headlamps, the door entry lamps will remain lit
for approximately 5 minutes.
Page 453 of 723
.
�Closing: Turn thumbwheels 4 and 5
downward.
Side air vents
�Op")
452 Controls in detail
Air vents
Opening and closing air vents
Center air vents
�Opening: Turn thumbwheels 4
and5 upward (
�page 450).
�Closing: Turn thumbwheels 4 and 5
downward.
Side air vents
�Opening: Turn thumbwheels next to
side air vents2 and7 upward
(
�page 450).
�Closing: Turn thumbwheels down-
ward.
Rear center console air vents
�Increasing/decreasing air volume:
Turn thumbwheelc or d to the left
or right (
�page 450).
Ventilated storage compartment
The storage compartment under the front
armrest can be ventilated when the auto-
matic climate control is switched on.
1Switching ventilation off
2Switching ventilation on
The air volume is dependent on the setting
of:
�air distribution control
�air volume control
�air vents in the dashboard
The air temperature is about the same as
that of the dashboard air vents. It cannot
be regulated separately.
iFor draft-free ventilation, move the sliders
for the center air vents 3 and 6 (
�page 450)
to the middle position.
iThe temperature at the air ventsa andb
(
�page 450) for rear passenger compartment
will be approximately the same as at the dash-
board center air vents.
!Extreme temperatures can occur in the stor-
age compartment. Switch off the air vents in the
storage compartment while the heating is
switched on if you are transporting heat-sensi-
tive items in the compartment.
Keep the air vents free of obstruction.
Page 457 of 723
 in the center con-
sole or COMAND (
�page 245) to sepa-
rately adjust the air tempe")
456 Controls in detail
Automatic climate control
Setting temperature
Use temperature controls %$
2anda (
�page 453) in the center con-
sole or COMAND (
�page 245) to sepa-
rately adjust the air temperature on each
side of the passenger compartment. You
should raise or lower the temperature set-
ting in small increments, preferably start-
ing at 72°F (22°C). The automatic climate
control will adjust to the set temperature
as fast as possible.
�Press temperature control %$
2and/ora (
�page 453) upward or
downward.
The climate control system will corre-
spondingly adjust the interior air tem-
perature.
Adjusting air volume
Use buttonsQ (
�page 453) in the cen-
ter console or COMAND to separately ad-
just the air volume on each side of the
passenger compartment.
�Press buttonQ up to increase or
down to decrease air volume.
The indicator lamps on buttonsU
(
�page 453) goes out.
The automatic function is switched off.
The air volume is adjusted correspond-
ing to the set blower speed.
Front defroster
You can use this setting to defrost the
windshield, for example if it is iced up. You
can also defog the windshield and the side
windows.Activating
�Press button; (�page 453) up or
down.
The indicator lamp on the button
comes on.
The air conditioning switches to the follow-
ing functions automatically:
�most efficient blower speed and heat-
ing power, depending on outside tem-
perature
�air flows onto the windshield and the
front side windows
�the air conditioning compressor
switches on at outside temperatures
above approximately 41°F (5°C) for
air-drying
�the air recirculation mode is switched
off
iKeep this setting selected only until the
windshield is clear again.
Page 474 of 723

473 Controls in detail
Loading and storing
Rear storage box
1Handle
2Cover
�Fold down rear center armrest.
�Pull handle1 upward in the direction
of arrow.
�Swing down cover2.
Cup holders
Cup holder in front center console
1Mark
2Handle
�Opening: Press mark1 on the front.
�Closing: Fold cover in until it engages.
!Do not sit on or lean your body weight
against the armrest when it is folded down, as
you could otherwise damage it.
Warning!G
In order to help prevent spilling liquids on
vehicle occupants and/or vehicle equip-
ment, only use containers that fit into the
cup holder. Use lids on open containers and
do not fill containers to a height where the
contents, especially hot liquids, could spill
during braking, vehicle maneuvers, or in an
accident. Liquids spilled on vehicle occu-
pants may cause serious personal injury.
Liquids spilled on vehicle equipment may
cause damage not covered by the
Mercedes-Benz Limited Warranty.
When not in use, keep the cup holders
closed. An open cup holder may cause injury
to you or others when contacted during
braking, vehicle maneuvers, or in an acci-
dent.
Keep in mind that objects placed in the cup
holder may come loose during braking, vehi-
cle maneuvers, or in an accident and be
thrown around in the vehicle interior.
Objects thrown around in the vehicle interi-
or may cause an accident and/or serious
personal injury.
��
Page 483 of 723

482 Controls in detail
Useful features
Installing a different mobile phone
cradle
Example illustration
1Contact plate
2Recesses
3Mobile phone cradle
�Insert mobile phone cradle3 into
recesses2 of contact plate1.
�Push mobile phone cradle3 forward
until it engages.
Tele Aid
The Tele Aid system
(Tele
matic Alarm Identification on De-
mand)
The Tele Aid system consists of three
types of response:
�automatic and manual emergency
�Roadside Assistance, and
�informationThe Tele Aid system is operational provid-
ing that the vehicle’s battery is charged,
properly connected, not damaged and mo-
bile phone and GPS coverage are available.
The speaker volume of a Tele Aid call can
be adjusted when using the volume control
on the multifunction steering wheel. To
raise, press buttonæ and to lower,
press buttonç or use the COMAND
volume thumbwheel , on the lower
part of the front center console
(
�page 91).
�To activate, press the SOS button, the
Roadside Assistance button• or
the Information button¡, depend-
ing on the type of response required.
!The initial activation of the Tele Aid system
may only be performed by completing the sub-
scriber agreement and placing an acquaintance
call using the Information button¡. Failure
to complete either of these steps will result in a
system that is not activated.
If you have any questions regarding activation,
please call the Response Center at
1-800-756-9018 (in the USA) or
1-888-923-8367 (in Canada).
iThe Tele Aid system utilizes the mobile
phone network for communication and the GPS
(Global Positioning System) satellites for vehicle
location. If either of these signals are unavail-
able, the Tele Aid system may not function and if
this occurs, assistance must be summoned by
other means.