Page 652 of 723

649 Practical hints
Flat tire
�Flat tire
Preparing the vehicle
�Park the vehicle in a safe distance from
moving traffic on a hard, flat surface
when possible.
�Turn on the hazard warning flashers.
�Turn the steering wheel so that the
front wheels are in a straight ahead
position.
�Shift the automatic transmission toP
(
�page 389).
�Turn off the engine (�page 387).
�Remove the SmartKey from the starter
switch.
Vehicles with SmartKey with
KEYLESS-GO*:
�Turn off the engine by pressing the
KEYLESS-GO* button once
(
�page 388).
�Open the driver’s door (this puts
the starter switch in position0,
same as with the SmartKey re-
moved from the starter switch). The
driver’s door then can be closed
again.
�Have any passenger exit the vehicle at
a safe distance from the roadway.
Mounting the Minispare wheel
iOpen the door only when conditions are safe
to do so.
Warning!G
The dimensions of the Minispare wheel are
different from those of the road wheels. As
a result, the vehicle handling characteristics
change when driving with a Minispare wheel
mounted. Adapt your driving style accord-
ingly.
The Minispare wheel is for temporary use
only. When driving with Minispare wheel
mounted, ensure proper tire inflation
pressure and do not exceed a vehicle speed
of 50 mph (80 km/h).
Contact the nearest Mercedes-Benz Center
as soon as possible to have the Minispare
wheel replaced with a regular road wheel.
Never operate the vehicle with more than
one Minispare wheel mounted.
Do not switch off the ESP
® when a Minis-
pare wheel is mounted.
Page 653 of 723
.
�Take vehicle tool kit and vehicle jack
out of trunk (
�page 632).
�Take the Minispare wheel and w")
650 Practical hints
Flat tire
Preparing the vehicle
�Prepare the vehicle as described
(
�page 649).
�Take vehicle tool kit and vehicle jack
out of trunk (
�page 632).
�Take the Minispare wheel and wheel
bolts out of the trunk (
�page 634).Lifting the vehicle
�Prevent the vehicle from rolling away
by blocking wheels with wheel chocks
or other sizeable objects.
One wheel chock is included with the
vehicle tool kit (
�page 634).
When changing wheel on a level surface:
�Place the wheel chock in front of and
another sizeable suitable object behind
the wheel that is diagonally opposite to
the wheel being changed.
Always try lifting the vehicle using the jack
on a level surface. However, should cir-
cumstances require you to do so on a hill,
place the wheel chock and another size-
able suitable object as follows:
�Place the wheel chock and another
sizeable suitable object on the downhill
side blocking both wheels of the axle
not being worked on.
Warning!G
The jack is designed exclusively for jacking
up the vehicle at the jack take-up brackets
built into both sides of the vehicle. To help
avoid personal injury, use the jack only to lift
the vehicle during a wheel change. Never
get beneath the vehicle while it is supported
by the jack. Keep hands and feet away from
the area under the lifted vehicle. Always en-
gage the electronic parking brake and block
wheels before raising vehicle with jack.
Do not disengage electronic parking brake
while the vehicle is raised. Be certain that
the jack is always vertical (plumb line) when
in use, especially on hills. Always try to use
the jack on level surface. Make sure the jack
arm is fully seated in the jack take-up brack-
et. Always lower the vehicle onto sufficient
capacity jackstands before working under
the vehicle.
Page 654 of 723
651 Practical hints
Flat tire
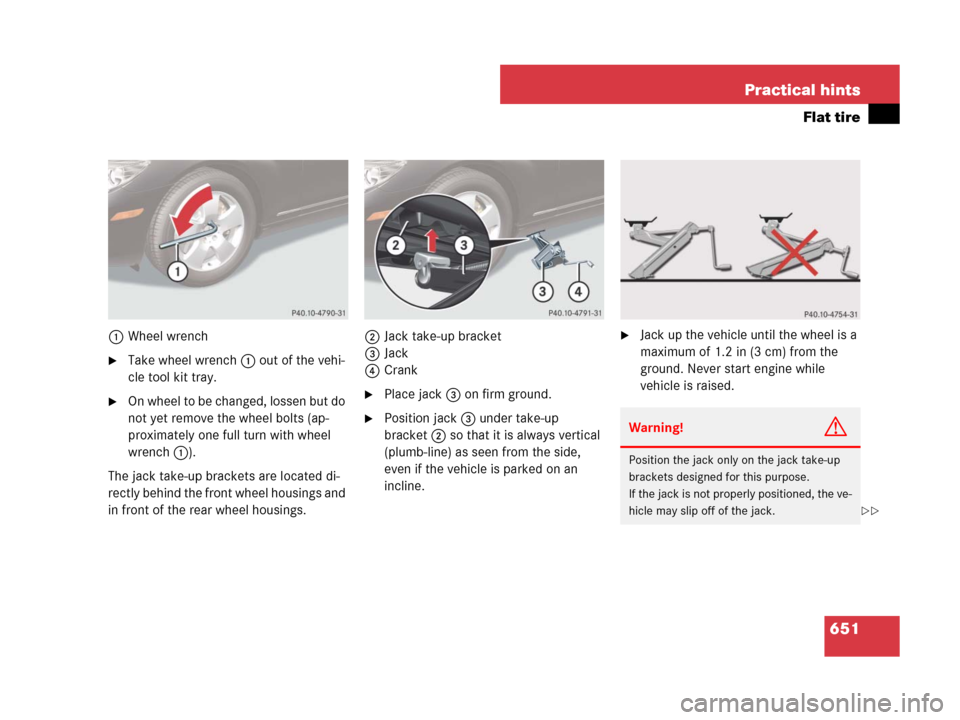
1Wheel wrench
�Take wheel wrench 1 out of the vehi-
cle tool kit tray.
�On wheel to be changed, lossen but do
not yet remove the wheel bolts (ap-
proximately one full turn with wheel
wrench1).
The jack take-up brackets are located di-
rectly behind the front wheel housings and
in front of the rear wheel housings.2Jack take-up bracket
3Jack
4Crank�Place jack3 on firm ground.
�Position jack3 under take-up
bracket2 so that it is always vertical
(plumb-line) as seen from the side,
even if the vehicle is parked on an
incline.
�Jack up the vehicle until the wheel is a
maximum of 1.2 in (3 cm) from the
ground. Never start engine while
vehicle is raised.
Warning!G
Position the jack only on the jack take-up
brackets designed for this purpose.
If the jack is not properly positioned, the ve-
hicle may slip off of the jack.
��
Page 655 of 723

652 Practical hints
Flat tire
Removing the wheel
1Alignment bolt
�Unscrew upper-most wheel bolt and re-
move.
�Replace this wheel bolt with alignment
bolt1 supplied in the tool kit.
�Remove the remaining bolts.
�Remove the wheel.Mounting the Minispare wheel
1Wheel bolt for light alloy rims
2Wheel bolt for Minispare wheel
(located in trunk with spare wheel)
Warning!G
The jack is intended only for lifting the
vehicle briefly for wheel changes. It is not
suited for performing maintenance work
under the vehicle.
�Never start the engine when the vehicle
is raised.
�Never lie down under the raised vehicle.
!Do not place wheel bolts in sand or dirt. This
could result in damage to the bolt and wheel hub
threads.
!Wheel bolts2 must be used when mount-
ing a Minispare wheel. The use of any wheel
bolts other than wheel bolts2 for a Minispare
wheel will physically damage the vehicle’s
brakes.
Warning!G
Make sure to use the original length wheel
bolts when remounting the original wheel
after it has been repaired.
��
Page 697 of 723
 107
CD mode 115
DVD mode 115
MP3 mode 115
Audio (Control system
instrument cluster) 263
CD changer 264
DVD changer 264
Audio DVD
Fast forward/rewind (COMAND) 117
Menu overvie")
694 Index
Audio (COMAND) 107
CD mode 115
DVD mode 115
MP3 mode 115
Audio (Control system
instrument cluster) 263
CD changer 264
DVD changer 264
Audio DVD
Fast forward/rewind (COMAND) 117
Menu overview (COMAND) 114
Pause function (COMAND) 116
Stop function (COMAND) 116
Auto-dimming, Rear view mirrors 355Automatic climate control 453
Adjusting air distribution
(COMAND) 246
Adjusting air flow from air vents
(COMAND) 249
Adjusting air volume
(COMAND) 246
Adjusting the footwell temperature
(COMAND) 249
Air recirculation mode 458
Central climate control menu
(COMAND) 247
Defrosting 456
Operating via COMAND 244
Rear window defroster 457
Selecting Mono mode
(COMAND) 248
Setting temperature
(COMAND) 245
Setting the temperature 456
Switching cooling on or off
(COMAND) 247Automatic headlamp mode 271, 364
Automatic lighting control,
Interior lighting 370
Automatic locking when driving 334
Automatic shift program 399
Automatic transmission
Accelerator position 396
Automatic shift program 399
Emergency operation
(limp-home mode) 401
Fluid 684
Fluid level 517
Gear ranges 398
Gear selector lever 389
Gear shifting malfunctions 401
Hill start assist system 397
Kickdown 396
Program mode selector switch 399
Shifting procedure 392
Starting the engine 378
Steering wheel gearshift control 400
Transmission fluid 517
Transmission positions 393
Page 719 of 723
 229
Introduction 274
Navigation 285
Operating safety 273
Operation via the
m")
716 Index
Voice Control
Address book 295
Command list 305
DVD changer 303
Individualization 320
Individualization (COMAND) 229
Introduction 274
Navigation 285
Operating safety 273
Operation via the
multifunction steering wheel 276
Radio 299
Switching help window on or off
(COMAND) 229
Telephone 278
Troubleshooting 317W
Warning indicators
Park Assist* 437
Parktronic* 433
Warning sounds
DISTRONIC Plus* 414
Drivers seat belts 54
Electronic parking brake 386
PRE-SAFE
® Brake* 75
Seat belt telltale 574
Warranty coverage 673
Washing the vehicle 554
Wear pattern, Tires 548
Weights, Vehicle 683
Wheels
Change 649
Collapsible wheel chock 634
Minispare wheel 634, 681
Removing 652
Rims and Tires 678
Sizes 678
Tightening torque 654
Tires and wheels 520
Window curtain air bags 46, 47
Windows see Power windowsWindshield
Cleaning 562
Cleaning wiper blades 562
Infrared reflecting 496
Windshield washer fluid 685, 691
Mixing ratio 691
Refilling 519
Wiping with 373
Windshield wipers 372
Cleaning wiper blades 562
Replacing wiper blades 647
Single wipe 373
Winter driving 549
Snow chains 550
Tires 549
Winter driving instructions 504
Winter tires 549
Wood trims, Cleaning 564
Wrench, wheel (vehicle tool kit) 632
X
Xenon headlamp see Headlamps