Page 87 of 723
86 Control systems
COMAND introduction
Operating COMAND
Menu overview
The illustration below shows the structure
of the main functions and their main
menus.Each main function has a main menu. Each
menu item in turn has several submenu
items.
NaviPageAudioPageTelephone*PageVehiclePage
Commands/menus
Map Display159FM/AM Radio95Telephone*120Exterior Lighting Delayed Switch-off235
Mode161Sat Radio
(USA only)100Address Book*214Locator Lighting236
CD107Telephone OFF*122Exterior Mirror Convenience Settings237
DVD-Audio107Automatic Locking238
MP3107Easy Entry/Exit Feature239
Audio OFF94Interior Lighting Delayed Switch-off241
Interior Ambient Light240
Rear Window Sunshade*242
Trunk Opening-height Restriction*242
Tow-away Alarm243
Page 154 of 723

General notes
Operational readiness of the navigation
system following a system software
update by an authorized
Mercedes-Benz Center
After a sy")
153 Control systems
COMAND navigation (introduction)
General notes
Operational readiness of the navigation
system following a system software
update by an authorized
Mercedes-Benz Center
After a system software update by an au-
thorized Mercedes-Benz Center, the in-
stalled map software may no longer be
compatible. If this is the case, the naviga-
tion system will not be operational.
You will know if this is the case, when the
following message will appear when you
switch to navigation mode: “The system
software has been updated. The map soft-
ware must be updated now. Please insert
the DVD with the map software.”
�Updating map software: Proceed as
described in the “Updating the map
software” section (
�page 149). Use
map software which is compatible with
the system software.Initial use or use following a system
software update
In both these cases, the navigation system
must determine the position of the vehicle.
You may have to drive for a while before
precise route guidance is possible.
GPS reception
Correct functioning of the navigation sys-
tem depends on GPS reception, among
other things. In certain situations, GPS re-
ception may be impaired, there may be in-
terference or no reception at all, e.g. in
tunnels, in multistory parking garages or
there is snow covering the trunk lid where
the GPS antenna is located. If there is
snow on the trunk lid it should be removed.Route guidance after vehicle transpor-
tation
COMAND has to redetermine the position
of the vehicle if the vehicle has been trans-
ported (e.g. by ferry, by train or after tow-
ing).
Positioning takes place automatically even
when COMAND is switched off. The dura-
tion varies from one case to another.
Route guidance may be restricted as fol-
lows during vehicle positioning:
�Navigation announcements, route
guidance displays and displayed street
names are not consistent with the ac-
tual location of the vehicle.
�COMAND does not generate navigation
announcements.
�Instead of the route guidance displays,
you see the “Off Road” display and a di-
rection arrow. The direction arrow
shows the compass heading to the des-
tination.
iPlease note that the update must be allowed
to run to the end in this case. If you interrupt it,
the navigation system will continue to be non-op-
erational.
Page 236 of 723
")
235 Control systems
COMAND vehicle menu
�COMAND vehicle menu
In this menu, you can program the follow-
ing vehicle functions:Setting night security illumination
(Exterior Lighting Delayed Switch-off)
Use this function to set whether and how
long you would like the exterior lighting to
illuminate during darkness after exiting the
vehicle and both doors closed.
The exterior lighting automatically goes
out after the delayed switch-off time has
expired.
You can select:
�“0 sec.”, the delayed switch-off feature
is deactivated
�“15 sec.”, “30 sec.”, “45 sec.”, or
“60 sec.”, the delayed switch-off fea-
ture is activated
�Select “Vehicle”.
The main area is active.
�Selecting “Exterior Lighting Delayed
Switch-off” menu: Slide omp or
rotateymz.
�Confirming selection: Press n.
�Selecting length of time: Slide qmr
or rotate ymz.
�Confirming selection: Press n.
or
�Select “Vehicle” � “Vehicle” � “Exte-
rior Lighting Delayed Switch-off”.
A selection list appears.
The current setting is indicated by a
dotR.
FunctionPage
Exterior Lighting Delayed
Switch-off235
Locator Lighting236
Exterior Mirror Convenience
Settings237
Automatic Locking238
Easy Entry/Exit Feature239
Interior Ambient Light240
Interior Lighting Delayed
Switch-off241
Rear-window Sunshade242
Trunk Opening-height Restriction*242
Tow-away Alarm243
iThe components and operating principles of
COMAND can be found on (
�page 81).
iYou can reactivate this function within
10 minutes by opening a door.
��
Page 243 of 723
242 Control systems
COMAND vehicle menu
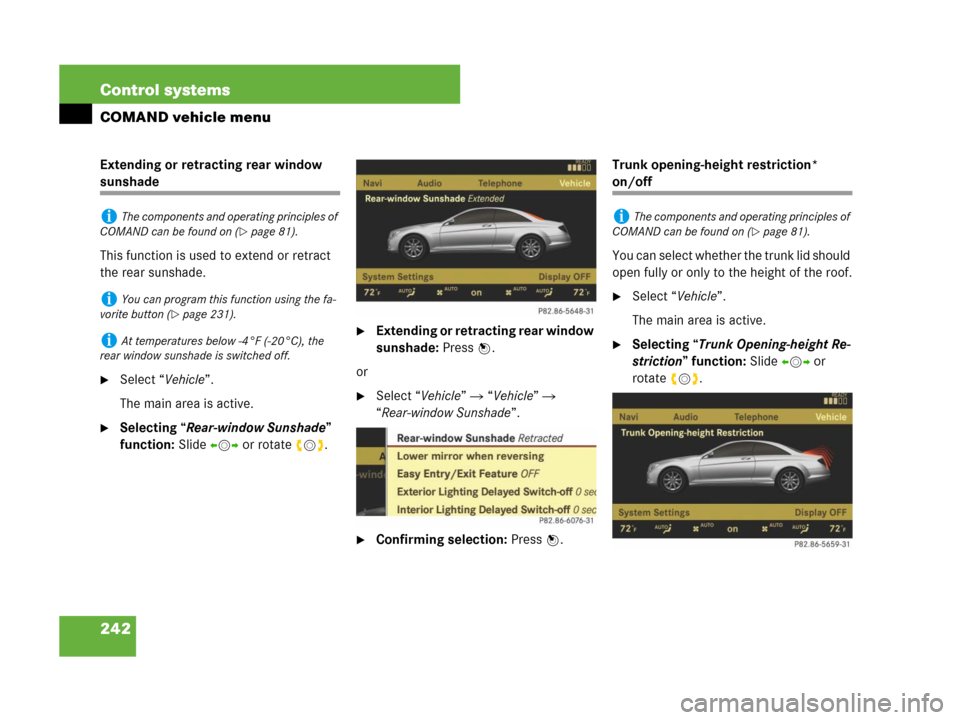
Extending or retracting rear window
sunshade
This function is used to extend or retract
the rear sunshade.
�Select “Vehicle”.
The main area is active.
�Selecting “Rear-window Sunshade”
function: Slide omp or rotate ymz.
�Extending or retracting rear window
sunshade: Press n.
or
�Select “Vehicle” � “Vehicle” �
“Rear-window Sunshade”.
�Confirming selection: Press n.Trunk opening-height restriction*
on/off
You can select whether the trunk lid should
open fully or only to the height of the roof.
�Select “Vehicle”.
The main area is active.
�Selecting “Trunk Opening-height Re-
striction” function: Slide omp or
rotateymz.
iThe components and operating principles of
COMAND can be found on (
�page 81).
iYou can program this function using the fa-
vorite button (
�page 231).
iAt temperatures below -4°F (-20°C), the
rear window sunshade is switched off.
iThe components and operating principles of
COMAND can be found on (
�page 81).
Page 244 of 723

243 Control systems
COMAND vehicle menu
�Confirming selection: Press n.
or
�Select “Vehicle” � “Vehicle” � “Trunk
Opening-height Restriction”.
A checkmark appears when the trunk
opening-height restriction is switched
on.
�Confirming selection: Press n.
Switching the tow-away alarm on/off
Depending on vehicle production date,
your vehicle may not be equipped with the
tow-away alarm.
To prevent triggering the tow-away alarm
feature (
�page 78), switch off the
tow-away alarm before towing the vehicle,
or when parking on a surface subject to
movement, such as a ferry or auto train.
�Select “Vehicle”.
The main area is active.
�Selecting “Tow-away Alarm” func-
tion: Slide omp or rotate ymz.
�Confirming selection: Press n.or
�Select “Vehicle” � “Vehicle” �
“Tow-away Alarm”.
A checkmark appears when the
tow-away alarm is switched on.
�Confirming selection: Press n.
iThe components and operating principles of
COMAND can be found on (
�page 81).
iYou can program the tow-away alarm func-
tion (
�page 231) using the favorite button in the
center console.
When you press the favorite button, you can
switch the functions on or off.
Page 322 of 723
321 Controls in detail
Locking and unlocking
Starter switch positions
Seats
Steering wheel
Mirrors
Memory function
Fastening the seat belts
Lighting
Windshield wipers
Power windowsDriving and parking
Automatic transmission
Instrument cluster
Driving systems
Air vents
Automatic climate control
Trunk
Power tilt/sliding sunroof
Loading and storing
Useful features
Page 323 of 723

322 Controls in detail
Locking and unlocking
SmartKey
Your vehicle comes supplied with two
SmartKeys, each with remote control and
a removable mechanical key.
The locking tabs for the mechanical key
portion of the two SmartKeys are of differ-
ent color to help distinguish each
SmartKey unit.
The SmartKey provides an extended oper-
ating range. To prevent theft, however, it is
advisable to only unlock the vehicle when
you are in close proximity to it.
The SmartKey centrally locks and unlocks,
when set to factory settings (
�page 324):
�the doors
�the trunk
�the fuel filler flap
SmartKey with remote control
1‹ Lock button
2ŠOpening button for trunk
(
�page 461)
3Mechanical key locking tab
4ŒUnlock button
5Battery check lamp
6ÂPanic button (
�page 63)
!To prevent possible malfunction, avoid ex-
posing the SmartKey to high levels of electro-
magnetic radiation.
Warning!G
When leaving the vehicle, always remove the
SmartKey from the starter switch, take it
with you, and lock the vehicle. Do not leave
children unattended in the vehicle, or with
access to an unlocked vehicle. A child’s
unsupervised access to a vehicle could
result in an accident and/or serious
personal injury.
Warning!G
To prevent possible personal injury, always
keep hands and fingers away from the door
or trunk lid opening when closing a door or
the trunk. Be especially careful when small
children are around.
Before closing doors, make sure there is no
possibility of someone getting caught in a
door during closing.
Page 324 of 723

323 Controls in detail
Locking and unlocking
iWhen you open a door, the side windows on
that side lowers slightly. Once you close the
door, the window moves up again.
!The side windows will not open or close if
the battery is discharged or the windows are cov-
ered with ice. As a result, you may no longer be
able to properly close the door. Do not attempt
to force the door shut. Doing so may damage the
door or the side window. Correct the condition
that prevents the windows from operating before
attempting to close the door.
iUSA only:
This device complies with Part 15 of the FCC
Rules. Operation is subject to the following two
conditions:
(1) This device may not cause harmful interfer-
ence, and
(2) this device must accept any interference
received, including interference that may
cause undesired operation.
Any unauthorized modification to this device
could void the user’s authority to operate the
equipment.
iCanada only:
This device complies with RSS-210 of Industry
Canada. Operation is subject to the following
two conditions:
(1) This device may not cause interference, and
(2) this device must accept any interference
received, including interference that may
cause undesired operation of the device.
Any unauthorized modification to this device
could void the user’s authority to operate the
equipment.
iYou can also open and close the side
windows and tilt/sliding sunroof using the
SmartKey, see “Summer opening feature”
(
�page 376) and see “Convenience closing fea-
ture” (
�page 376).
!If you cannot lock or unlock the vehicle with
the SmartKey, then either the batteries in the
SmartKey are discharged, the SmartKey is mal-
functioning or the vehicle batteries are drained.
�Check the batteries in the SmartKey and re-
place them if necessary (
�page 639).
�Use the mechanical key to unlock the driv-
er’s door (
�page 635) and trunk
(
�page 636).
�Have the vehicle batteries and their connec-
tions checked (
�page 655).
If the SmartKey is malfunctioning, contact
Roadside Assistance or an authorized
Mercedes-Benz Center.