Page 76 of 723

75 Safety and Security
Driving safety systems
To maintain the proper distance to the ve-
hicle in front of you and thus prevent a
rear-end collision, you must apply the
brakes yourself.
�Immediately brake the vehicle to avoid
a collision.
Under no circumstances should the
driver await the intermittent warning
sound before braking. See the follow-
ing warning note.
The intermittent warning sound ceases
and the distance warning lampl
goes out when the necessary distance
to the vehicle ahead is again
established.
Warning!G
PRE-SAFE® Brake brakes your vehicle with a
maximum of 13 ft/s2 (4 m/s2). This corre-
sponds to about 40% of the maximum decel-
eration ability of your vehicle. This
automatic braking is intended only to ini-
tiate the braking if the driver has not already
done so. The driver must apply the brakes in
order to prevent a collision.
PRE-SAFE
® Brake applies the brake pedal
automatically which results in the brake
pedal moving. Therefore keep driver’s foot
area clear at all times, including the area un-
der the brake pedal. Objects stored in this
area may impair pedal movement which
could interfere with the braking ability of the
PRE-SAFE
® Brake.
Do not place your foot under the brake pedal
– your foot could become caught.
Warning!G
An intermittent warning sounds and the dis-
tance warning lampl in the instrument
cluster is illuminated if PRE-SAFE
® Brake
calculates that the distance to the vehicle
ahead and your vehicle’s current speed indi-
cate that PRE-SAFE
® Brake will not be capa-
ble of slowing the vehicle sufficiently to
maintain the preset following distance,
which creates a danger of a collision.
Immediately brake your vehicle to increase
the distance between your vehicle and the
vehicle driving in front of you. The warning
sound is intended as a final caution that you
have not interceded with your own braking
inputs to avoid a potentially dangerous situ-
ation. Do not wait for the operation of the
warning signal to intercede with your own
braking, as that will result in potentially dan-
gerous emergency braking which will not al-
ways result in an impact being avoided.
Tailgating increases the risk of an accident.
Page 96 of 723
95 Control systems
COMAND FM/AM radio
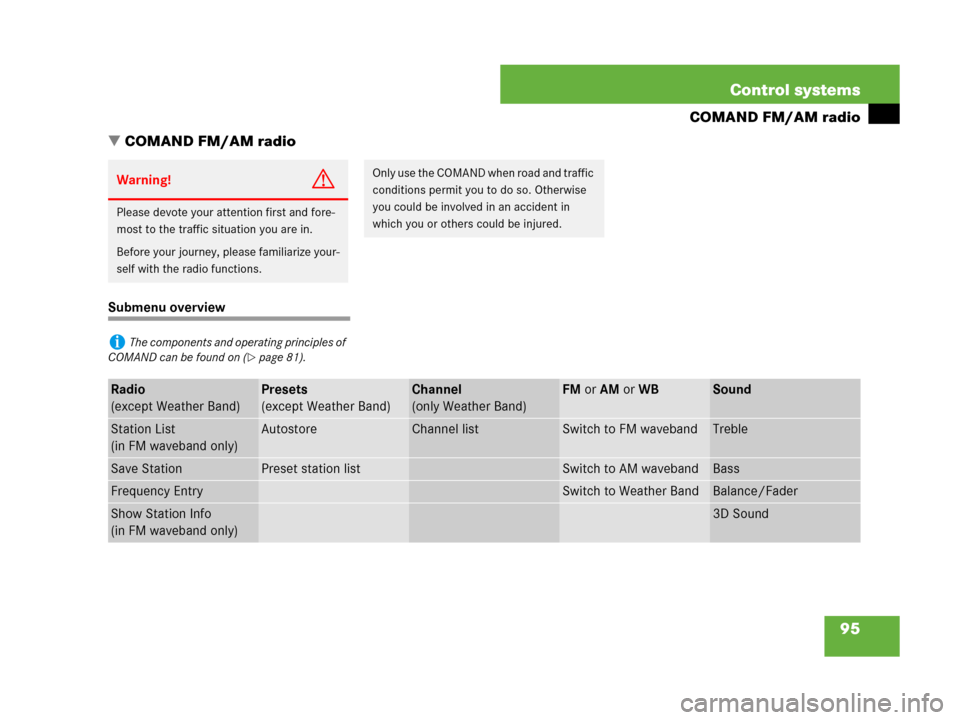
�COMAND FM/AM radio
Submenu overview
Warning!G
Please devote your attention first and fore-
most to the traffic situation you are in.
Before your journey, please familiarize your-
self with the radio functions.
Only use the COMAND when road and traffic
conditions permit you to do so. Otherwise
you could be involved in an accident in
which you or others could be injured.
iThe components and operating principles of
COMAND can be found on (
�page 81).
Radio
(except Weather Band)Presets
(except Weather Band)Channel
(only Weather Band)FM or AM or WBSound
Station List
(in FM waveband only)AutostoreChannel listSwitch to FM wavebandTreble
Save StationPreset station listSwitch to AM wavebandBass
Frequency EntrySwitch to Weather BandBalance/Fader
Show Station Info
(in FM waveband only)3D Sound
Page 97 of 723

96 Control systems
COMAND FM/AM radio
Switching to radio mode
�Select “Audio”� “Audio”� “FM/AM
Radio”.
or
�Press the M shortcut button once or
twice.
The radio display appears once you
have switched to radio mode. You will
hear the station/channel last tuned in
in the previously selected waveband,
provided that the station/channel can
be received.
Illustration: radio mode in FM waveband
1Main area with frequency display
2Preset position of selected station
3Frequency of selected station
4Name of selected station
5Sound settings
6To switch to Weather Band
7To switch to AM waveband
8Selected waveband
9Preset options
aRadio options
Switching wavebands
You can switch between the FM, AM and
WB (Weather Band) wavebands.
�Select “Audio”� “Audio”� “FM/AM
Radio”� “FM” or “AM” or “WB”.
You will hear the station last tuned in
on the selected waveband.
Selecting stations/channels
You have the following selection options:
�The station list
�The search function
�The station presets
�The manual frequency entry
�The channel list
Selecting stations using the station list
iThe number of times you have to press the
M shortcut button depends on the operating
mode currently selected.
iStation name display 4 is available for the
FM waveband and can only be seen when it is
switched on (
�page 99) and if the station trans-
mits a name.
iThe station list is only available for the FM
waveband. It contains all the stations that can be
currently received and is sorted by station fre-
quencies.
Page 98 of 723

97 Control systems
COMAND FM/AM radio
�Select “Audio”� “Audio”� “FM/AM
Radio”� “FM”.
�Select “Radio”� “Station List”.
The station list appears. The dot R in
front of a list entry indicates the cur-
rently selected station. A number in
front of the list entry indicates the pre-
set position in the station preset mem-
ory.
�Select a station by rotating ymz or
sliding qmr and press n.
Selecting stations/channels using the
search function
�Slide omp or rotate ymz when the
main area is selected.
Depending on the direction in which
the controller is being slid or rotated,
the system searches upward or down-
ward and stops at the next receivable
station/channel.Selecting stations using station pre-
sets
�Select “Audio” � “Audio” � “FM/AM
Radio” � “FM” or “AM”.
�Select “Presets”.
or
�Press n when the main area is select-
ed.
The preset menu appears. The dot R
in front of a preset position indicates
that the currently selected station is
saved there.
�Select station preset by rotating ymz
or sliding qmr and press n.Selecting stations by entering the fre-
quency manually
�Select “Audio”�“Audio”�“FM/AM
Radio”�“FM” or “AM”.
�Select “Radio”�“Frequency Entry”.
The menu for manual frequency entry
appears.
�Exiting menu without making an en-
try: Press L back button in the cen-
ter console (
�page 82).
�Increasing or decreasing number:
Slide qmr or rotate ymz.
�Selecting the next number:
Slidemp.
�Confirming frequency entry:
Pressn.
COMAND tunes in to the frequency en-
tered.
iThis function is not available for Weather
Band.iThis function is not available for Weather
Band.
iYou can only select currently permitted
numbers.
��
Page 99 of 723

98 Control systems
COMAND FM/AM radio
Selecting channels using the channel
list
�Select “Audio” � “Audio” � “FM/AM
Radio” � “WB” � “Channel”.
or
�Press n when the main area is select-
ed.
The channel list appears. The dotR in
front of a list entry indicates the cur-
rently selected channel.
�Select channel by rotating ymz or
slidingqmr and press n.
Saving stationsYou have the following options:
�Saving stations manually
�Saving stations using Autostore
Saving stations manually
Option 1
�Select “Audio” � “Audio” � “FM/AM
Radio” � “FM” or “AM”.
�Select “Radio ”� “Save Station”.
Option 2
�Press n when the main area is select-
ed.
Option 3
�Select “Audio” � “Audio” � “FM/AM
Radio” � “FM” or “AM”.
�Select “Presets”.
All three of these will call up a station pre-
set screen. The dot R in front of a preset
position indicates that the currently select-
ed station is saved there.
�Selecting a preset position:
Slideqmr or rotate ymz.
Saving a station to a selected preset po-
sition
If you have called up the station preset
screen using option 1:
�Press n briefly.
In options 2 and 3:
�Press and hold n until you hear a sig-
nal.
The station is saved.
iIf you enter a frequency in the AM waveband
which is outside the frequency range, COMAND
tunes in to the next lowest frequency.
iThis function is only available for Weather
Band.
iTwenty stations can be saved in each wave-
band except for Weather Band.
��
Page 100 of 723

99 Control systems
COMAND FM/AM radio
Saving using autostore
Option 1
�Press n when the main area is select-
ed.
�Select “Autostore”.
Option 2
�Select “Audio” � “Audio” � “FM/AM
Radio” � “FM” or “AM”.
�Select “Presets” � “Autostore”.
Option 3
�Select “Audio” � “Audio” � “FM/AM
Radio” � “Radio” � “Save Station” �
“Autostore”.
Station name display
1Station name display
�Switching the station name display
on/off: Select “Audio” � “Audio” �
“FM/AM Radio” � “FM” � “Radio” �
“Show Station Info”.The display is switched on or off, de-
pending on the previous setting. When
the display is switched on, a check-
mark appears in front of the
“Show Station Info” menu item.
iThis function is not available for Weather
Band. The Autostore function saves receivable
stations as presets in order of their reception
quality. All stations saved manually in the preset
memory will be lost if COMAND finds 20 sta-
tions. If COMAND finds less than 20 stations, for
example 9, then the stations saved in preset po-
sitions 1 – 9 will be over written.iIn the FM waveband, COMAND can show
the name of the station currently tuned in. Sta-
tion name display 1 can only be seen when it is
switched on and if the station transmits a name.
Page 101 of 723
100 Control systems
COMAND satellite radio (USA only)
Submenu overview
Warning!G
Please devote your attention first and fore-
most to the traffic situation you are in.
Before your journey, please familiarize your-
self with the radio functions.
Only use the COMAND when road and traffic
conditions permit you to do so. Otherwise
you could be involved in an accident in
which you or others could be injured.
iThe components and operating principles of
COMAND can be found on (
�page 81).
Sat Radio Presets Info Category Sound
Channel ListStation presets Show program infoSelect categoryTreble
Save ChannelBass
Channel Entry Balance/Fader
Service3D Sound
Page 103 of 723

Satellite radio service is not activated
The telephone number of the SIRIUS Ser-
vice Center and the twelve-digit electronic
serial number (SIRIU")
102 Control systems
COMAND satellite radio (USA only)
Satellite radio service is not activated
The telephone number of the SIRIUS Ser-
vice Center and the twelve-digit electronic
serial number (SIRIUS-ID) of the particular
receiver are displayed.
This information is required when calling
the SIRIUS Service Center for an activation
request.
�Closing screen: Press n.Only the preview channel is activated
The satellite radio preview channel ap-
pears.
Satellite radio service is fully activated
The main satellite radio menu appears. You
will hear the channel last tuned in, provid-
ed that it can be received.
Main satellite radio menu
1Main area with channel display
2Preset position of selected channel
3Selected channel
4Selected program category
5Sound settings
6To select program category
7Channel number of selected channel
8Other channel information
9Preset options
aSatellite radio options
iCredit card information is also required for
your application. The activation process takes
approximately 5 to 10 minutes after calling the
SIRIUS Service Center.
iIf only the preview channel is activated, you
cannot tune in another channel. If you try to do
this, you will see the screen described in the sec-
tion “Satellite radio service is not activated”
(
�page 102).

Submenu overview
Warning!G
Please devote your attention first and fore-
most to the traffic situation you are in.
Before your journey, please fami")