Page 618 of 723
615 Practical hints
What to do if …?
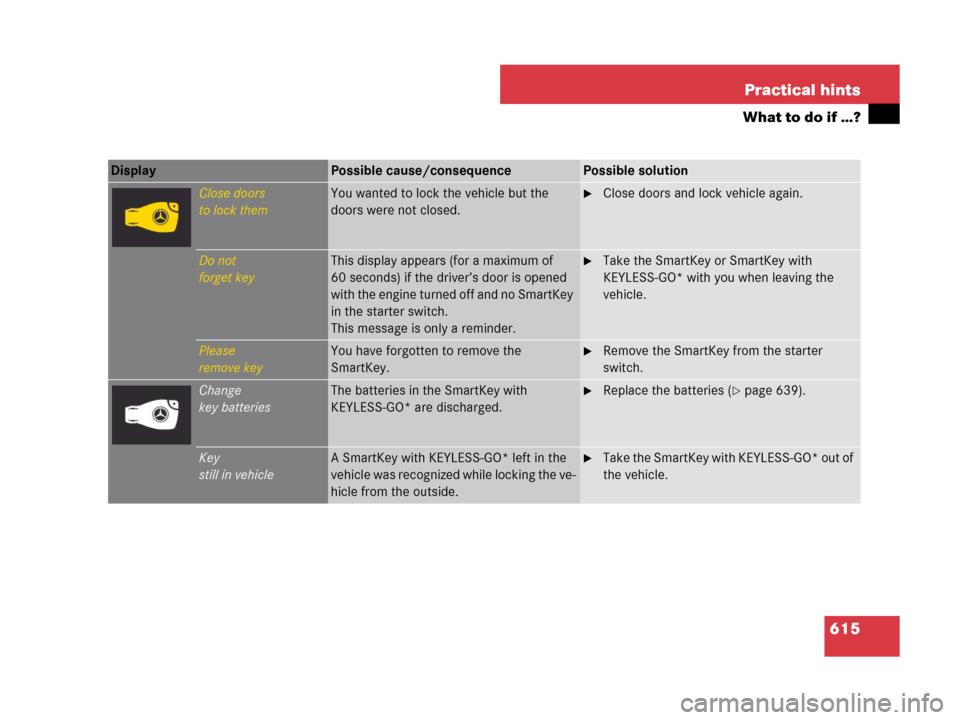
Display Possible cause/consequencePossible solution
Close doors
to lock themYou wanted to lock the vehicle but the
doors were not closed.�Close doors and lock vehicle again.
Do not
forget keyThis display appears (for a maximum of
60 seconds) if the driver’s door is opened
with the engine turned off and no SmartKey
in the starter switch.
This message is only a reminder.�Take the SmartKey or SmartKey with
KEYLESS-GO* with you when leaving the
vehicle.
Please
remove keyYou have forgotten to remove the
SmartKey.�Remove the SmartKey from the starter
switch.
Change
key batteriesThe batteries in the SmartKey with
KEYLESS-GO* are discharged.�Replace the batteries (�page 639).
Key
still in vehicleA SmartKey with KEYLESS-GO* left in the
vehicle was recognized while locking the ve-
hicle from the outside.�Take the SmartKey with KEYLESS-GO* out of
the vehicle.
Page 626 of 723
623 Practical hints
What to do if …?
Display Possible cause/consequencePossible solution
Night View Assist
Lights ON or AUTO,
not in R gearYou have tried to switch on Night View
Assist* but the light switch is not set
to*or B.
In addition, the automatic transmission is in
positionR.�Turn the exterior lamp switch
to*orB (
�page 363).
�Shift the automatic transmission to P, N or D
(
�page 389).
Night View Assist
only when
it is darkYou have tried to switch on Night View
Assist* by daylight.You can only switch on Night View Assist* when
it is dark.
Engine oil level
Stop vehicle!
Switch engine offCL 600 only
There is no oil in the engine. There is a dan-
ger of engine damage.�Carefully bring the vehicle to a halt as soon
as it is safe to do so in a safe location.
�Turn off the engine.
�Add engine oil (�page 516) and check the
engine oil level (
�page 513).
Page 627 of 723
 or “Add 1.0 qts.
(Canada:1.0 l) engine oil at next refueling”
(CL 600) appears wh")
624 Practical hints
What to do if …?
When the message “Check engine oil level
at next refueling” (CL 550) or “Add 1.0 qts.
(Canada:1.0 l) engine oil at next refueling”
(CL 600) appears while the engine is run-
ning and at operating temperature, the en-
gine oil level has dropped to approximately
the minimum level.When this occurs, the warning will first
come on intermittently and then stay on if
the oil level drops further.
If no oil leaks are noted, continue to drive
to the nearest service station where the
engine oil should be topped to the required
level with an approved engine oil.
For information on approved engine oils,
refer to the Factory Approved Service
Products pamphlet (USA only) or contact
an authorized Mercedes-Benz Center.
Display Possible cause/consequencePossible solution
USA only:
Add 1.0 qts. engine oil
at next refueling
(USA only)
Add 1.0 l engine oil
at next refueling
(Canada only)CL 600 only:
The engine oil level is too low.�Check the engine oil level (�page 513) and
add engine oil as required (
�page 516).
�If you must add engine oil frequently, have
the engine checked for possible leaks.
Check engine oil level
at next refuelingCL 550 only:
The engine oil level has dropped to approx-
imately the minimum level.�Check the engine oil level (�page 513) and
add engine oil as required (
�page 516).
�If you must add engine oil frequently, have
the engine checked for possible leaks.
!The engine oil level warnings should not be
ignored. Extended driving with the symbol dis-
played could result in serious engine damage
that is not covered by the Mercedes-Benz Limit-
ed Warranty.
Page 628 of 723
625 Practical hints
What to do if …?
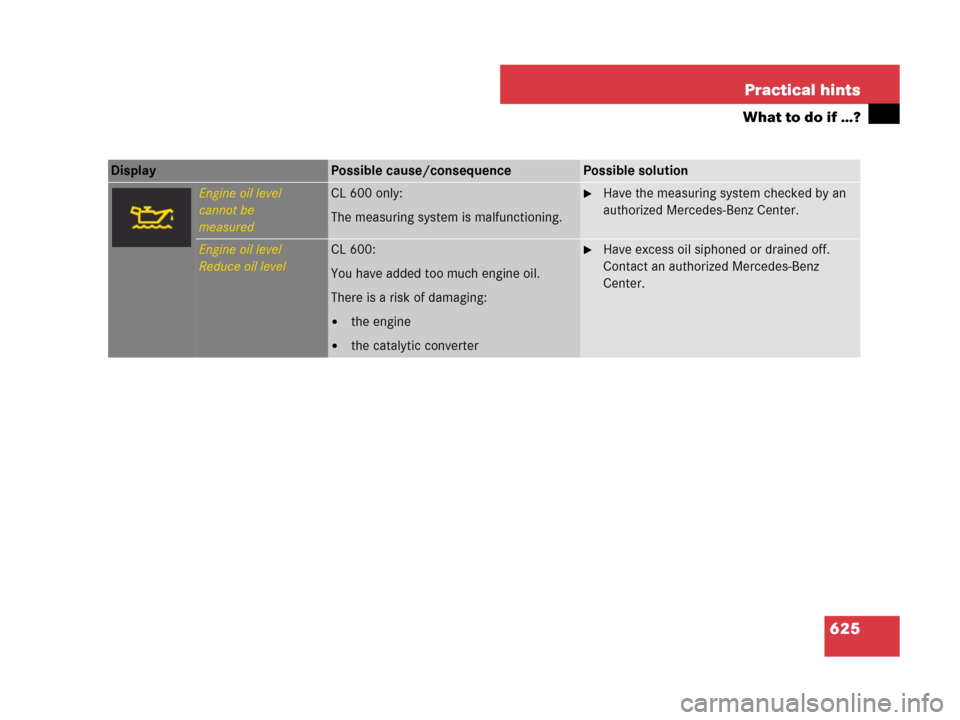
Display Possible cause/consequencePossible solution
Engine oil level
cannot be
measuredCL 600 only:
The measuring system is malfunctioning.�Have the measuring system checked by an
authorized Mercedes-Benz Center.
Engine oil level
Reduce oil levelCL 600:
You have added too much engine oil.
There is a risk of damaging:
�the engine
�the catalytic converter
�Have excess oil siphoned or drained off.
Contact an authorized Mercedes-Benz
Center.
Page 634 of 723

631 Practical hints
What to do if …?
Display Possible cause/consequencePossible solution
Shift to 'P'You have attempted to turn off the engine
with the KEYLESS-GO* start/stop button
and opened the driver’s door with the auto-
matic transmission not shift to positionP.�Shift the automatic transmission toP
(
�page 389).
or
�Close the driver’s door.
You are driving with the trunk open.�Close the trunk (�page 462).
Washer fluid,
please refillThe water level has dropped to approx.
1.1 US qts (1.0 l).�Add washer fluid (�page 519).
Seat backrest,
Front Left
not lockedThe driver seat backrest is not engaged.
The driver’s seat belt can not secure the
driver�Fold back and push the seat backrest until
the seat cushion and seat backrest audibly
engage into the driving position.
Seat backrest,
Front Right
not lockedThe passenger seat backrest is not en-
gaged.
The front passenger’s seat belt can not se-
cure the passenger�Fold back and push the seat backrest until
the seat cushion and seat backrest audibly
engage into the driving position.
Page 652 of 723

649 Practical hints
Flat tire
�Flat tire
Preparing the vehicle
�Park the vehicle in a safe distance from
moving traffic on a hard, flat surface
when possible.
�Turn on the hazard warning flashers.
�Turn the steering wheel so that the
front wheels are in a straight ahead
position.
�Shift the automatic transmission toP
(
�page 389).
�Turn off the engine (�page 387).
�Remove the SmartKey from the starter
switch.
Vehicles with SmartKey with
KEYLESS-GO*:
�Turn off the engine by pressing the
KEYLESS-GO* button once
(
�page 388).
�Open the driver’s door (this puts
the starter switch in position0,
same as with the SmartKey re-
moved from the starter switch). The
driver’s door then can be closed
again.
�Have any passenger exit the vehicle at
a safe distance from the roadway.
Mounting the Minispare wheel
iOpen the door only when conditions are safe
to do so.
Warning!G
The dimensions of the Minispare wheel are
different from those of the road wheels. As
a result, the vehicle handling characteristics
change when driving with a Minispare wheel
mounted. Adapt your driving style accord-
ingly.
The Minispare wheel is for temporary use
only. When driving with Minispare wheel
mounted, ensure proper tire inflation
pressure and do not exceed a vehicle speed
of 50 mph (80 km/h).
Contact the nearest Mercedes-Benz Center
as soon as possible to have the Minispare
wheel replaced with a regular road wheel.
Never operate the vehicle with more than
one Minispare wheel mounted.
Do not switch off the ESP
® when a Minis-
pare wheel is mounted.
Page 654 of 723
651 Practical hints
Flat tire
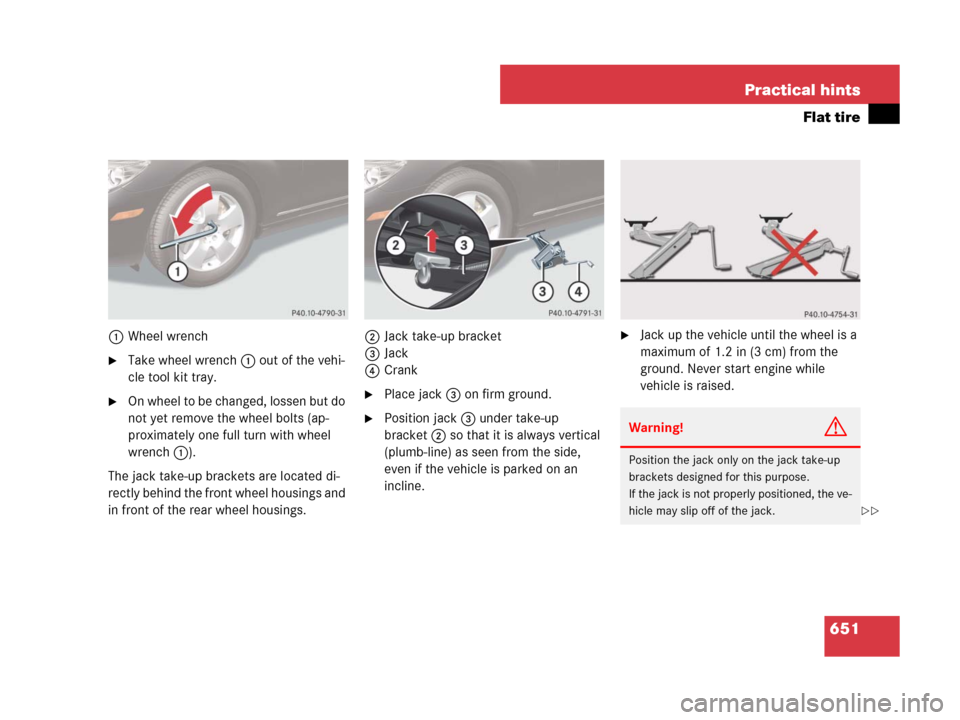
1Wheel wrench
�Take wheel wrench 1 out of the vehi-
cle tool kit tray.
�On wheel to be changed, lossen but do
not yet remove the wheel bolts (ap-
proximately one full turn with wheel
wrench1).
The jack take-up brackets are located di-
rectly behind the front wheel housings and
in front of the rear wheel housings.2Jack take-up bracket
3Jack
4Crank�Place jack3 on firm ground.
�Position jack3 under take-up
bracket2 so that it is always vertical
(plumb-line) as seen from the side,
even if the vehicle is parked on an
incline.
�Jack up the vehicle until the wheel is a
maximum of 1.2 in (3 cm) from the
ground. Never start engine while
vehicle is raised.
Warning!G
Position the jack only on the jack take-up
brackets designed for this purpose.
If the jack is not properly positioned, the ve-
hicle may slip off of the jack.
��
Page 655 of 723

652 Practical hints
Flat tire
Removing the wheel
1Alignment bolt
�Unscrew upper-most wheel bolt and re-
move.
�Replace this wheel bolt with alignment
bolt1 supplied in the tool kit.
�Remove the remaining bolts.
�Remove the wheel.Mounting the Minispare wheel
1Wheel bolt for light alloy rims
2Wheel bolt for Minispare wheel
(located in trunk with spare wheel)
Warning!G
The jack is intended only for lifting the
vehicle briefly for wheel changes. It is not
suited for performing maintenance work
under the vehicle.
�Never start the engine when the vehicle
is raised.
�Never lie down under the raised vehicle.
!Do not place wheel bolts in sand or dirt. This
could result in damage to the bolt and wheel hub
threads.
!Wheel bolts2 must be used when mount-
ing a Minispare wheel. The use of any wheel
bolts other than wheel bolts2 for a Minispare
wheel will physically damage the vehicle’s
brakes.
Warning!G
Make sure to use the original length wheel
bolts when remounting the original wheel
after it has been repaired.
��