Page 353 of 441
352 Practical hints
What to do if …
Display symbolDisplay messagePossible cause/consequencePossible solution
.Rear
fog lamp
Auxiliary bulb
onThe rear fog lamp is malfunctioning.
A substitute bulb is being used.�Replace the bulb as soon as possible
(
�page 373).
Reverse
lamp
leftThe left backup lamp is malfunctioning.�Replace the bulb as soon as possible
(
�page 373).
Reverse
lamp
rightThe right backup lamp is malfunctioning.�Replace the bulb as soon as possible
(
�page 373).
Switch off
lightsYou have removed the SmartKey from the
starter switch, opened the driver’s door
and left the headlamps on.�Switch off the headlamps.
Tail lamp
left
Auxiliary bulb
on
The left tail lamp is malfunctioning.
A substitute bulb is being used.�Replace the bulb as soon as possible
(
�page 373).
Tail lamp
right
Auxiliary bulb
on
The right tail lamp is malfunctioning.
A substitute bulb is being used.�Replace the bulb as soon as possible
(
�page 373).
Page 362 of 441
361 Practical hints
Unlocking/locking in an emergency
�Unlocking/locking in an emergency
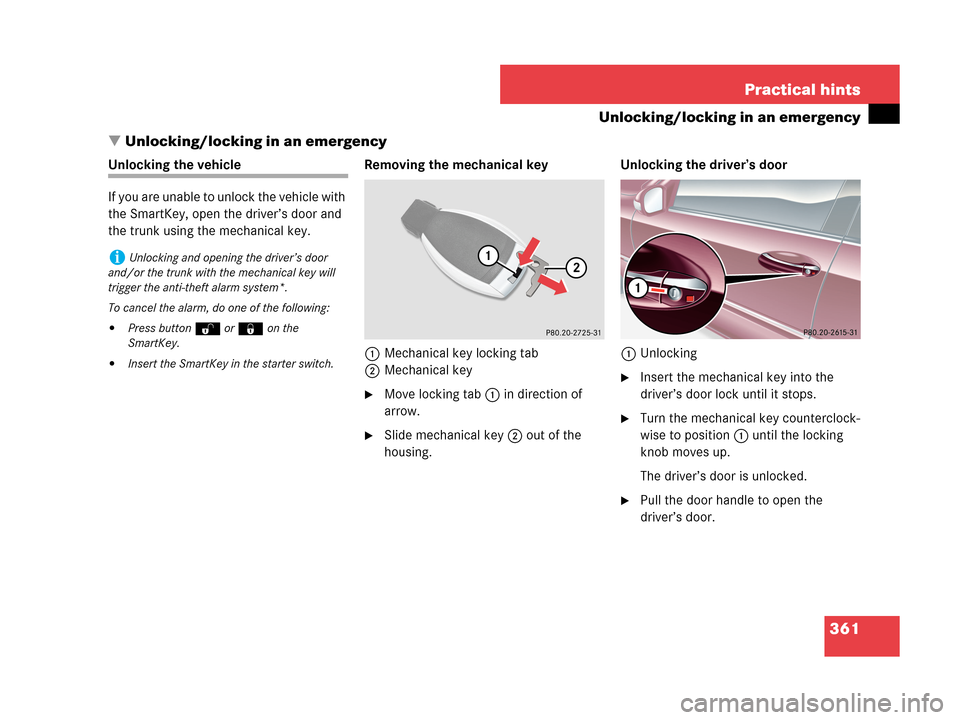
Unlocking the vehicle
If you are unable to unlock the vehicle with
the SmartKey, open the driver’s door and
the trunk using the mechanical key. Removing the mechanical key
1Mechanical key locking tab
2Mechanical key
�Move locking tab1 in direction of
arrow.
�Slide mechanical key2 out of the
housing.Unlocking the driver’s door
1Unlocking
�Insert the mechanical key into the
driver’s door lock until it stops.
�Turn the mechanical key counterclock-
wise to position1 until the locking
knob moves up.
The driver’s door is unlocked.
�Pull the door handle to open the
driver’s door.
iUnlocking and opening the driver’s door
and/or the trunk with the mechanical key will
trigger the anti-theft alarm system*.
To cancel the alarm, do one of the following:
�Press buttonŒ or‹ on the
SmartKey.
�Insert the SmartKey in the starter switch.
Page 363 of 441
 is required to open the trunk lid.
The trunk lid lock is located n")
362 Practical hints
Unlocking/locking in an emergency
Unlocking and opening the trunk
A minimum height clearance of 5.71 ft
(1.74 m) is required to open the trunk lid.
The trunk lid lock is located next to the
handle above the rear license plate recess.
1Unlocking in an emergency
2Handle�Insert the mechanical key into the
trunk lid lock until it stops.
�Turn the mechanical key
counterclockwise to position1.
The trunk lid unlocks.
�Pull on handle2.
The trunk opens.
�Turn the mechanical key back and
remove it from the trunk lid lock.
Locking the vehicle
If you can not lock the vehicle with the
SmartKey, do the following:
�Close the passenger door, the rear
doors and the trunk.
�Press the central locking switch in the
center console (
�page 100).
�Check to see whether the locking
knobs on the doors have moved down.
�If necessary push them down manually.
�Remove the mechanical key out of the
SmartKey (
�page 361).
�Check whether the trunk is locked.
�If necessary, lock the trunk with the
mechanical key (
�page 99).
�Close the driver’s door.
Except for the driver’s door, the vehicle
should now be locked.
!The trunk lid swings open upwards
automatically. Always make sure there is suffi-
cient overhead clearance.
Page 364 of 441
363 Practical hints
Unlocking/locking in an emergency
1Locking
�Insert the mechanical key into the
driver’s door lock until it stops.
�Turn the mechanical key clockwise to
position1.
The driver’s door is locked.Manually unlocking the transmission
gear selector lever
In case of power failure, the transmission
gear selector lever can be manually un-
locked, e.g. to tow the vehicle.
�Slide out the swiveling cup holder
(
�page 240).
1Tool
�Insert a tool1 (e.g. flat blade screw
driver) into the opening.
�Perform the following two steps
simultaneously:
�Press tool1 forward in direction
of the arrow.
�Move gear selector lever from
positionP.
�Remove tool1 from the opening.
iThis procedure does not arm the anti-theft
alarm system, nor does it lock the fuel filler flap.
iThe gear selector lever is locked again when
moving it to positionP.
Page 393 of 441
392 Practical hints
Fuses
Main fuse box in passenger
compartment
The main fuse box is located in the passen-
ger compartment on the driver’s side of
the cockpit.
1Main fuse box coverOpening fuse box�Open the driver’s door.
�Pull fuse box cover1 open with a
screw driver or similar tool (see arrow).
�Remove fuse box cover1 rearward.
Closing fuse box
�Attach fuse box cover1 in the front.
�Fold fuse box cover1 in until it
engages.
Fuse box in engine compartment
The fuse box is located in the engine
compartment on the driver’s side.
1Cover
2Screws
3Retainer
Removing cover
�Twist screws2
90° counterclockwise.
�Lift the rear of cover1.
�Slide out retainer3 and remove
cover1 by pulling towards front.
Page 404 of 441

403 Technical data
Rims and Tires
�Rims and Tires
!Only use tires which have been tested and
approved for your vehicle by Mercedes-Benz.
Tires approved by Mercedes-Benz are developed
to provide best possible performance in conjunc-
tion with the driving safety systems on your vehi-
cle such as ABS or ESP
®. Tires specially
developed for your vehicle and tested and ap-
proved by Mercedes-Benz can be identified by
finding the following on the tire’s sidewall:
�MO = Mercedes-Benz Original equipment
tires
�MOE = Mercedes-Benz Original Extended
(tires with limited run-flat characteristics)
original equipment tires. Using tires other
than those approved by Mercedes-Benz may
result in damage that is not covered by the
Mercedes-Benz Limited Warranty.
iFor information on driving with MOExtended
tires, see “MOExtended system*” (
�page 382).
!Using tires other than those approved by
Mercedes-Benz can have detrimental effects,
such as
�poor handling characteristics
�increased noise
�increased fuel consumption
Moreover, tires and rims not approved by
Mercedes-Benz may, under load, exhibit dimen-
sional variations and different tire deformation
characteristics that could cause them to come
into contact with the vehicle body or axle parts.
Damage to the tires or the vehicle may be the
result.
iFurther information on tires and rims is
available at any authorized Mercedes-Benz
Center. A placard with the recommended tire in-
flation pressures is located on the driver’s door
B-pillar. Some vehicles may have supplemental
tire inflation pressure information for driving at
high speeds (
�page 290) or for vehicle loads
less than the maximum loaded vehicle condition
(
�page 290). If such information is provided, it can be found
on the placard located on the inside of the fuel
filler flap. The tire inflation pressure should be
checked regularly and should only be adjusted
on cold tires. Follow tire manufacturer’s mainte-
nance recommendation included with vehicle.
iThe following pages also list the approved
wheel rim and tire sizes for equipping your vehi-
cles with winter tires. Winter tires are not avail-
able as standard or optional factory equipment,
but can be purchased from an authorized
Mercedes-Benz Center.
Depending on vehicle model and the standard or
optional factory-equipped wheel rim/tire config-
uration on your vehicle (Appearance Package,
Sport Package etc.), equipping your vehicle with
winter tires approved for your vehicle model may
also require the purchase of two or four wheel
rims of the recommended size for use with these
winter tires. See an authorized Mercedes-Benz
Center for more information.