Page 357 of 441
356 Practical hints
Where will I find ...?
First aid kit
The first aid kit is located in the trunk on
the left side secured by a hook and loop
fastener.
1First aid kit
2Hook and loop fastener
�Unfasten hook and loop fastener2.
�Remove first aid kit1.
Vehicle tool kit
The vehicle tool kit is located in the storage
compartment underneath the trunk floor.
The following is included:
�Towing eye bolt
�Wheel wrench
�Alignment bolt
�Vehicle jack
�Spare fuses
�Collapsible wheel chock
�A pair of gloves Removing the vehicle tool kit
�Lift up trunk floor cover and engage
trunk floor handle in upper edge of
trunk.
1Retaining screw
2Storage well casing
�Loosen retaining screw1 by turning it
counterclockwise.
�Remove storage well casing2.
iCheck expiration dates and contents for
completeness at least once a year and replace
missing/expired items.
Page 358 of 441

357 Practical hints
Where will I find ...?
3Arrow
4Minispare wheel with spare wheel bolts
in container on wheel rim
5Vehicle tool kit storage well casing
6Vehicle tool kit
�Remove vehicle tool kit6.Storing the vehicle tool kit
�Place vehicle tool kit6 in vehicle tool
kit storage well casing5.
�Place storage well casing2 over the
vehicle tool kit storage well casing5
and turn retaining screw1 clockwise
as far it will go to secure the Minispare
wheel.Vehicle jack
iArrow3 on vehicle tool kit storage well
casing5 must point in the direction of travel.
Otherwise you cannot place the storage well
casing2 on top and secure the Minispare
wheel with retaining screw1.
!To prevent damage, always disengage trunk
floor handle from upper edge of trunk and lower
trunk floor before closing the trunk.
Warning!G
The jack is designed exclusively for jacking
up the vehicle at the jack take-up brackets
built into both sides of the vehicle. To help
avoid personal injury, use the jack only to lift
the vehicle during a wheel change. Never
get beneath the vehicle while it is supported
by the jack. Keep hands and feet away from
the area under the lifted vehicle. Always
firmly set parking brake and block wheels
before raising vehicle with jack.
Do not disengage parking brake while the
vehicle is raised. Be certain that the jack is
always vertical (plumb line) when in use,
especially on hills. Always try to use the jack
on level surface. Make sure the jack arm is
fully seated in the jack take-up bracket.
Always lower the vehicle onto sufficient
capacity jackstands before working under
the vehicle.
Page 359 of 441
358 Practical hints
Where will I find ...?
The vehicle jack is located in the storage
compartment underneath the trunk floor.
Storage position
�Turn crank handle in direction of arrow
as far as it will go.
�Push crank handle up.
Operational position
�Turn crank handle clockwise.
Before storing the vehicle jack in its
compartment:
�It should be fully collapsed.
�The handle must be folded in (storage
position).Setting up the collapsible wheel chock
The collapsible wheel chock serves to
additionally secure the vehicle, e.g. while
changing the wheel.
1Tilt the plate upward
2Fold the lower plate outward
3Insert the plate
Page 361 of 441

360 Practical hints
Where will I find ...?
Storing the Minispare wheel
�Place Minispare wheel3 in wheel
well.
�Place vehicle tool kit storage well
casing4 over the Minispare wheel.
Make sure arrow2 on vehicle tool kit
storage well casing4 points in the
direction of travel.
�Place storage well casing (�page 356)
over vehicle tool kit storage well
casing4 and turn the retaining screw
(
�page 356) clockwise as far it will go
to secure the Minispare wheel.In case of a flat tire, you may temporarily
use the Minispare wheel when observing
the following restrictions:
�Do not exceed a vehicle speed of
50 mph (80 km/h).
�Drive to the nearest tire repair facility
to have the flat tire repaired or
replaced as appropriate.
�Do not operate vehicle with more than
one Minispare wheel mounted.
For more information, see “Rims and Tires”
(
�page 403).
Spare wheel bolts
1Wheel bolt for light alloy rims
2Wheel bolt for Minispare wheel (locat-
ed in trunk with spare wheel)
iArrow2 on vehicle tool kit storage well
casing4 must point in the direction of travel.
Otherwise you cannot place the storage well cas-
ing (
�page 356) on top and secure the Minis-
pare wheel with the retaining screw
(
�page 356).
!To prevent damage, always disengage trunk
floor handle from upper edge of trunk and lower
trunk floor before closing the trunk lid.
Warning!G
The dimensions of the Minispare wheel are
different from those of the road wheels. As
a result, the vehicle handling characteristics
change when driving with a Minispare wheel
mounted.
The Minispare wheel should only be used
temporarily, and should be replaced with a
regular road wheel as quickly as possible.
!Wheel bolts2 must be used when mount-
ing the Minispare wheel. The use of any wheel
bolts other than wheel bolts2 for the Minispare
wheel will physically damage the vehicle’s
brakes.
Warning!G
Make sure to use the original length wheel
bolts when remounting the original wheel
after it has been repaired.
Page 362 of 441
361 Practical hints
Unlocking/locking in an emergency
�Unlocking/locking in an emergency
Unlocking the vehicle
If you are unable to unlock the vehicle with
the SmartKey, open the driver’s door and
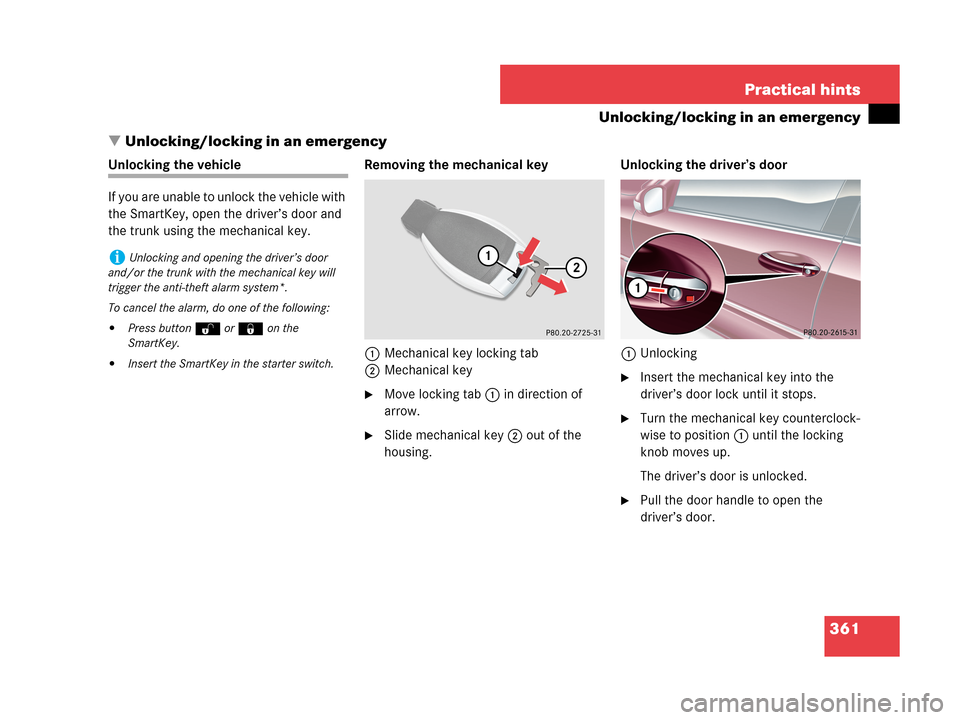
the trunk using the mechanical key. Removing the mechanical key
1Mechanical key locking tab
2Mechanical key
�Move locking tab1 in direction of
arrow.
�Slide mechanical key2 out of the
housing.Unlocking the driver’s door
1Unlocking
�Insert the mechanical key into the
driver’s door lock until it stops.
�Turn the mechanical key counterclock-
wise to position1 until the locking
knob moves up.
The driver’s door is unlocked.
�Pull the door handle to open the
driver’s door.
iUnlocking and opening the driver’s door
and/or the trunk with the mechanical key will
trigger the anti-theft alarm system*.
To cancel the alarm, do one of the following:
�Press buttonŒ or‹ on the
SmartKey.
�Insert the SmartKey in the starter switch.
Page 363 of 441
 is required to open the trunk lid.
The trunk lid lock is located n")
362 Practical hints
Unlocking/locking in an emergency
Unlocking and opening the trunk
A minimum height clearance of 5.71 ft
(1.74 m) is required to open the trunk lid.
The trunk lid lock is located next to the
handle above the rear license plate recess.
1Unlocking in an emergency
2Handle�Insert the mechanical key into the
trunk lid lock until it stops.
�Turn the mechanical key
counterclockwise to position1.
The trunk lid unlocks.
�Pull on handle2.
The trunk opens.
�Turn the mechanical key back and
remove it from the trunk lid lock.
Locking the vehicle
If you can not lock the vehicle with the
SmartKey, do the following:
�Close the passenger door, the rear
doors and the trunk.
�Press the central locking switch in the
center console (
�page 100).
�Check to see whether the locking
knobs on the doors have moved down.
�If necessary push them down manually.
�Remove the mechanical key out of the
SmartKey (
�page 361).
�Check whether the trunk is locked.
�If necessary, lock the trunk with the
mechanical key (
�page 99).
�Close the driver’s door.
Except for the driver’s door, the vehicle
should now be locked.
!The trunk lid swings open upwards
automatically. Always make sure there is suffi-
cient overhead clearance.
Page 364 of 441
363 Practical hints
Unlocking/locking in an emergency
1Locking
�Insert the mechanical key into the
driver’s door lock until it stops.
�Turn the mechanical key clockwise to
position1.
The driver’s door is locked.Manually unlocking the transmission
gear selector lever
In case of power failure, the transmission
gear selector lever can be manually un-
locked, e.g. to tow the vehicle.
�Slide out the swiveling cup holder
(
�page 240).
1Tool
�Insert a tool1 (e.g. flat blade screw
driver) into the opening.
�Perform the following two steps
simultaneously:
�Press tool1 forward in direction
of the arrow.
�Move gear selector lever from
positionP.
�Remove tool1 from the opening.
iThis procedure does not arm the anti-theft
alarm system, nor does it lock the fuel filler flap.
iThe gear selector lever is locked again when
moving it to positionP.
Page 365 of 441
364 Practical hints
Opening/closing in an emergency
Power tilt/sliding sunroof*
You can open or close the tilt/sliding
sunroof manually should an electrical
malfunction occur.
The tilt/sliding sunroof drive is located
behind the lens1 of the interior overhead
light.
1Lens
�Remove SmartKey from the starter
switch.
�Pry off lens1 using a flat blade
screwdriver.2Locking tabs
�Slide both locking tabs2 in direction
of the arrows.
�Lower the rear of the cover.
�Remove the cover.
�Take the crank3 out of the Mer-
cedes-Benz vehicle literature pouch.3Crank
�Insert crank3 through hole on the left
side.
�Turn crank3 clockwise to:
�slide sunroof closed
�raise sunroof at the rear
�Turn crank3 counterclockwise to:
�slide sunroof open
�lower sunroof at the rear
iDo not disconnect electrical connectors.
iTurn crank3 slowly and smoothly.
The tilt/sliding sunroof must be synchronized af-
ter being operated manually (
�page 226).