Page 134 of 441
133 Controls in detail
Control system
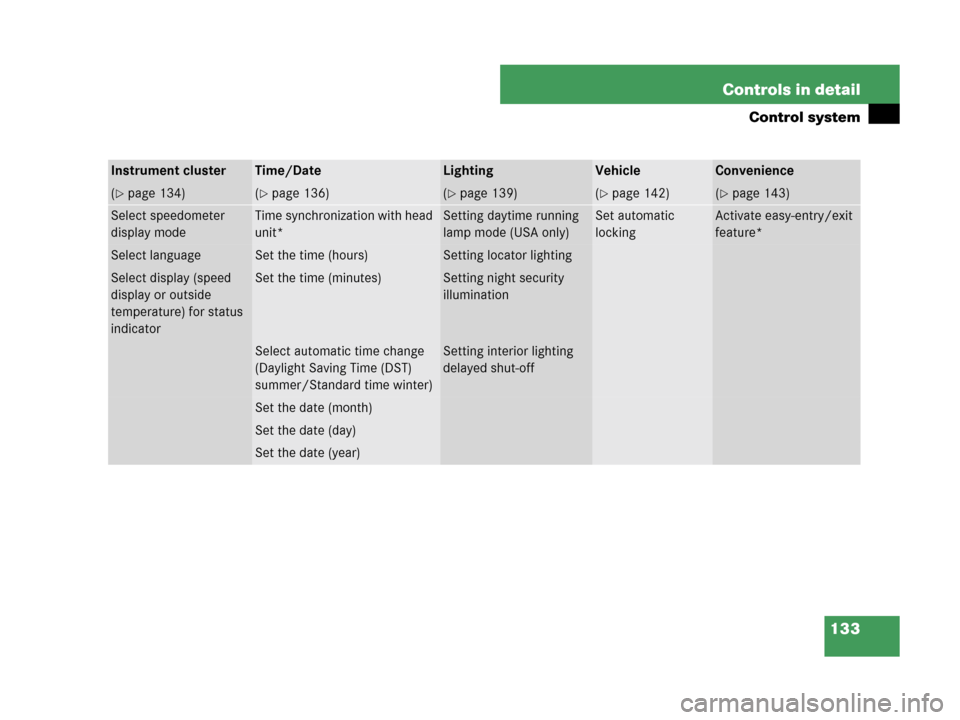
Instrument clusterTime/DateLightingVehicleConvenience
(�page 134)(�page 136)(�page 139)(�page 142)(�page 143)
Select speedometer
display modeTime synchronization with head
unit*Setting daytime running
lamp mode (USA only)Set automatic
lockingActivate easy-entry/exit
feature*
Select languageSet the time (hours)Setting locator lighting
Select display (speed
display or outside
temperature) for status
indicatorSet the time (minutes)Setting night security
illumination
Select automatic time change
(Daylight Saving Time (DST)
summer/Standard time winter)Setting interior lighting
delayed shut-off
Set the date (month)
Set the date (day)
Set the date (year)
Page 137 of 441

136 Controls in detail
Control system
Time/Date submenu
Access the
Time/Date submenu via the
Settings menu. Use the Time/Date
submenu to change the instrument cluster
display settings.
The following functions are available:Time synchronization with head unit*
This function can only be seen on vehicles
with COMAND* and navigation module*.
�Move the selection marker with
buttonæ orç to the
Time/Date
submenu.
�Press buttonj ork repeatedly
until the message
Time synchro.
w/Head Unit
appears in the multifunc-
tion display.
The selection marker is on the current
setting.
�Press buttonæ orç to select
the desired setting.Set the time (hours)
This function can be seen in vehicles with
audio system, or in vehicles with
COMAND* if the time synchronization with
head unit* feature was set to
Off.
�Move the selection marker with
buttonæ orç to the
Time/Date
submenu.
�Press buttonj ork repeatedly
until the message
Time Hours appears
in the multifunction display.
The selection marker is on the hour
setting.
FunctionPage
Time synchronization with
head unit*136
Set the time (hours)136
Set the time (minutes)137
Select automatic time change
(Daylight Saving Time (DST)
summer/Standard time winter)137
Set the date (month)138
Set the date (day)138
Set the date (year)138
iVehicles with COMAND*:
For information on setting the time, refer to the
separate COMAND operating instructions.
Page 138 of 441

This function can be seen in vehicles with
audio system, or in vehicles with
COMAND* if the time s")
137 Controls in detail
Control system
�Press buttonæ orç to set the
hour.
Set the time (minutes)
This function can be seen in vehicles with
audio system, or in vehicles with
COMAND* if the time synchronization with
head unit* feature was set to
Off.
�Move the selection marker with
buttonæ orç to the
Time/Date
submenu.
�Press buttonj ork repeatedly
until the message
Time Minutes
appears in the multifunction display.
The selection marker is on the minute
setting.
�Press buttonæ orç to set the
minutes.
Select automatic time change (Daylight
Saving Time (DST) summer/Standard
time winter)
This function can be seen in vehicles with
audio system, or in vehicles with
COMAND* if the time synchronization with
head unit* feature was set to
Off.
�Move the selection marker with
buttonæ orç to the
Time/Date
submenu.
�Press buttonj ork repeatedly
until the message
Daylight sav.
Summer / Winter time
appears in the
multifunction display.
The selection marker is on the current
setting.
�Press buttonæ orç to select if
the changeover between summer and
winter time should be automatic or
manual. iVehicles with COMAND*:
For information on setting the time, refer to the
separate COMAND operating instructions.
Page 141 of 441
 or daytime
running lamp mode (
Constant).
With daytime running lamp mode activated
and the exterior l")
140 Controls in detail
Control system
�Press buttonæ orç to select
manual operation (
Manual) or daytime
running lamp mode (
Constant).
With daytime running lamp mode activated
and the exterior lamp switch in
positionM orU, the low beam
headlamps are switched on when the
engine is running.
In low ambient light conditions the
following lamps will switch on additionally:
�Parking lamps
�Tail lamps
�License plate lamps
�Side marker lamps
For more information on the daytime
running lamp mode, see “Lighting”
(
�page 109).Setting locator lighting
With the locator lighting feature activated
and the exterior lamp switch in
positionU, the following lamps will
switch on during darkness when the vehi-
cle is unlocked with the SmartKey:
�Parking lamps
�Tail lamps
�License plate lamps
�Side marker lamps
�Front fog lamps
The locator lighting switches off when the
driver’s door is opened.If you do not open a door after unlocking
the vehicle with the SmartKey, the lamps
will switch off automatically after
approximately 40 seconds.
�Move the selection marker with
buttonæ orç to the
Lighting
submenu.
�Press buttonj ork repeatedly
until the message
Surround lighting
appears in the multifunction display.
The selection marker is on the current
setting.
�Press buttonæ orç to switch
the locator lighting function
On or Off.
iFor safety reasons, resetting the Lighting
submenu to factory settings (
�page 131) while
driving will not deactivate the daytime running
lamp mode.
The following message appears in the
multifunction display:
Lighting - Cannot be completely reset
to factory settings while driving.
��
Page 142 of 441

141 Controls in detail
Control system
�Turn the exterior lamp switch to
positionU when exiting the vehicle.
The locator lighting feature is
activated.
Setting night security illumination
(Headlamps delayed shut-off feature)
Use this function to set whether you would
like the exterior lamps to remain on for
15 seconds during darkness after exiting
the vehicle and closing all doors.
With the headlamps delayed shut-off
feature activated and the exterior lamp
switch in positionU before the engine
is turned off, the following lamps will
switch on when the engine is turned off:
�Parking lamps
�Tail lamps
�License plate lamps
�Side marker lamps
�Front fog lampsIf after turning off the engine you do not
open a door or do not close an opened
door, the lamps will automatically switch
off after 60 seconds.
�Move the selection marker with
buttonæ orç to the
Lighting
submenu.
�Press buttonj ork repeatedly
until the message
Headl. delayed
shut-off
appears in the multifunction
display.
The selection marker is on the current
setting.
�Press buttonæ orç to switch
the headlamps delayed shut-off feature
Onor Off.
�Turn the exterior lamp switch to
positionU before turning off the
engine.
The headlamps delayed shut-off
feature is activated.
You can temporarily deactivate the head-
lamp delayed shut-off feature:
�Before exiting the vehicle, turn the
SmartKey in the starter switch to
position0.
�Then turn it to position2 and back to
position0.
The headlamps delayed shut-off
feature is deactivated. It will reactivate
as soon as you reinsert the SmartKey in
the starter switch.
Page 143 of 441

142 Controls in detail
Control system
Setting interior lighting delayed shut-off
Use this function to set whether you would
like the interior lighting to remain on for
10 seconds during darkness after you have
removed the SmartKey from the starter
switch.
�Move the selection marker with
buttonæ orç to the
Lighting
submenu.
�Press buttonj ork repeatedly
until the message
Interior light.
delay.sw.off
appears in the multifunc-
tion display.
The selection marker is on the current
setting.
�Press buttonæ orç to switch
the interior lighting delayed shut-off
feature
Off or On.
Vehicle submenu
Access the
Vehicle submenu via the
Settings menu. Use the Vehicle submenu
to make general vehicle settings.
The following function is available:
Selecting audio search function
Use of the
Audio search function to select
a radio station (
�page 127) will enable
you to start a frequency scan (
Frequency)
or select a radio station stored in memory
(
Memory).
�Move the selection marker with
buttonæ orç to the
Vehicle
submenu.
�Press buttonj ork repeatedly
until the message
Audio search
appears in the multifunction display.
The selection marker is on the current
setting.
�Press buttonæ or ç to set the
audio search function to
Frequency
or
Memory.
To select a radio station, see “Selecting ra-
dio station” (
�page 127).
FunctionPage
Selecting audio search function142
Setting automatic locking143
Page 156 of 441

155 Controls in detail
Automatic transmission*
Driving tips
Accelerator position
Your driving style influences the
transmission’s shifting behavior:
Less throttle Earlier upshifting
More throttle Later upshifting
Kickdown
Use kickdown when you want maximum
acceleration.
�Press the accelerator past the point of
resistance.
Depending on the engine speed the
transmission shifts into a lower gear.
�Ease on the accelerator when you have
reached the desired speed.
The transmission shifts up again.Stopping
When you stop briefly, e.g. at traffic lights:
�Leave the transmission in gear.
�Hold the vehicle with the brake.
When you stop for a longer period of time
with the engine idling and/or on a hill:
�Set the parking brake.
�Move the gear selector lever to park
positionP.
Maneuvering
When you maneuver in tight areas,
e.g. when pulling into a parking space:
�Control the vehicle speed by gradually
releasing the brakes.
�Accelerate gently.
�Never abruptly step on the accelerator.Working on the vehicle
Warning!G
When working on the vehicle, set the
parking brake and move gear selector lever
to park positionP. Otherwise the vehicle
could roll away.
Page 162 of 441

161 Controls in detail
Good visibility
Auto-dimming rear view mirrors*
The reflection brightness of the exterior
rear view mirror on the driver’s side and
the interior rear view mirror will respond
automatically to glare when
�the ignition is switched on
and
�incoming light from headlamps falls on
the sensor in the interior rear view
mirror.
The rear view mirror will not react if
�reverse gearR is engaged
�the interior lighting is turned on
Sun visors
The sun visors protect you from sun glare
while driving.
Warning!G
The auto-dimming function does not react if
incoming light is not aimed directly at
sensors in the interior rear view mirror.
The interior rear view mirror and the exterior
rear view mirror on the driver’s side do not
react, for example, if the rear window
sunshade* is in raised position.
Light hitting the mirror(s) at certain angles
(incident light) could blind you. As a result,
you may not be able to observe traffic con-
ditions and could cause an accident.
Warning!G
In the case of an accident, liquid electrolyte
may escape from the mirror housing if the
mirror glass breaks.
Electrolyte has an irritating effect. Do not
allow the liquid to come into contact with
eyes, skin, clothing, or respiratory system.
In case it does, immediately flush affected
area with water, and seek medical help if
necessary.
!Electrolyte drops coming into contact with
the vehicle paint finish can be completely re-
moved only while in the liquid state and by apply-
ing plenty of water.
Warning!G
Exercise care when using the passen-
ger-side exterior rear view mirror. The mirror
surface is convex (outwardly curved surface
for a wider field of view). Objects in mirror
are closer than they appear. Check your
interior rear view mirror or glance over your
shoulder before changing lanes.
Warning!G
Do not use the vanity mirror while driving.
Keep the vanity mirrors in the sun visors
closed while vehicle is in motion. Reflected
glare can endanger you and others.