Page 79 of 441

78 Safety and Security
Occupant safety
�Remove cover1 from anchorage
ring3.
�Guide tether strap between head
restraint and top of seat back.
Head restraint must be installed and
positioned such that the top tether
strap can pass freely between the head
restraint and top of seat back.
Make sure the tether strap is not
twisted.2Hook
3Anchorage ring
�Securely fasten hook2, which is part
of the tether strap, to anchorage
ring3.Once the top tether anchorage hook is
attached, the child restraint itself can be
secured. Secure the child restraint and
tighten the top tether strap according to
the child restraint manufacturer’s instruc-
tions.
�Reinstall cover1 after removing the
tether strap.
Warning!G
Always lock backrest in its upright position
when rear seat bench is occupied by pas-
sengers, or the extended cargo area is not in
use. Check for secure locking by pushing
and pulling on the backrest.
iFor safety, make sure the hook2 has
attached to the anchorage ring3 beyond the
safety catch, as illustrated.��
Page 81 of 441

80 Safety and Security
Occupant safety
Blocking of rear door window operation
You can block the rear door window
operation (for instance when you have
children riding in the rear passenger
compartment).
The override switch is located on the door
control panel of the driver’s door.
1Deactivating override switch
2Activating override switch
3Override switchActivating override switch
�Slide override switch3 to the right in
direction2.
The rear door windows can no longer
be operated using the respective
switch located in the rear doors.
Deactivating override switch
�Slide override switch3 to the left in
direction1.
The rear door windows can be operated
again using the respective switch
located in the rear doors.
For more information, see “Power win-
dows” (
�page 221).
Warning!G
Activate the override switch when children
are riding in the back seats of the vehicle.
The children may otherwise injure them-
selves, e.g. by becoming trapped in the win-
dow opening.
When leaving the vehicle, always remove the
SmartKey from the starter switch, take it
with you, and lock the vehicle. Do not leave
children unattended in the vehicle, or with
access to an unlocked vehicle. A child’s
unsupervised access to a vehicle could
result in an accident and/or serious
personal injury.
iOperation of the rear door windows with the
switches located on the door control panel of the
driver’s door is still possible.
Page 102 of 441

101 Controls in detail
Seats
�Seats
For information on seat adjustment, see
“Adjusting” (
�page 34).
Front seat active head restraintsYou cannot remove the active head re-
straints on the driver’s and front passen-
ger’s seat.
For removal of the active head restraints
we recommend that you contact an autho-
rized Mercedes-Benz Center.
For information on head restraint
adjustment, see “Seats” (
�page 34).
For information on active head restraints,
see “Active head restraint” (
�page 73).
Rear seat head restraints
Warning!G
For your protection, drive only with properly
positioned head restraints.
Adjust the head restraint so that it is as
close to the head as possible and the center
of the head restraint supports the back of
the head at eye level. This will reduce the po-
tential for injury to the head and neck in the
event of an accident or similar situation.
iAdjust the head restraint in such a way that
it is as close to the head as possible.
Warning!G
For safety reasons, always drive with the
rear head restraints in the upright position
when the rear seats are occupied.
Keep the area around head restraints clear
of articles (e.g. clothing) to not obstruct the
folding operation of the head restraints.
Page 105 of 441

104 Controls in detail
Seats
Removing and installing rear seat head
restraints (rear outer seats)
1Release button
Removing rear seat head restraints
�Fold back head restraint (�page 102).
�Pull head restraint to its highest
position.
�Push release button1 and pull out
head restraint.Installing rear seat head restraints
�Insert head restraint and push it down
until it engages.
�Push release button1 and adjust
head restraint to desired position.
iThe rear center seat head restraint cannot
be removed.
Warning!G
For your protection, drive only with properly
positioned head restraints.
Adjust head restraint so that the head re-
straint supports the back of the head at eye
level. This will reduce the potential for injury
to the head and neck in the event of an ac-
cident or similar situation.
Do not drive the vehicle without the seat
head restraints. Head restraints are intend-
ed to help reduce injuries during an acci-
dent.
Do not interchange head restraints from
front and rear seat.
iAdjust the head restraint in such a way that
it is as close to the head as possible.
Page 234 of 441

233 Controls in detail
Loading
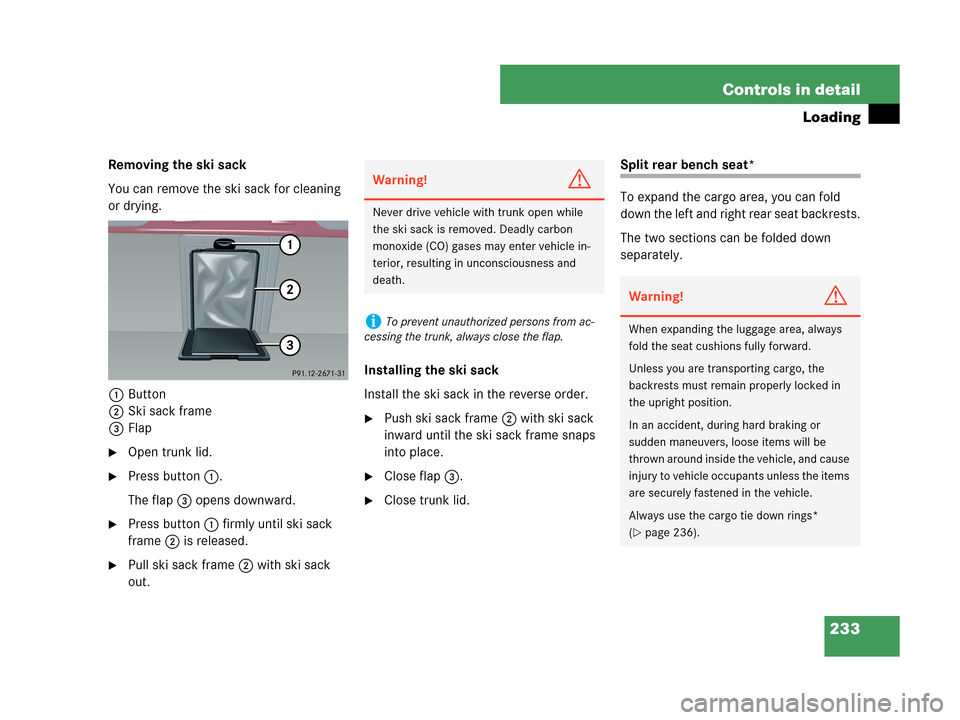
Removing the ski sack
You can remove the ski sack for cleaning
or drying.
1Button
2Ski sack frame
3Flap
�Open trunk lid.
�Press button1.
The flap3 opens downward.
�Press button1 firmly until ski sack
frame2 is released.
�Pull ski sack frame2 with ski sack
out.Installing the ski sack
Install the ski sack in the reverse order.
�Push ski sack frame2 with ski sack
inward until the ski sack frame snaps
into place.
�Close flap3.
�Close trunk lid.
Split rear bench seat*
To expand the cargo area, you can fold
down the left and right rear seat backrests.
The two sections can be folded down
separately.
Warning!G
Never drive vehicle with trunk open while
the ski sack is removed. Deadly carbon
monoxide (CO) gases may enter vehicle in-
terior, resulting in unconsciousness and
death.
iTo prevent unauthorized persons from ac-
cessing the trunk, always close the flap.
Warning!G
When expanding the luggage area, always
fold the seat cushions fully forward.
Unless you are transporting cargo, the
backrests must remain properly locked in
the upright position.
In an accident, during hard braking or
sudden maneuvers, loose items will be
thrown around inside the vehicle, and cause
injury to vehicle occupants unless the items
are securely fastened in the vehicle.
Always use the cargo tie down rings*
(
�page 236).
Page 242 of 441

241 Controls in detail
Useful features
Cup holder in rear seat armrest
1Cup holder
Opening cup holder
�Briefly press the front of cup holder1.
The cup holder slides out slightly.
�Pull out the cup holder until it stops.
Closing cup holder
�Slide cup holder back until it engages.
Ashtrays
Center console ashtray
1Cover plate
2Sliding button
3Ashtray insert
�Briefly press the bottom of cover
plate1.
The cover plate opens automatically.Removing ashtray insert
�Secure vehicle from movement by
setting the parking brake.
�Move the gear selector lever to
positionN (manual transmission:
second gear).
Now you have more room to take out
the ashtray insert.
�Push sliding button2 to the right.
The ashtray insert3 slides out
slightly.
�Remove the ashtray insert.
!Do not sit on or lean your body weight
against the armrest when it is folded down, as
you could otherwise damage it.
Warning!G
Remove front ashtray only with vehicle
standing still. Set the parking brake to
secure vehicle from movement. Move gear
selector lever to positionN (manual trans-
mission: second gear). With gear selector
lever in positionN (manual transmission:
second gear) turn off the engine.
Page 243 of 441

242 Controls in detail
Useful features
Reinstalling ashtray insert
�Push the ashtray insert3 down into
the retainer until it engages.
�Push down cover plate1 to close
ashtray.
The cover plate engages.
Rear seat ashtray
1Button
2Ashtray insert
3Cover
�Pull at top of cover3.Removing ashtray insert
�Push button1 to disengage ashtray
insert2 and remove it.
Reinstalling ashtray insert
�Push the ashtray insert2 down into
the retainer until it engages.
�Push at top of cover3 to close
ashtray.
Cigarette lighter
�Switch on the ignition (�page 32).
Warning!G
Never touch the heating element or sides of
the lighter; they are extremely hot. Hold the
knob only.
Make sure that any children traveling with
you do not injure themselves or start a fire
with the hot cigarette lighter.
When leaving the vehicle, always remove the
SmartKey from the starter switch, take it
with you, and lock the vehicle. Do not leave
children unattended in the vehicle, or with
access to an unlocked vehicle. A child’s
unsupervised access to a vehicle could
result in an accident and/or serious
personal injury.
Page 321 of 441

320 Operation
Vehicle care
Upholstery
Using aftermarket seat covers or wearing
clothing that have the tendency to give off
coloring (e.g. when wet, etc.) may cause
the upholstery to become permanently
discolored. By lining the seats with a
proper intermediate cover,
contact-discoloration will be prevented.Leather upholstery
Please note that leather upholstery is a
natural product and is therefore subject to
a natural aging process. Leather
upholstery may also react to certain
ambient influences such as high humidity
or high temperature by showing wrinkles
for example.
�Wipe leather upholstery with a damp
cloth and dry thoroughly or clean with
Mercedes-Benz approved Leather
Care.
Exercise particular care when cleaning
perforated leather as its underside should
not become wet.
MB Tex upholstery
�Use Mercedes-Benz approved Interior
Care onto a soft, lint-free cloth and
apply with light pressure for cleaning
the upholstery.Wood trims
�Dampen cloth using water and use
damp cloth to clean wood trims in your
vehicle.
Warning!G
Only use seat or head restraint covers which
have been tested and approved by
Mercedes-Benz for your vehicle model.
Using other seat or head restraint covers
may interfere with or prevent the activation
of the active head restraints. Contact an
authorized Mercedes-Benz Center for
availability.
!Wipe with light pressure to avoid damage to
the upholstery.
!Do not use solvents like tar remover or
wheel cleaner nor polishes or waxes as these
may be abrasive.