Page 318 of 441
.
�Fold the wiper arms forward until they
snap into place")
317 Operation
Vehicle care
Cleaning the windows and the wiper
blades
�Make sure the hood is fully closed.
�Switch off the ignition (�page 32).
�Fold the wiper arms forward until they
snap into place.
�Clean the wiper blade inserts with a
clean cloth and detergent solution.
�Use a soft, clean cloth and a mild win-
dow cleaning solution on all outside
and inside glass surfaces.
An automotive glass cleaner is recom-
mended.Light alloy wheels
If possible, clean wheels once a week.
�Use Mercedes-Benz approved Wheel
Care, a soft bristle brush and a strong
spray of water for cleaning the light
alloy wheels.!Never open the hood when the wiper arms
are folded forward.
Warning!G
For safety reasons, switch off wipers and
remove SmartKey from starter switch
before cleaning the windshield and/or the
wiper blades. Otherwise, the wiper motor
could suddenly turn on and cause injury.
!Do not pull on the wiper blade inserts. They
could tear.
!Fold the windshield wiper arms back onto
the windshield before turning the SmartKey in
the starter switch.
Hold on to the wiper when folding the wiper arm
back. If released, the force of the impact from
the tensioning spring could crack the windshield.
!To clean the window interior, do not use a
dry cloth, abrasives, solvents or cleaners
containing solvents. Do not touch the inside of
the front, rear or side windows with hard objects
such as an ice scraper or ring. Doing so may
damage the windows.
!Only use acid-free cleaning materials. Acid
may cause corrosion or damage the clear coat.
!The vehicle should not be parked for an
extended period of time immediately after it has
been cleaned, especially not after the wheel rims
have been cleaned with wheel rim cleaner.
Wheel rim cleaners can lead to increased
corrosion of the brake disks and brake pads.
Non-approved wheel cleaners may also damage
the wheel paint if the car is not driven after
cleaning. Therefore, the vehicle’s brake system
should always be warmed-up before it is parked
after cleaning. To do so, please drive your vehicle
for several minutes to allow the brakes to dry.
When applying Mercedes-Benz approved Tire
Care and Mercedes-Benz approved Wheel Care
products, take care not to spray them on the
brake disks.
Page 322 of 441
321 Practical hints
What to do if …
Where will I find ...?
Unlocking/locking in an emergency
Opening/closing in an emergency
Resetting activated head restraints
Replacing SmartKey batteries
Replacing bulbs
Replacing wiper blades
Flat tire
Battery
Jump starting
Towing the vehicle
Fuses
Page 345 of 441

!(Canada only)
Release
parking brakeYou are driving with the parking brake
s")
344 Practical hints
What to do if …
Display symbolDisplay messagePossible cause/consequencePossible solution
;(USA only)
!(Canada only)
Release
parking brakeYou are driving with the parking brake
set.�Release the parking brake
(
�page 48).
2Brake
wearThe brake pads have reached their wear
limit.�Have the brake pads replaced as soon
as possible.
;(USA only)
3(Canada only)
Check brake
fluid levelThere is insufficient brake fluid in the
reservoir.�Risk of accident! Stop the vehicle and
notify an authorized Mercedes-Benz
Center. Do not add brake fluid! This
will not solve the problem.
Warning!G
Driving with the message Check brake
fluid level
displayed can result in an ac-
cident. Have your brake system checked im-
mediately. Do not add brake fluid before
checking the brake system. Overfilling the
brake fluid reservoir can result in spilling
brake fluid on hot engine parts and the
brake fluid catching fire. You could be seri-
ously burned.
!If you find that the brake fluid in the brake
fluid reservoir has fallen to the minimum mark or
below, have the brake system checked for brake
pad thickness and leaks.!Brake pad thickness must be visually in-
spected by a qualified technician at the intervals
specified in the Maintenance Booklet.
Page 350 of 441

349 Practical hints
What to do if …
Display symbolDisplay messagePossible cause/consequencePossible solution
4Gas cap
is openA loss of pressure has been detected in
the fuel system. The fuel cap may not be
closed properly or the fuel system may be
leaky.�Check the fuel cap (�page 271).
If it is not closed properly:
�Close the fuel cap.
If it is closed properly:
�Have the fuel system checked by an
authorized Mercedes-Benz Center.
IRemove keyYou have forgotten to remove the
SmartKey.�Remove the SmartKey from the starter
switch.
Get a new
keyNo additional code available for
SmartKey.�Change the SmartKey.
.3rd brake
lampThe high mounted brake lamp is
malfunctioning.�Contact an authorized Mercedes-Benz
Center as soon as possible.
AUTO-Light
inoperativeThe light sensor is malfunctioning.
The headlamps switch on automatically.�In the control system, set lamp opera-
tion to manual mode (
�page 139).
�Switch on the headlamps using the
exterior lamp switch.
�Contact an authorized Mercedes-Benz
Center as soon as possible.
Page 353 of 441
352 Practical hints
What to do if …
Display symbolDisplay messagePossible cause/consequencePossible solution
.Rear
fog lamp
Auxiliary bulb
onThe rear fog lamp is malfunctioning.
A substitute bulb is being used.�Replace the bulb as soon as possible
(
�page 373).
Reverse
lamp
leftThe left backup lamp is malfunctioning.�Replace the bulb as soon as possible
(
�page 373).
Reverse
lamp
rightThe right backup lamp is malfunctioning.�Replace the bulb as soon as possible
(
�page 373).
Switch off
lightsYou have removed the SmartKey from the
starter switch, opened the driver’s door
and left the headlamps on.�Switch off the headlamps.
Tail lamp
left
Auxiliary bulb
on
The left tail lamp is malfunctioning.
A substitute bulb is being used.�Replace the bulb as soon as possible
(
�page 373).
Tail lamp
right
Auxiliary bulb
on
The right tail lamp is malfunctioning.
A substitute bulb is being used.�Replace the bulb as soon as possible
(
�page 373).
Page 362 of 441
361 Practical hints
Unlocking/locking in an emergency
�Unlocking/locking in an emergency
Unlocking the vehicle
If you are unable to unlock the vehicle with
the SmartKey, open the driver’s door and
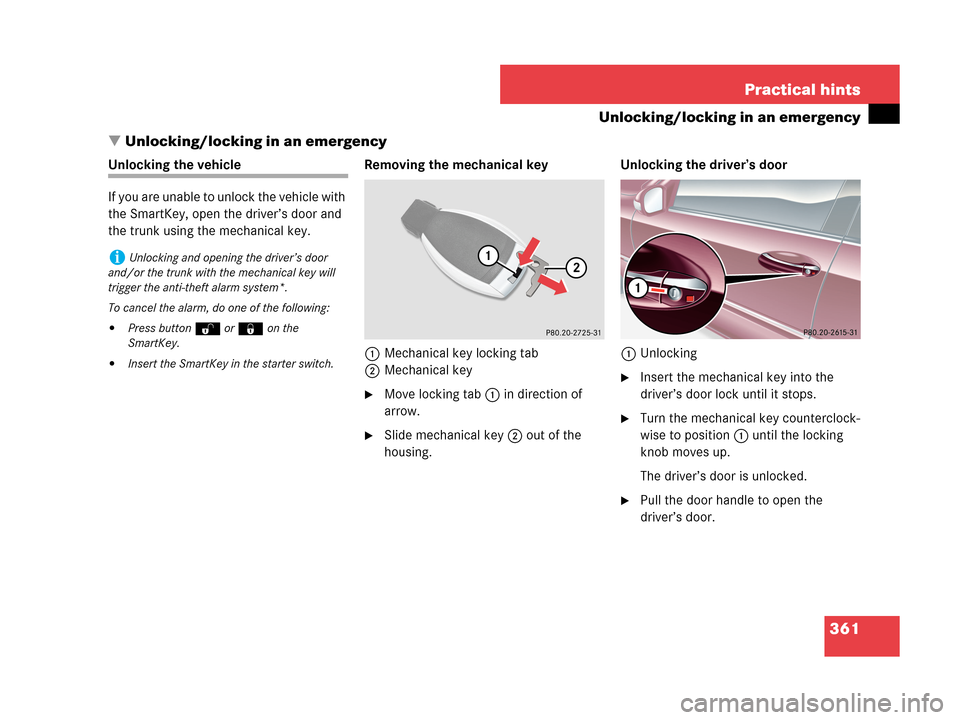
the trunk using the mechanical key. Removing the mechanical key
1Mechanical key locking tab
2Mechanical key
�Move locking tab1 in direction of
arrow.
�Slide mechanical key2 out of the
housing.Unlocking the driver’s door
1Unlocking
�Insert the mechanical key into the
driver’s door lock until it stops.
�Turn the mechanical key counterclock-
wise to position1 until the locking
knob moves up.
The driver’s door is unlocked.
�Pull the door handle to open the
driver’s door.
iUnlocking and opening the driver’s door
and/or the trunk with the mechanical key will
trigger the anti-theft alarm system*.
To cancel the alarm, do one of the following:
�Press buttonŒ or‹ on the
SmartKey.
�Insert the SmartKey in the starter switch.
Page 363 of 441
 is required to open the trunk lid.
The trunk lid lock is located n")
362 Practical hints
Unlocking/locking in an emergency
Unlocking and opening the trunk
A minimum height clearance of 5.71 ft
(1.74 m) is required to open the trunk lid.
The trunk lid lock is located next to the
handle above the rear license plate recess.
1Unlocking in an emergency
2Handle�Insert the mechanical key into the
trunk lid lock until it stops.
�Turn the mechanical key
counterclockwise to position1.
The trunk lid unlocks.
�Pull on handle2.
The trunk opens.
�Turn the mechanical key back and
remove it from the trunk lid lock.
Locking the vehicle
If you can not lock the vehicle with the
SmartKey, do the following:
�Close the passenger door, the rear
doors and the trunk.
�Press the central locking switch in the
center console (
�page 100).
�Check to see whether the locking
knobs on the doors have moved down.
�If necessary push them down manually.
�Remove the mechanical key out of the
SmartKey (
�page 361).
�Check whether the trunk is locked.
�If necessary, lock the trunk with the
mechanical key (
�page 99).
�Close the driver’s door.
Except for the driver’s door, the vehicle
should now be locked.
!The trunk lid swings open upwards
automatically. Always make sure there is suffi-
cient overhead clearance.
Page 364 of 441
363 Practical hints
Unlocking/locking in an emergency
1Locking
�Insert the mechanical key into the
driver’s door lock until it stops.
�Turn the mechanical key clockwise to
position1.
The driver’s door is locked.Manually unlocking the transmission
gear selector lever
In case of power failure, the transmission
gear selector lever can be manually un-
locked, e.g. to tow the vehicle.
�Slide out the swiveling cup holder
(
�page 240).
1Tool
�Insert a tool1 (e.g. flat blade screw
driver) into the opening.
�Perform the following two steps
simultaneously:
�Press tool1 forward in direction
of the arrow.
�Move gear selector lever from
positionP.
�Remove tool1 from the opening.
iThis procedure does not arm the anti-theft
alarm system, nor does it lock the fuel filler flap.
iThe gear selector lever is locked again when
moving it to positionP.