2007 MERCEDES-BENZ C-CLASS ESTATE door lock
[x] Cancel search: door lockPage 126 of 377

Instrument cluste
r 123Instrument cluster
You will find an illustration of the instrumen t
cluster in the "At a glance" section
( Y page 28). G
Risk of accident
No messages can be displayed if instru -
ment cluster and/or the multi-function dis-
play fail .
This means that you will not see information
about the driving situation, such as the
speed, outside temperature, warning/indi-
cator lamps, display messages or system
failures. The vehicle's handling character-
istics may be affected. Adjust your driving
style and speed accordingly.
Immediately consult a qualified specialist
workshop which has the necessary special-
ist knowledge and tools to carry out the
work required. Mercedes-Benz recom-
mends that you use a Mercedes-Benz
Service Centre for this purpose. In particu-
lar, work relevant to safety or on safety-
related systems must be carried out at a
qualified specialist workshop. Activating the multi-function displa
y
X Switch on the ignition.
The multi-function display is also activate d
when you switch on the lights or open th e
driver's door. Adjusting the instrument cluster
lighting
1
Brightness control
X Brighter or dimmer: turn clockwise or
anti-clockwise. Coolant temperature gaug
e
The coolant temperature gauge is in the
instrument cluster on the left-hand side. The
coolant temperature may rise to 120 †under
normal operating conditions and if the con-
centration of antifreeze/corrosion inhibitor is
correct. The coolant temperature may rise to
the top end of the scale at high outside tem-
peratures and on long uphill stretches. Resetting the trip meter
Vehicles with a 4-button multi-function
steering wheel: you can reset the trip meter
in the standard displa ymenu
( Y page 128).
Vehicles with a 12-button luxury multi-
function steering wheel* :you can find th e
"Reset values" function in the Tripmenu in
the on-board computer (Y page 135). Controls
* optional
204_AKB; 2; 3, en-GB
mkalafa,
2007-06-26T23:11:51+02:00 - Seite 123
Page 146 of 377
On-board computer (vehicles with the luxury multi-function steering wheel*, 12 buttons)
143
R
Motorway mode
R Active light functio n
R Extended range foglamps
X Press %or$ to select the Light
submenu.
X Press #to confirm.
X Press %or$ to select the Intell.
Light System function.
You will see the selected setting: Onor
Off.
X Press #to change the selected setting .
Switching the daytime driving lights on/
off
If you have activated the Daylight driving
lights function and the light switch is in the
M or* position, the parking lamp,
dipped-beam headlamps and licence plate
lighting are switched on automatically when
the engine is running.
In countries where daytime driving lamps are
legally required, Onis the factory setting.
X Press %or$ to select the Light
submenu.
X Press #to confirm. X
Press %or$ to select the Daytime
driving lamps function.
You will see the selected setting: Onor
Off.
X Press #to change the selected setting .
Switching the surround lighting on or off
If you activate the Surround lighting func-
tion and you unlock the vehicle with the key
when it is dark, the following will light up:
R The side lamps
R The tail lamps
R The licence plate lighting
R The front foglamps
The surround lighting switches off automati-
cally after 40 seconds or if the driver's door
is opened.
X Press %or$ to select the Light
submenu.
X Press #to confirm.
X Press %or$ to select the Surround
lighting function.
You will see the selected setting: Onor
Off .
X Press #to change the selected setting .Activating or deactivating the interior
lighting delayed switch-off
If you activate the
Interior lighting
delay sw. off function and pull the key out
of the ignition lock, the interior lighting
remains on for around 10 seconds if it is dark .
X Press %or$ to select the Light
submenu.
X Press #to confirm.
X Press %or$ to select the Interior
Lighting Delay function.
You will see the selected setting: Onor
Off .
X Press #to change the selected setting .
Vehicl e In the
Vehicle menu, you can activate/deac-
tivate the automatic locking feature or set the
permanent Speedtronic with Speed limit
(winter tyres) function(Y page 151).
Activating/deactivating automatic door
locking
If you select the Automatic Door Lock func-
tion, the vehicle is centrally locked above a
speed of around 15 km/h. Controls
* optional
204_AKB; 2; 3, en-GB
mkalafa,
2007-06-26T23:11:51+02:00 - Seite 143 Z
Page 147 of 377
On-board computer (vehicles with the luxury multi-function steering wheel*, 12 buttons)
144
You will find further information on automatic
locking in the "Automatic locking" section
(
Y page 79).
X Press %or$ to select the Vehicle
submenu.
X Press #to confirm.
X Press %or$ to select the Auto-
matic Door Loc kfunction.
You will see the selected setting: Onor
Off.
X Press #to change the selected setting .
Convenience In the
Convenience menu, you can activate/
deactivate the easy-entry/exit feature* and
the "Fold in mirrors when locking" function .
Activating or deactivating the easy-entry /
exit feature*
You can use the Easy-Entry/Exit function
to activate or deactivate the easy-entry/exit
feature (Y page 93). G
Risk of injury
When the easy-entry/exit feature is active,
the steering wheel moves. There is a risk of
occupants becoming trapped. Before acti - vating the easy-entry feature, make sure
that nobody can become trapped.
Do not leave children unsupervised in the
vehicle, even if they are secured in a child
restraint system. The children could open
the driver's door and thereby unintention-
ally activate the easy-entry feature and
become trapped.
X Press %or$ to select the Conve-
nience submenu.
X Press #to confirm.
X Press %or$ to select the easy-
entry/exi tfeature.
You will see the selected setting: Onor
Off.
X Press #to change the selected setting .
Activating or deactivating the "Fold in
mirrors when locking*" function
If you activate the Fold in mirrors whe n
locking function, the exterior mirrors fold in
when you lock the vehicle. When you switch
on the ignition, the exterior mirrors fold out
again.
If you have switched the function on and you
fold in the exterior mirrors using the button on the door
(Y page 94), they will not fold out
when the ignition is switched on. The exterior
mirrors can then only be folded out using the
button on the door.
X Press %or$ to select the Conve-
nience submenu.
X Press #to confirm.
X Press %or$ to select the Fold in
mirrors when lockin gfunction.
You will see the selected setting: Onor
Off.
X Press #to change the selected setting .
Restoring the factory setting s Most of the submenus can be restored to the
default settings in the
Factory Setting
menu.
For safety reasons, not all functions are reset:
the Speed limit (winter tyres) function
in permanent Speedtronic can only be set in
the Vehicle menu. The Daytime driving
lamps function in the Lightmenu is only
reset if the vehicle is stationary.
X Press %or$ to select the Factory
setting submenu.
X Press #to confirm. Controls
* optional
204_AKB; 2; 3, en-G
B
mkalafa , 2007-06-26T23:11:51+02:00 - Seite 144
Page 231 of 377
Car
e 228
High-pressure cleaners G
Risk of accident
Do not use high-pressure cleaners with cir-
cular-jet nozzles (dirt grinders) to clean
your vehicle or - especially - the tyres. Yo u
could otherwise damage the tyres and
cause an accident.
! Observe the instructions issued by the
equipment manufacturer concerning the
distance to be maintained between the
nozzle of the high-pressure cleaner and the
vehicle (at least 30 cm).
Move the high-pressure cleaner nozzle
around when cleaning your vehicle .
Do not aim directly at any of the following:
R Tyres
R Door joint
R Electrical components
R Batter y
R Connectors
R Bulbs
R Seals
Damaged seals or electrical components
can lead to failures or leaks .Cleaning the wiper blades and the out
-
side of the windscreen G
Risk of injury
Turn the key to position 0in the ignition
lock before cleaning the windscreen or the
wiper blades. There is otherwise a risk of
the windscreen wipers being set in motion
and causing injury.
! Only fold the windscreen wipers away
from the windscreen when vertical, other-
wise you will damage the bonnet.
X Fold the wiper arms away from the wind-
screen until you feel them engage.
X Clean the windscreen and the wiper blades .
X Fold the windscreen wipers back agai n
before the ignition is switched on.
! Do not clean the wiper blades too often,
as otherwise the coating may come off.
This could cause wiper noise.
Cleaning the windows !
Do not use dry cloths, abrasive products,
solvents or cleaning agents containing sol-
vents to clean the inside of the windows. Clean the insides of the windows with
a
damp cloth or commercially-available glass
cleaner. Avoid touching the inside of the
rear windscreen and the side windows with
hard objects, e.g. ice scrapers or rings. You
could otherwise cause damage to the win-
dows, rear window heating or aerial on the
rear window.
i Anti-glare film retrofitted to the insides of
the windows could interfere with radio or
mobile phone reception, especially if it is
conductive or metal-coated film. Informa -
tion about anti-glare film can be obtained
from any Mercedes-Benz Service Centre.
Cleaning the headlamps X
Clean the headlamp lenses with a wet
sponge.
! Only use washer fluid which is suitable
for plastic lenses. Unsuitable washer fluid
could damage the plastic lenses of th e
headlamps.
Therefore, do not use the following:
R Dry cloths
R Abrasive cleaning agents Operatio
n
204_AKB; 2; 3, en-GB
mkalafa,
2007-06-26T23:11:51+02:00 - Seite 228
Page 237 of 377
Where will I find...?
234
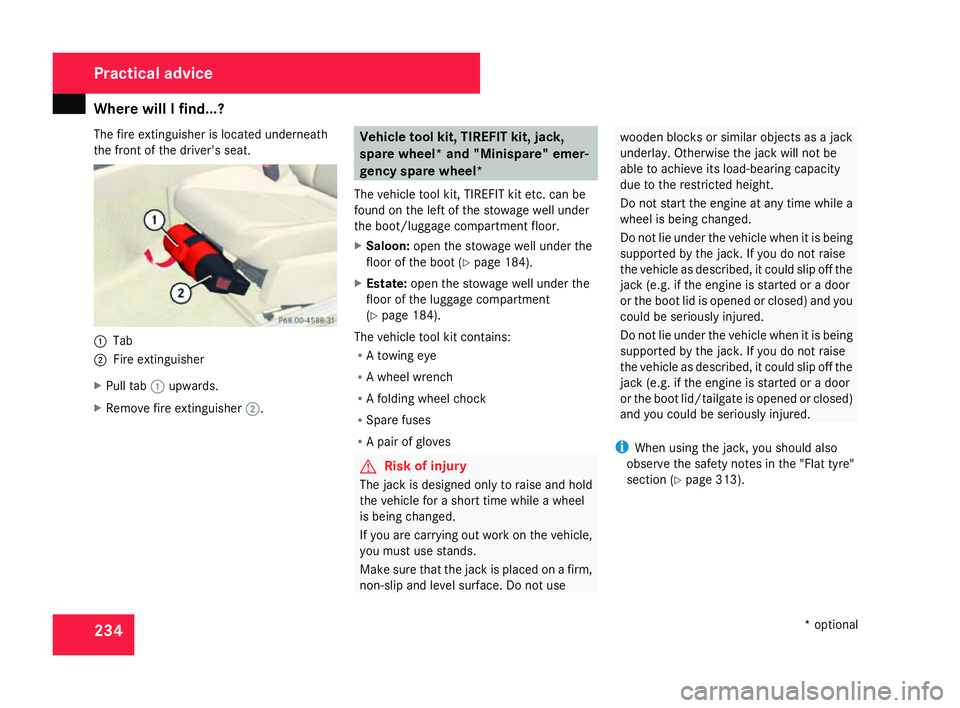
The fire extinguisher is located underneath
the front of the driver's seat.
1
Tab
2 Fire extinguishe r
X Pull tab 1upwards.
X Remove fire extinguisher 2. Vehicle tool kit, TIREFIT kit, jack
,
spare wheel* and "Minispare" emer-
gency spare wheel*
The vehicle tool kit, TIREFIT kit etc. can be
found on the left of the stowage well under
the boot/luggage compartment floor.
X Saloon: open the stowage well under the
floor of the boot (Y page 184).
X Estate: open the stowage well under th e
floor of the luggage compartment
( Y page 184).
The vehicle tool kit contains :
R A towing ey e
R A wheel wrench
R A folding wheel chock
R Spare fuses
R A pair of glove s G
Risk of injury
The jack is designed only to raise and hol d
the vehicle for a short time while a whee l
is being changed.
If you are carrying out work on the vehicle,
you must use stands.
Make sure that the jack is placed on a firm ,
non-slip and level surface. Do not us e wooden blocks or similar objects as a jac
k
underlay. Otherwise the jack will not be
able to achieve its load-bearing capacit y
due to the restricted height.
Do not start the engine at any time while a
wheel is being changed.
Do not lie under the vehicle when it is bein g
supported by the jack. If you do not raise
the vehicle as described, it could slip off the
jack (e.g. if the engine is started or a door
or the boot lid is opened or closed) and you
could be seriously injured.
Do not lie under the vehicle when it is being
supported by the jack. If you do not raise
the vehicle as described, it could slip off the
jack (e.g. if the engine is started or a door
or the boot lid/tailgate is opened or closed)
and you could be seriously injured.
i When using the jack, you should also
observe the safety notes in the "Flat tyre"
section (Y page 313). Practical advice
* optional
204_AKB; 2; 3, en-GB
mkalafa,
2007-06-26T23:11:51+02:00 - Seite 234
Page 245 of 377

Display
messages 24
2 Display messages Possible cause/consequence Possible solution
Check brake
fluid level
G
Risk of accident
There is insufficient brake fluid in the
brake fluid reservoir. In addition, the
3 warning lamp in the instrument clus-
ter lights up and a warning tone sounds. X
Pull over as soon as it is safe to do so.
X Do not continue driving under any circumstan-
ces .
X Consult the nearest qualified specialist work -
shop.
X Do not top up the brake fluid. This will not rec -
tify the malfunction. P
Shift to
P P
Shift to
P You have switched off the engine with the
KEYLESS GO* button and opened the driv-
er's door.
You have attempted to lock the vehicle. X
Move the selector lever to P.
The engine can be started again. To start
engine, shift
to either P or
N To start engine,
shift to either
P
or N You have attempted to start the engin
e
while the selector lever is not in position
P or N. X
Move the selector lever to Por N. Clean the fuel
filter X
Visit a qualified specialist workshop. Practical advice
* optional
204_AKB; 2; 3, en-GB
mkalafa,
2007-06-26T23:11:51+02:00 - Seite 242
Page 248 of 377
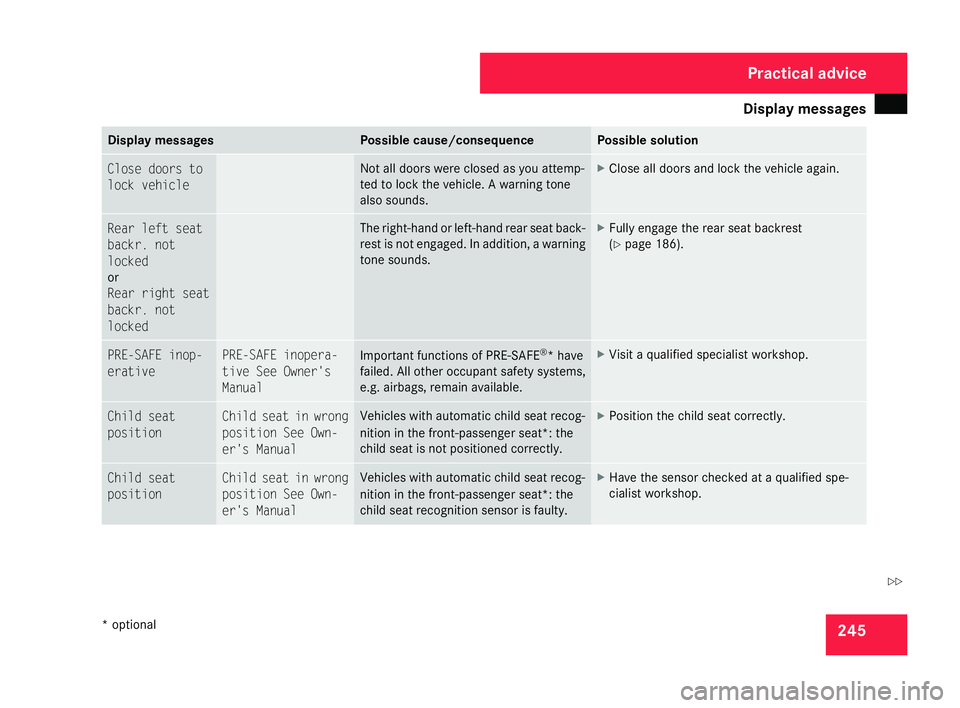
Display
messages 24
5 Display messages Possible cause/consequence Possible solution
Close doors to
lock vehicl
e Not all doors were closed as you attemp-
ted to lock the vehicle. A warning tone
also sounds. X
Close all doors and lock the vehicle again .Rear left seat
backr. not
locked
or
Rear right seat
backr. not
locked The right-hand or left-hand rear seat back-
rest is not engaged. In addition, a warning
tone sounds. X
Fully engage the rear seat backrest
(Y page 186). PRE-SAFE inop-
erativ
e PRE-SAFE inopera-
tive See Owner's
Manual
Important functions of PRE-SAFE
®
* have
failed. All other occupant safety systems,
e.g. airbags, remain available. X
Visit a qualified specialist workshop. Child seat
position Child seat in wrong
position See Own-
er's Manual Vehicles with automatic child seat recog-
nition in the front-passenger seat*: the
child seat is not positioned correctly. X
Position the child seat correctly. Child seat
position Child seat in wrong
position See Own-
er's Manual Vehicles with automatic child seat recog-
nition in the front-passenger seat*: the
child seat recognition sensor is faulty. X
Have the sensor checked at a qualified spe -
cialist workshop. Practical advic
e
* optional
204_AKB; 2; 3, en-GB
mkalafa,
2007-06-26T23:11:51+02:00 - Seite 245 Z
Page 272 of 377
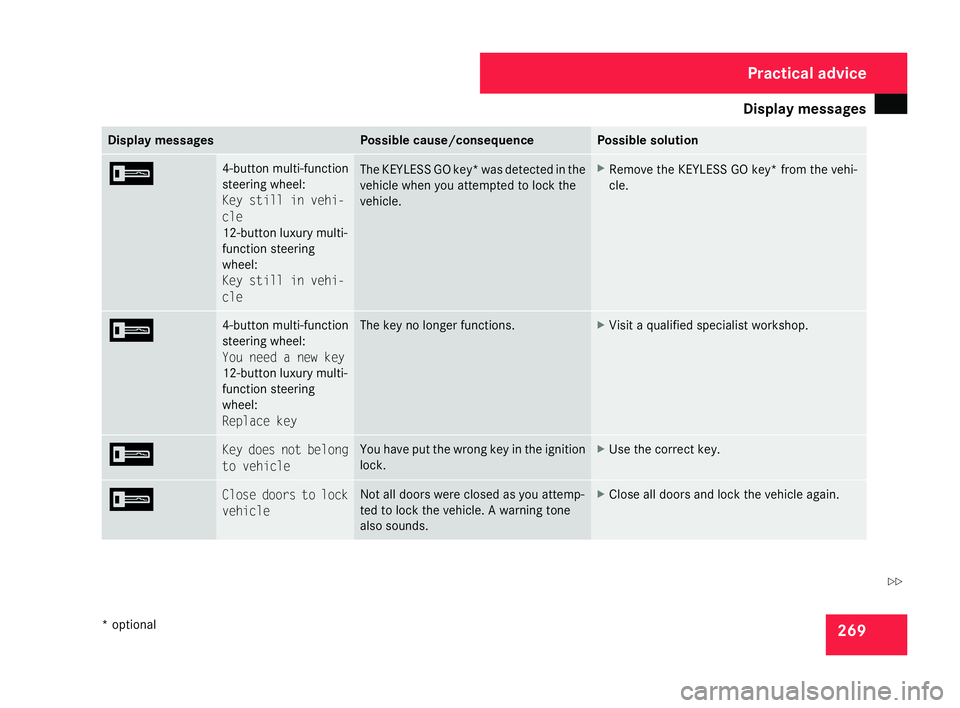
Display
messages 26
9 Display messages Possible cause/consequence Possible solution
I 4-button multi-function
steering wheel:
Key still in vehi-
cle
12-button luxury multi-
function steering
wheel:
Key still in vehi-
cle
The KEYLESS GO key* was detected in the
vehicle when you attempted to lock the
vehicle. X
Remove the KEYLESS GO key* from the vehi-
cle . I 4-button multi-function
steering wheel:
You need a new key
12-button luxury multi-
function steering
wheel:
Replace key The key no longer functions. X
Visit a qualified specialist workshop. I Key does not belong
to vehicle You have put the wrong key in the ignition
lock. X
Use the correct key. I Close doors to lock
vehicle Not all doors were closed as you attemp-
ted to lock the vehicle. A warning tone
also sounds. X
Close all doors and lock the vehicle again . Practical advice
* optional
204_AKB; 2; 3, en-GB
mkalafa,
2007-06-26T23:11:51+02:00 - Seite 269 Z