2007 MERCEDES-BENZ C-CLASS ESTATE tailgate
[x] Cancel search: tailgatePage 189 of 377
Loading and stowing
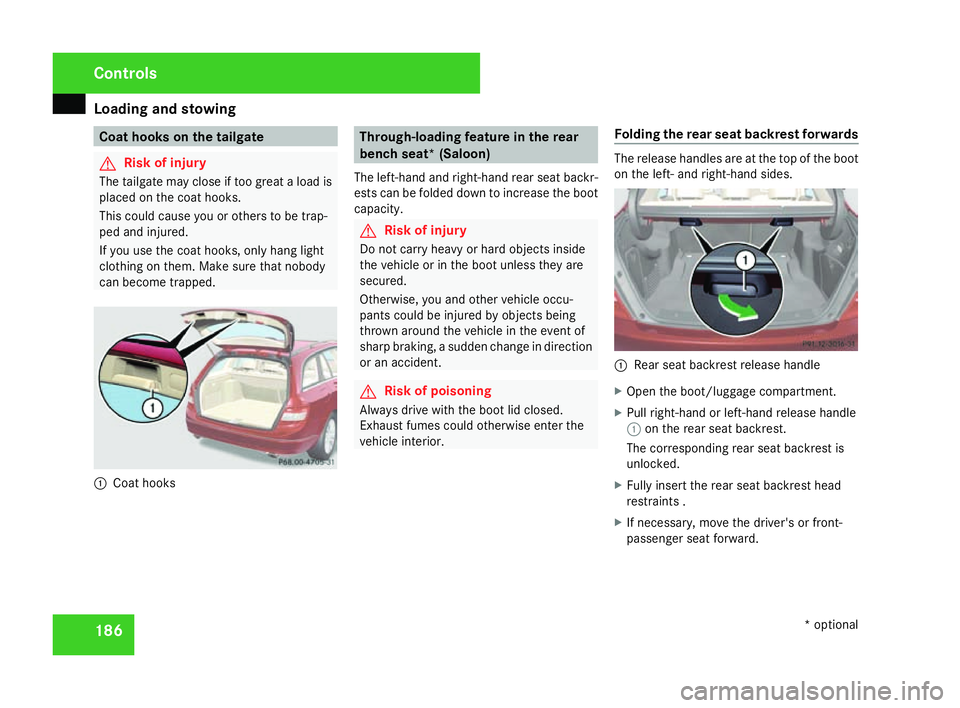
186 Coat hooks on the tailgate
G
Risk of injury
The tailgate may close if too great a load is
placed on the coat hooks.
This could cause you or others to be trap -
ped and injured.
If you use the coat hooks, only hang light
clothing on them. Make sure that nobody
can become trapped. 1
Coat hooks Through-loading feature in the rea
r
bench seat* (Saloon)
The left-hand and right-hand rear seat backr -
ests can be folded down to increase the boot
capacity. G
Risk of injury
Do not carry heavy or hard objects inside
the vehicle or in the boot unless they are
secured .
Otherwise, you and other vehicle occu-
pants could be injured by objects being
thrown around the vehicle in the event of
sharp braking, a sudden change in direction
or an accident. G
Risk of poisoning
Always drive with the boot lid closed .
Exhaust fumes could otherwise enter the
vehicle interior. Folding the rear seat backrest forwards The release handles are at the top of the boot
on the left- and right-hand sides. 1
Rear seat backrest release handle
X Open the boot/luggage compartment.
X Pull right-hand or left-hand release handle
1 on the rear seat backrest .
The corresponding rear seat backrest is
unlocked.
X Fully insert the rear seat backrest hea d
restraints .
X If necessary, move the driver's or front-
passenger seat forward .Cont
rols
* optional
204_AKB; 2; 3, en-GB
mkalafa,
2007-06-26T23:11:51+02:00 - Seite 186
Page 191 of 377
Loading and stowing
188 G
Risk of injury
Do not carry heavy or hard objects inside
the vehicle or in the luggage compartment
unless they are secured .
Otherwise, you and other vehicle occu-
pants could be injured by objects being
thrown around the vehicle in the event of
sharp braking, a sudden change in direction
or an accident.
When using the extended luggage compart-
ment always clip in the safety net. G
Risk of poisoning
Always drive with the tailgate closed .
Exhaust fumes could otherwise enter the
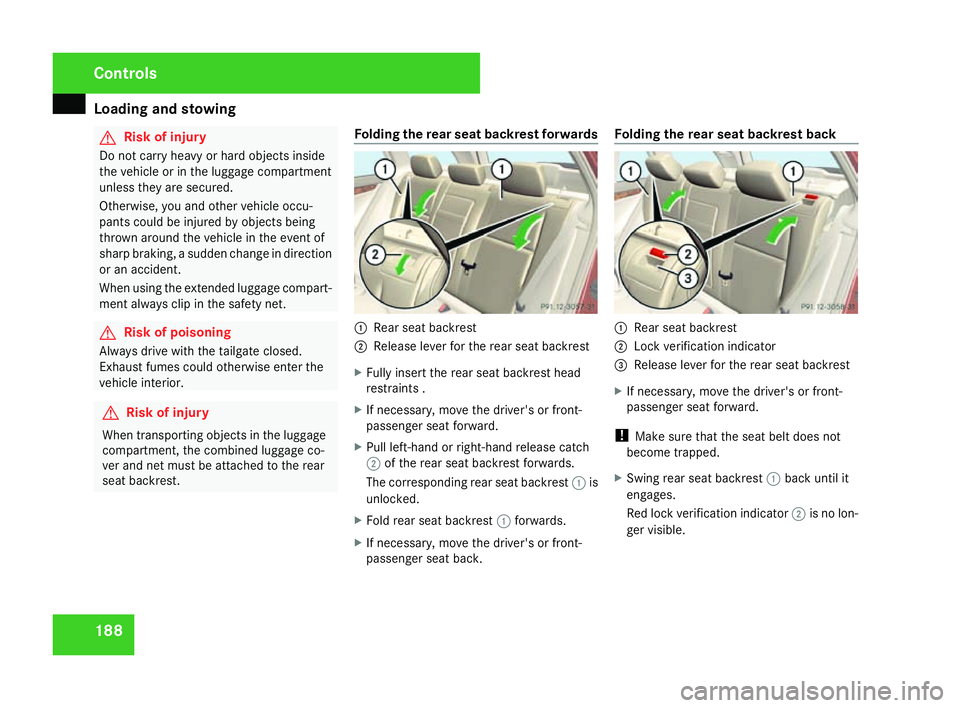
vehicle interior. Folding the rear seat backrest forwards 1
Rear seat backrest
2 Release lever for the rear seat backrest
X Fully insert the rear seat backrest hea d
restraints .
X If necessary, move the driver's or front-
passenger seat forward .
X Pull left-hand or right-hand release catch
2 of the rear seat backrest forwards.
The corresponding rear seat backrest 1is
unlocked.
X Fold rear seat backrest 1forwards.
X If necessary, move the driver's or front-
passenger seat back. Folding the rear seat backrest back
1
Rear seat backrest
2 Lock verification indicator
3 Release lever for the rear seat backrest
X If necessary, move the driver's or front-
passenger seat forward .
! Make sure that the seat belt does not
become trapped.
X Swing rear seat backrest 1back until it
engages.
Red lock verification indicator 2is no lon-
ger visible. Controls
204_AKB; 2; 3, en-GB
mkalafa,
2007-06-26T23:11:51+02:00 - Seite 188G
Risk of injur y When transporting objec
tsinthe luggage
compartment, the combine dluggage co-
ver and net mus tbe attached to the rea r
seat backres t.
Page 237 of 377
Where will I find...?
234
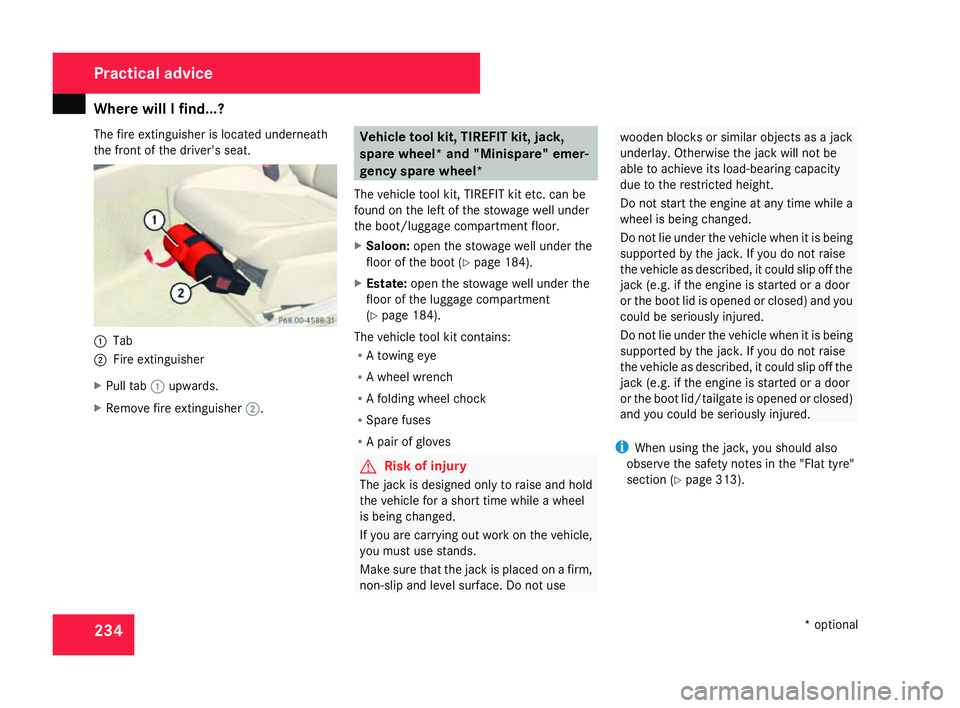
The fire extinguisher is located underneath
the front of the driver's seat.
1
Tab
2 Fire extinguishe r
X Pull tab 1upwards.
X Remove fire extinguisher 2. Vehicle tool kit, TIREFIT kit, jack
,
spare wheel* and "Minispare" emer-
gency spare wheel*
The vehicle tool kit, TIREFIT kit etc. can be
found on the left of the stowage well under
the boot/luggage compartment floor.
X Saloon: open the stowage well under the
floor of the boot (Y page 184).
X Estate: open the stowage well under th e
floor of the luggage compartment
( Y page 184).
The vehicle tool kit contains :
R A towing ey e
R A wheel wrench
R A folding wheel chock
R Spare fuses
R A pair of glove s G
Risk of injury
The jack is designed only to raise and hol d
the vehicle for a short time while a whee l
is being changed.
If you are carrying out work on the vehicle,
you must use stands.
Make sure that the jack is placed on a firm ,
non-slip and level surface. Do not us e wooden blocks or similar objects as a jac
k
underlay. Otherwise the jack will not be
able to achieve its load-bearing capacit y
due to the restricted height.
Do not start the engine at any time while a
wheel is being changed.
Do not lie under the vehicle when it is bein g
supported by the jack. If you do not raise
the vehicle as described, it could slip off the
jack (e.g. if the engine is started or a door
or the boot lid is opened or closed) and you
could be seriously injured.
Do not lie under the vehicle when it is being
supported by the jack. If you do not raise
the vehicle as described, it could slip off the
jack (e.g. if the engine is started or a door
or the boot lid/tailgate is opened or closed)
and you could be seriously injured.
i When using the jack, you should also
observe the safety notes in the "Flat tyre"
section (Y page 313). Practical advice
* optional
204_AKB; 2; 3, en-GB
mkalafa,
2007-06-26T23:11:51+02:00 - Seite 234
Page 304 of 377
Locking/unlocking in an emergency
301Locking the vehicle
If the vehicle can no longer be locked cen -
trally with the key or the KEYLESS GO key*:
X Open the driver's door.
X Close the front-passenger door, the rear
doors and the boot lid/tailgate.
X Press the central locking button
(Y page 80).
X Check whether the locking knobs on th e
doors are still visible. Press the locking
knobs down by hand if necessary.
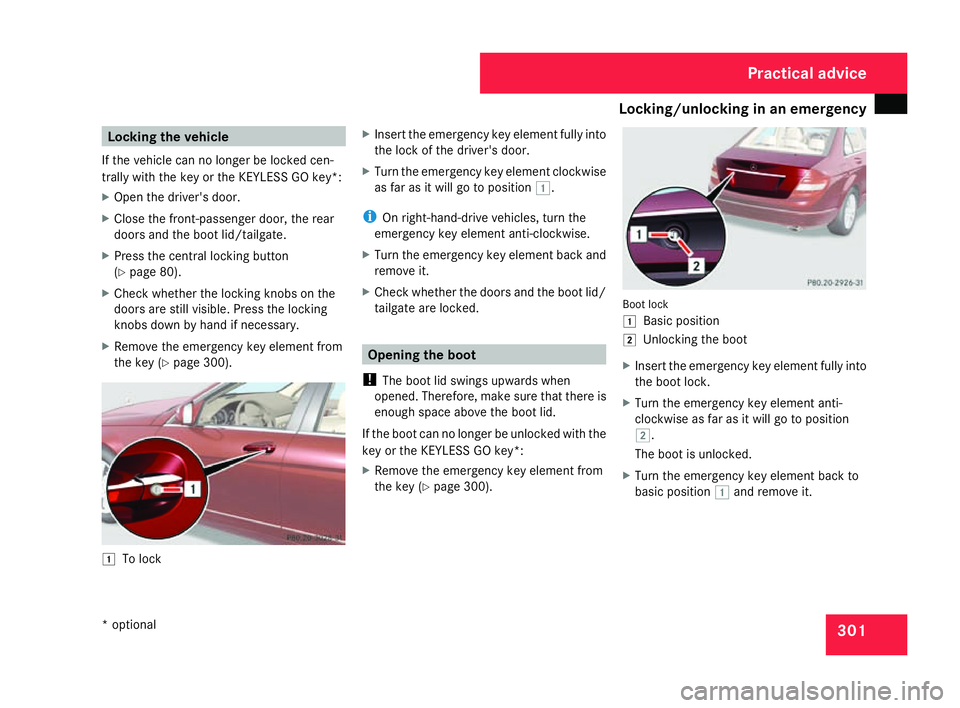
X Remove the emergency key element from
the key (Y page 300). $
To lock X
Insert the emergency key element fully into
the lock of the driver's door.
X Turn the emergency key element clockwise
as far as it will go to position $.
i On right-hand-drive vehicles, turn the
emergency key element anti-clockwise.
X Turn the emergency key element back and
remove it.
X Check whether the doors and the boot lid/
tailgate are locked. Opening the boot
! The boot lid swings upwards when
opened. Therefore, make sure that there is
enough space above the boot lid.
If the boot can no longer be unlocked with th e
key or the KEYLESS GO key *:
X Remove the emergency key element from
the key (Y page 300). Boot lock
$ Basic position
% Unlocking the boot
X Insert the emergency key element fully into
the boot lock.
X Turn the emergency key element anti-
clockwise as far as it will go to position
% .
The boot is unlocked.
X Turn the emergency key element back to
basic position $and remove it. Practical advice
* optional
204_AKB; 2; 3, en-GB
mkalafa
, 2007-06-26T23:11:51+02:00 - Seite 301
Page 305 of 377
Locking/unlocking in an emergency
302 Opening the tailgate
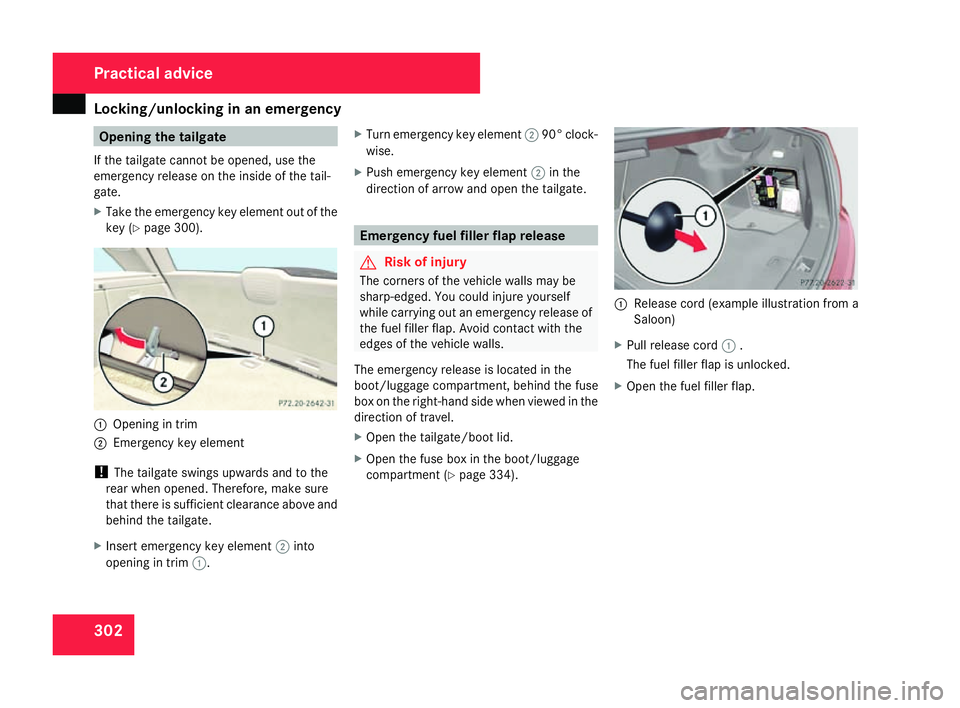
If the tailgate cannot be opened, use th e
emergency release on the inside of the tail-
gate.
X Take the emergency key element out of the
key (Y page 300). 1
Opening in trim
2 Emergency key element
! The tailgate swings upwards and to the
rear when opened. Therefore, make sure
that there is sufficient clearance above and
behind the tailgate .
X Insert emergency key element 2into
opening in trim 1. X
Turn emergency key element 290° clock-
wise.
X Push emergency key element 2in the
direction of arrow and open the tailgate. Emergency fuel filler flap release
G
Risk of injury
The corners of the vehicle walls may be
sharp-edged. You could injure yoursel f
while carrying out an emergency release of
the fuel filler flap. Avoid contact with th e
edges of the vehicle walls.
The emergency release is located in the
boot/luggage compartment, behind the fuse
box on the right-hand side when viewed in the
direction of travel.
X Open the tailgate/boot lid.
X Open the fuse box in the boot/luggage
compartment (Y page 334). 1
Release cord (example illustration from a
Saloon)
X Pull release cord 1.
The fuel filler flap is unlocked.
X Open the fuel filler flap. Practical advice
204_AKB; 2; 3, en-GB
mkalafa,
2007-06-26T23:11:51+02:00 - Seite 302
Page 317 of 377
Flat tyre
314
Vehicles with automatic transmission
*X
Move the selector lever to P.
For all vehicles X
Place the warning triangle (Y page 232) or
warning lamps at a suitable distance.
Observe legal requirements. G
Risk of injury
The jack is designed only to raise and hol d
the vehicle for a short time while a whee l
is being changed.
If you are carrying out work on the vehicle,
you must use stands.
Make sure that the jack is placed on a firm ,
non-slip and level surface. Do not us e
wooden blocks or similar objects as a jac k
underlay. Otherwise the jack will not be
able to achieve its load-bearing capacit y
due to the restricted height.
Do not start the engine at any time while a
wheel is being changed.
Do not lie under the vehicle when it is bein g
supported by the jack. If you do not raise
the vehicle as described, it could slip off the
jack (e.g. if the engine is started or a door or the boot lid/tailgate is opened or closed)
and you could be seriously injured. Using the TIREFIT kit
You can use the TIREFIT kit to seal small
punctures, particularly those in the tyre tread.
You can use TIREFIT in outdoor temperatures
down to -20 °C. G
Risk of accident
In the following situations, your safety is at
particular risk and TIREFIT is unable to pro -
vide breakdown assistance:
R if there are cuts or punctures in the tyre
greater than 4 mm
R if the wheel rim is damaged
R if you have driven at very low tyre pres-
sures or on a flat tyre
Do not drive any further. Consult a qualified
specialist workshop which has the neces-
sary specialist knowledge and tools to carr y
out the work required.
Mercedes-Benz recommends that you use
a Mercedes-Benz Service Centre for this
purpose. In particular, work relevant to
safety or on safety-related systems must be carried out at a qualified specialist work-
shop.
X Do not remove any foreign objects which
have penetrated the tyre, e.g. screws or
nails .
X Remove TIREFIT, the accompanying "max .
80 km/h“ and the electric air pump from
the stowage compartment in the boot floo r
(Saloon) or the luggage compartment floor
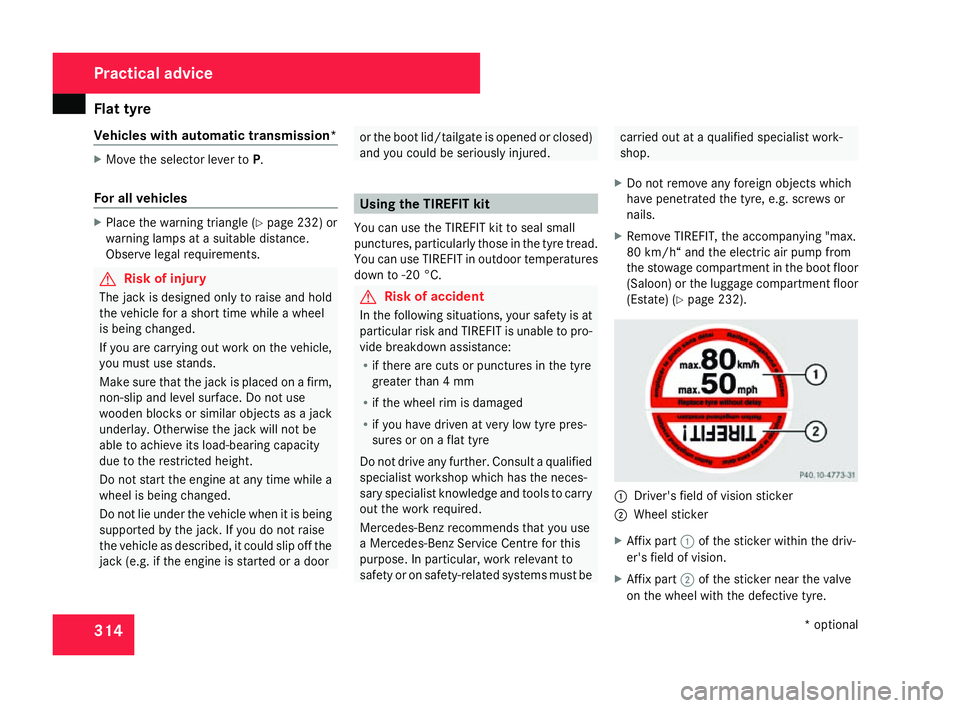
(Estate) (Y page 232). 1
Driver's field of vision sticker
2 Wheel sticker
X Affix part 1of the sticker within the driv-
er's field of vision.
X Affix part 2of the sticker near the valve
on the wheel with the defective tyre. Practical advice
* optional
204_AKB; 2; 3, en-GB
mkalafa,
2007-06-26T23:11:51+02:00 - Seite 314
Page 337 of 377
Fuse
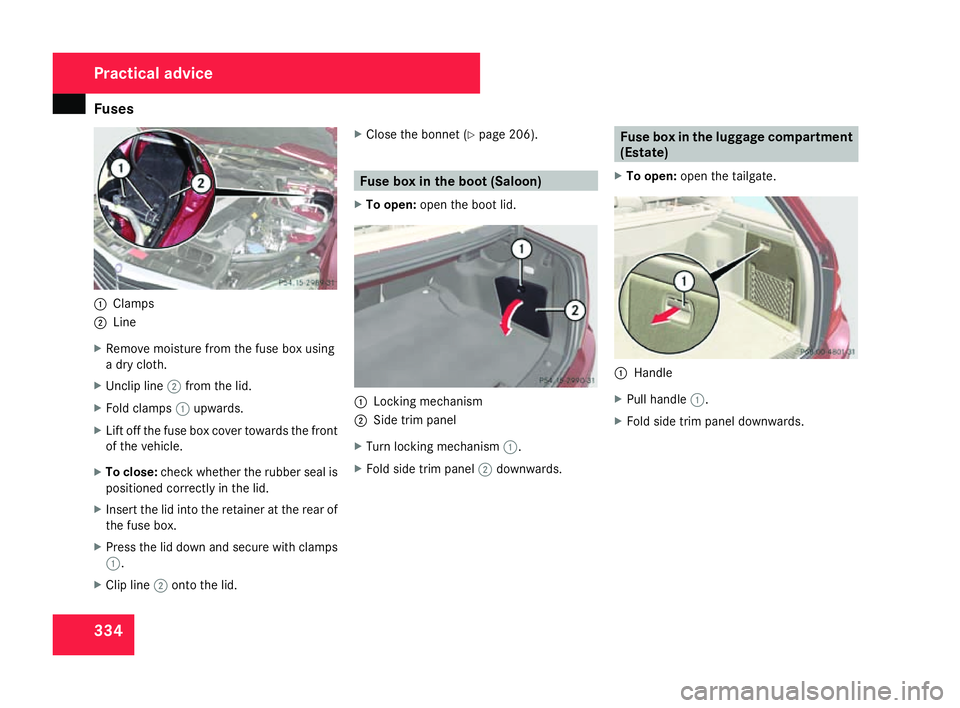
s 3341
Clamps
2 Line
X Remove moisture from the fuse box usin g
a dry cloth .
X Unclip line 2from the lid .
X Fold clamps 1upwards.
X Lift off the fuse box cover towards the front
of the vehicle .
X To close: check whether the rubber seal is
positioned correctly in the lid.
X Insert the lid into the retainer at the rear of
the fuse box.
X Press the lid down and secure with clamps
1 .
X Clip line 2onto the lid. X
Close the bonnet (Y page 206). Fuse box in the boot (Saloon)
X To open: open the boot lid. 1
Locking mechanism
2 Side trim panel
X Turn locking mechanism 1.
X Fold side trim panel 2downwards. Fuse box in the luggage compartment
(Estate)
X To open: open the tailgate . 1
Handl e
X Pull handle 1.
X Fold side trim panel downwards. Practical advic
e
204_AKB; 2; 3, en-GB
mkalafa,
2007-06-26T23:11:51+02:00 - Seite 334