2007 MERCEDES-BENZ C-CLASS ESTATE reset
[x] Cancel search: resetPage 181 of 377

Sliding sunroof
178
Opening
X
To open manually: press the switch in the
direction of arrow 1or3 until the roller
sunblinds have moved to the desired posi -
tion.
X To open fully :briefly press the switc h
beyond the pressure point in the direction
of arrow 1or3 .
X To stop: push or pull the switch in any
direction.
Closin g
X To close manually: pull the switch in the
direction of arrow 2or until the roller sun-
blinds have moved to the desired position.
X To close fully :briefly pull the switc h
beyond the pressure point in the direction
of arrow 2.
X To stop: push or pull the switch in any
direction.
Rain-closing feature *When the key is in position
0in the ignition
lock or is removed, the panorama sliding sun-
roof closes automatically: R
if it starts to rain
R at extreme outside temperatures
R after 6 hour s
R if there is a malfunction in the power supply
The panorama sliding sunroof remains raised
at the rear in order to allow ventilation of the
vehicle interior .
i The panorama sliding sunroof does not
close if:
R it is raised at the rear
R it is blocked
R no rain is falling within the field of the rain
sensor in the windscreen (e.g. because
the vehicle is under a bridge or in a car -
port )
Resetting the panorama sliding sunroo f
and the roller sunblinds Reset the panorama sliding sunroof and the
roller sunblinds if the panorama sliding sun-
roof or the roller sunblinds do not ope
n
smoothly. 1
To open
2 To close/lower
3 To raise
X Make sure that the key is in position 1or
2 in the ignition lock .
X Pull and hold the switch to the pressure
point in the direction of arrow 2and hold
it until the roller sunblinds are fully closed.
X Keep the switch pulled for an additional
second.
X Press and hold the switch to the pressure
point in the direction of arrow 1and hold
it until the roller sunblinds are fully opened.
X Press the switch to the pressure point in
the direction of arrow 1and hold it until Control
s
* optional
204_AKB; 2; 3, en-GB
mkalafa,
2007-06-26T23:11:51+02:00 - Seite 178
Page 229 of 377
Service
226 Service
Active Service System
ASSYST PLUS, the Active Service System,
tells you when the next service is due.
Services that are due appear in the multi-
function display:
Next service A in ... days
Next service A in ... km
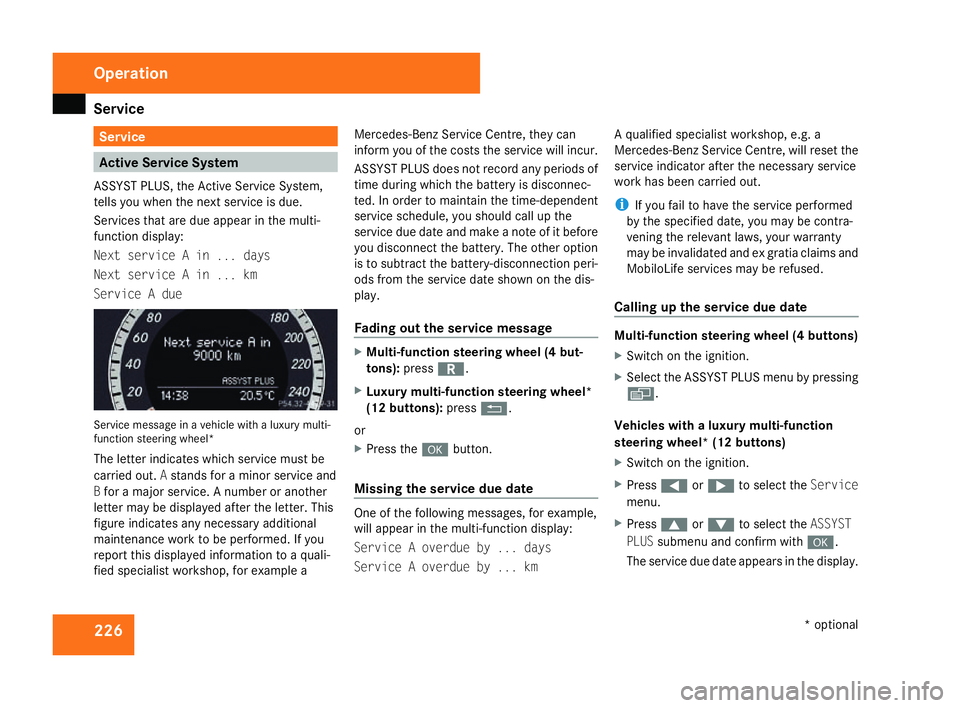
Service A due Service message in a vehicle with a luxury multi-
function steering wheel*
The letter indicates which service must be
carried out. Astands for a minor service and
B for a major service. A number or another
letter may be displayed after the letter. This
figure indicates any necessary additiona l
maintenance work to be performed. If you
report this displayed information to a quali-
fied specialist workshop, for example aMercedes-Benz Service Centre, they can
inform you of the costs the service will incur.
ASSYST PLUS does not record any periods of
time during which the battery is disconnec-
ted. In order to maintain the time-dependent
service schedule, you should call up the
service due date and make a note of it befor
e
you disconnect the battery. The other option
is to subtract the battery-disconnection peri-
ods from the service date shown on the dis-
play.
Fading out the service message X
Multi-function steering wheel (4 but-
tons) :press í.
X Luxury multi-function steering wheel*
(12 buttons): pressL.
or
X Press the #button.
Missing the service due dat e One of the following messages, for example,
will appear in the multi-function display:
Service A overdue by ... days
Service A overdue by ... kmA qualified specialist workshop, e.g.
a
Mercedes-Benz Service Centre, will reset the
service indicator after the necessary service
work has been carried out.
i If you fail to have the service performed
by the specified date, you may be contra-
vening the relevant laws, your warranty
may be invalidated and ex gratia claims and
MobiloLife services may be refused .
Calling up the service due date Multi-function steering wheel (4 buttons)
X
Switch on the ignition.
X Select the ASSYST PLUS menu by pressing
è .
Vehicles with a luxury multi-function
steering wheel* (12 buttons)
X Switch on the ignition.
X Press (or& to select the Service
menu.
X Press $or% to select the ASSYST
PLU Ssubmenu and confirm with #.
The service due date appears in the display .Operation
* optional
204_AKB; 2; 3, en-GB
mkalafa,
2007-06-26T23:11:51+02:00 - Seite 226
Page 234 of 377

231
Where will I find...?
...........................232
Display messages ............................. 236
Troubleshooting ................................ 276
Locking/unlocking in an emer-
gency ................................................. 300
Resetting triggered NECK-PRO
head restraints .................................. 303
Changing the batteries .....................304
Changing the bulbs ...........................305
Replacing the wiper blades ..............312
Flat tyre ............................................. 313
Battery ............................................... 324
Jump-starting .................................... 328
Towing and tow-starting ..................329
Fuses .................................................. 332 Practical advice
204_AKB; 2; 3, en-GB
mkalafa,
2007-06-26T23:11:51+02:00 - Seite 231
Page 291 of 377

Troubleshooting
28
8 Problem Possible cause/consequence Suggested solutions
The NECK-PRO head restraint
s
on the driver's and front-
passenger seats have been trig-
gered. Your vehicle has been involved in
a rear-end collision. X
Reset the NECK-PRO head restraints (Y page 303). Fuel and fuel tan
kProblem Possible cause/consequence Suggested solutions
Fuel is leaking from the vehicle.
G
Risk of fire
The fuel line or the fuel tank is
defective. X
Turn the key to position 0in the ignition lock immediately and
remove it.
X Do not restart the engine under any circumstances .
The leaking fuel creates a risk of fire or explosion.
X Consult a qualified specialist workshop. The fuel filler flap cannot be
opened. The fuel filler flap is not released. X
Unlock the vehicle (Y page 300). The opening mechanism is jam-
med. X
Release the fuel filler flap by hand (Y page 302).
X Consult a qualified specialist workshop. Practical advice
204_AKB; 2; 3, en-GB
mkalafa,
2007-06-26T23:11:51+02:00 - Seite 28
8
Page 306 of 377
Resetting triggered NECK-PRO head restraints
30
3 Releasing the parking lock manually
(vehicles with automatic transmis-
sion*)
In the event of an electrical fault, it is possible
to release the selector lever lock manually to
move it out of position P, e.g. if you wish to
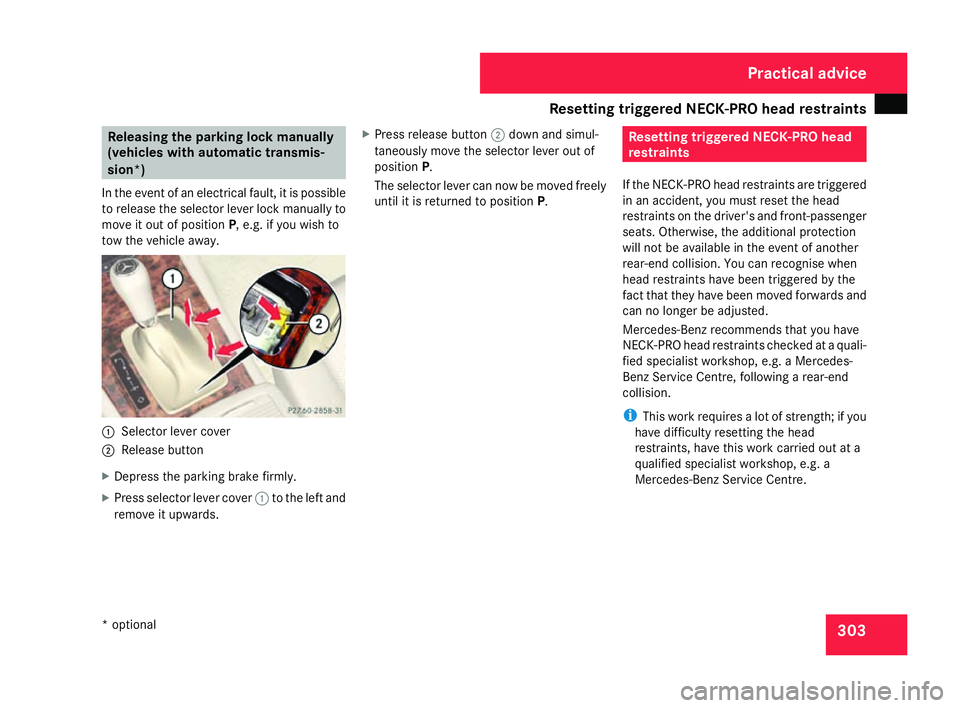
tow the vehicle away. 1
Selector lever cove r
2 Release butto n
X Depress the parking brake firmly.
X Press selector lever cover 1to the left and
remove it upwards . X
Press release button 2down and simul-
taneously move the selector lever out of
position P.
The selector lever can now be moved freely
until it is returned to position P. Resetting triggered NECK-PRO head
restraints
If the NECK-PRO head restraints are triggered
in an accident, you must reset the hea d
restraints on the driver's and front-passenge r
seats. Otherwise, the additional protection
will not be available in the event of another
rear-end collision. You can recognise when
head restraints have been triggered by the
fact that they have been moved forwards and
can no longer be adjusted.
Mercedes-Benz recommends that you have
NECK-PRO head restraints checked at a quali-
fied specialist workshop, e.g. a Mercedes-
Benz Service Centre, following a rear-end
collision.
i This work requires a lot of strength; if you
have difficulty resetting the head
restraints, have this work carried out at a
qualified specialist workshop, e.g. a
Mercedes-Benz Service Centre. Practical advice
* optional
204_AKB; 2; 3, en-GB
mkalafa,
2007-06-26T23:11:51+02:00 - Seite 303
Page 331 of 377

Jump-starting
328 Reconnecting the battery
! Always reconnect the battery in the
sequence described below. Never swap the
terminal clamps. You may otherwise dam-
age the vehicle electronics.
X Switch off all electrical consumers .
X Connect the positive terminal clamp and
secure the cover .
X Connect the negative terminal clamp.
X Connect the breather hose. Make sure that
a cell cap is fitted between the battery and
the breather hose.
X Close the boot/luggage compartment.
i If the battery power supply has been inter-
rupted (e.g. if it has been reconnected), you
must carry out the following tasks:
R Reset the function for folding the exterio r
mirrors in/out automatically* by folding
the mirrors out once (Y page 94). Jump-starting
Jump-starting your vehicle
If your vehicle's battery is discharged, the
engine can be jump-started from another
vehicle or from an external battery using jump
leads.
Observe the following points:
R Jump-starting must only be performed
when the engine and catalytic converte r
are cold.
R Do not start the engine if the battery ha s
frozen. Thaw the battery out first.
R Jump-starting may only be performed from
12V batteries .
R Only use jump leads which are protected
against polarity reversal and which have a
sufficient cross-section and insulated ter-
minal clamps.
i Jump leads which are protected against
polarity reversal and further informatio n
about jump-starting can be obtained from
any Mercedes-Benz Service Centre.
! Avoid repeated and lengthy starting
attempts. Never start the vehicle using a rapid battery
charger. G
Risk of injury
There is a risk of acid burns when jump -
starting a vehicle due to the gases which
escape from the battery. Do not lean over
the battery while the engine is being jump-
started. G
Risk of explosion
Gases escaping from the battery during
jump-starting may cause minor explosions.
Avoid creating sparks. Keep naked flames
away from the battery, and do not smoke .
Comply with safety precautions and tak e
protective measures when handling batter-
ies. You will find these under “Battery” in
the index .
X Make sure that the two vehicles do not
touch.
X Depress the parking brake.
X Manual transmission: engage neutral.
X Automatic transmission*: move the
selector lever to P.
X All vehicles: switch off all electric consum-
ers . Practical advice
* optional
204_AKB; 2; 3, en-GB
mkalafa,
2007-06-26T23:11:51+02:00 - Seite 328