Page 222 of 377

Driving
tips 21
9
for Mercedes-Benz vehicles or which corre-
spond to an equivalent quality standard.
Brake pads/linings which have not been
approved for Mercedes-Benz or which which
are not of an equivalent quality could affect
your vehicle's operating safety. G
Risk of accident
New brake linings only reach their optimum
braking effect after several hundred kilo-
metres of driving. Before this optimum
braking effect is reached, you should com-
pensate for the reduced braking effect by
applying greater pressure when braking.
This also applies after the brake discs or the
brake linings have been replaced .Tyre gri
p G
Risk of accident
Whereas the vehicle can be fully controlle d
at a certain speed on dry roads, you must
reduce your speed on wet or icy roads to
achieve the same road safety. Otherwise
you could cause an accident.
Pay particular attention to the road condi-
tions at temperatures around freezing
point. If ice has formed on the road surface (e.g.
from fog), a light film of water rapidly forms
on the ice when you brake, considerably
reducing tyre grip. Drive with particular
care in such weather conditions.
Driving on wet roads
If water has accumulated to a certain dept h
on the road surface, there is a danger of aqua-
planing occurring, even if:
R you drive at low speeds
R the tyres have adequate tread depth
For this reason, do not drive in tyre ruts, and
brake carefully. Driving on flooded roads
If you have to drive on stretches of road on
which water has collected, please bear in
mind that:
R the maximum permitted still water depth is
25 cm.
R you should drive no faster than at walkin g
pace.
! Bear in mind that vehicles travelling in
front or in the opposite direction creat e
waves. This may cause the maximum per-
missible water depth to be exceeded.
You must observe these notes, otherwise
damage may occur to the engine, electrics
and transmission . Operation
204_AKB; 2; 3, en-GB
mkalafa,
2007-06-26T23:11:51+02:00 - Seite 219
Page 310 of 377

Changing the bulbs
307
Rear bulbs Bulb Type
7 Third brake lamp LED
8 Side marker
lamp
Rear foglamp W 5
W
P 21 W 9 Turn signal
(rear) PY 21
W
or
LED* 18 a Brake lamp/tail
lamp 2 x P 21
W b Reversing lamp P 21
W
or
W 16 W19
(Estate) c Licence plate
lighting W 5
W Before changing bulbs
R
Use only the bulb types specified here.
R To prevent a short-circuit, switch off the
lights before changing a bulb.
R Only hold bulbs with a clean, lint-free cloth.
R Do not work with wet or greasy fingers.
R If the new bulb still does not light up, con-
sult a qualified specialist workshop, e.g. a
Mercedes-Benz Service Centre.
R Have the following bulbs changed at a
qualified specialist workshop, e.g. a
Mercedes-Benz Service Centre:
- the additional turn signal lamps in the
exterior mirrors
- the turn signal lamp* (vehicles with ligh t
package*)
- the third brake lamp
- the front foglamps
- the bi-xenon bulb s
- the licence plate lighting
i Due to the location of the front head -
lamps, it is best to have the bulbs changed at a qualified specialist workshop, e.g.
a
Mercedes-Benz Service Centre.
i Have the headlamp setting checked reg-
ularly at a qualified specialist workshop ,
e.g. a Mercedes-Benz Service Centre. Changing the front bulbs
Halogen headlamps (left-hand side, right mirror
image)
1 Bulb holder for turn signal
2 Housing cover for parking lamp
3 Housing cover for parking lamp
4 Housing cover for main-beam headlamp
5 Housing cover for dipped-beam headlamp
18 Vehicles with light package*: always have the LEDs changed at a qualified specialist workshop, e.g. a Mercedes-Benz Service Centre.
19 Only vehicles without LED turn signal lamps are equipped with these bulb type s Practical advice
* optional
204_AKB; 2; 3, en-GB
mkalafa,
2007-06-26T23:11:51+02:00 - Seite 307
Page 313 of 377

Changing the bulbs
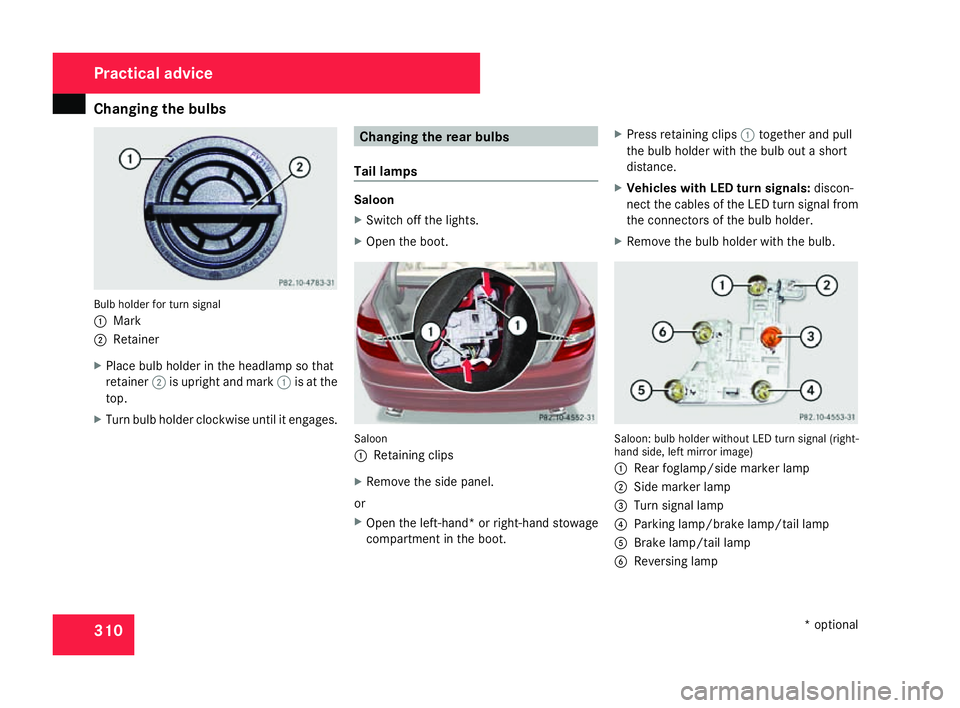
310Bulb holder for turn signal
1
Mark
2 Retainer
X Place bulb holder in the headlamp so that
retainer 2is upright and mark 1is at the
top .
X Turn bulb holder clockwise until it engages. Changing the rear bulbs
Tail lamps Saloon
X
Switch off the lights .
X Open the boot. Saloon
1
Retaining clips
X Remove the side panel.
or
X Open the left-hand* or right-hand stowage
compartment in the boot. X
Press retaining clips 1together and pull
the bulb holder with the bulb out a short
distance.
X Vehicles with LED turn signals: discon-
nect the cables of the LED turn signal from
the connectors of the bulb holder.
X Remove the bulb holder with the bulb. Saloon: bulb holder without LED turn signal (right
-
hand side, left mirror image)
1 Rear foglamp/side marker lamp
2 Side marker lamp
3 Turn signal lamp
4 Parking lamp/brake lamp/tail lamp
5 Brake lamp/tail lamp
6 Reversing lamp Practical advice
* optional
204_AKB; 2; 3, en-GB
mkalafa,
2007-06-26T23:11:51+02:00 - Seite 31
0
Page 314 of 377

Changing the bulbs
311
X
Rear foglamp/turn signal/parkin g
lamp/brake lamp/tail lamp/reversing
lamp: press the respective lamp back -
wards and turn it out of the bulb holder in
an anti-clockwise direction.
X Side marker lamp: pull bulb2out of the
bulb holder.
X Rear foglamp/turn signal/parkin g
lamp/brake lamp/tail lamp/reversing
lamp: insert the new bulb in the bulb holder
and turn in a clockwise direction .
X Side marker lamp: insert the new bulb in
the bulb holder and press in.
X Vehicles with LED turn signals: connect
the cables of the LED turn signal to the
connectors of the bulb holder.
X Reinsert the bulb holder and lock in posi-
tion .
X Close the side trim panel.
Estat e
X Switch off the lights .
X Open the luggage compartment. Estate
1
Retaining clips
X Remove the side panel.
X Press retaining clips 1together and pull
the bulb holder with the bulb out a short
distance.
X Vehicles with LED turn signals: discon-
nect the cables of the LED turn signal from
the connectors of the bulb holder.
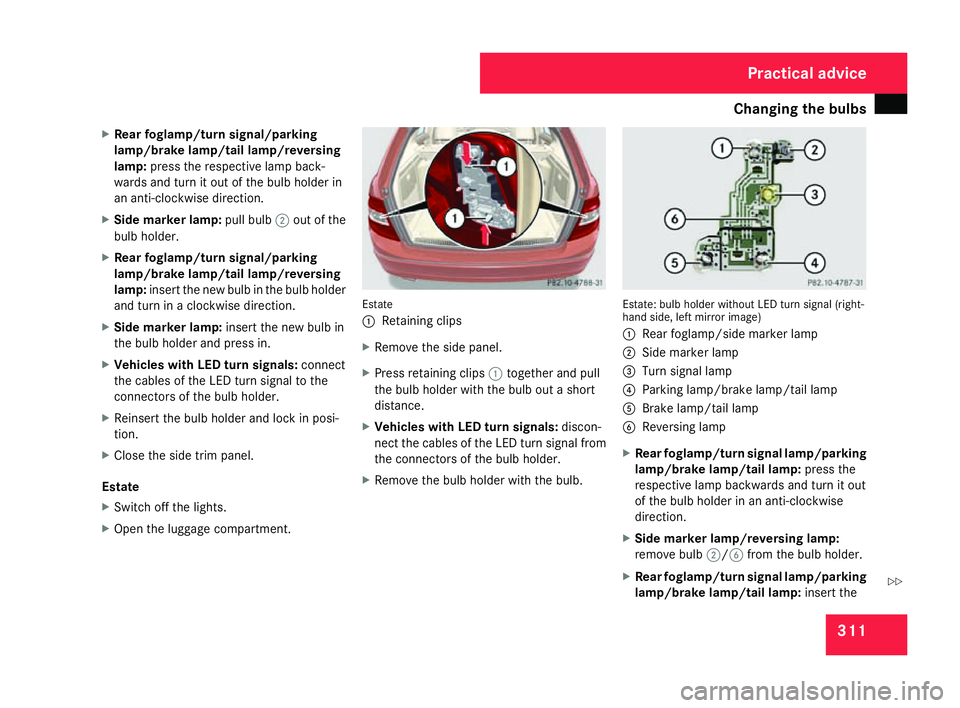
X Remove the bulb holder with the bulb. Estate: bulb holder without LED turn signal (right
-
hand side, left mirror image)
1 Rear foglamp/side marker lamp
2 Side marker lamp
3 Turn signal lamp
4 Parking lamp/brake lamp/tail lamp
5 Brake lamp/tail lamp
6 Reversing lamp
X Rear foglamp/turn signal lamp/parkin g
lamp/brake lamp/tail lamp: press the
respective lamp backwards and turn it out
of the bulb holder in an anti-clockwise
direction .
X Side marker lamp/reversing lamp:
remove bulb 2/6 from the bulb holder.
X Rear foglamp/turn signal lamp/parkin g
lamp/brake lamp/tail lamp: insert the Practical advice
204_AKB; 2; 3, en-GB
mkalafa,
2007-06-26T23:11:51+02:00 - Seite 311 Z