Page 5 of 202

Contents
Introduction . . . . . . . . . . . . . . . . . . . . . 7
Where to find it . . . . . . . . . . . . . . . . . . . 7
Symbols . . . . . . . . . . . . . . . . . . . . . . . . . 8
Operating safety. . . . . . . . . . . . . . . . . . . 9
At a glance . . . . . . . . . . . . . . . . . . . . . 11
Radio operating elements . . . . . . . . . . 12
Single CD operating elements . . . . . . . 14
CD changer* operating elements. . . . . 16
MP3 CD operating elements . . . . . . . . 18
Satellite radio* operating elements . . . 20
Telephone* operating elements . . . . . . 22
Navigation* operating elements . . . . . 24
Service operating elements . . . . . . . . . 26
Multifunction steering wheel . . . . . . . . 28
Selecting the multifunction display 29
Menu system . . . . . . . . . . . . . . . . . . . . 31
Quick reference COMAND . . . . . . . . . . 34
Switching the COMAND control
unit on and off . . . . . . . . . . . . . . . . 34
Volume . . . . . . . . . . . . . . . . . . . . . . 34Balance and fader . . . . . . . . . . . . . . 36
Bass and Treble . . . . . . . . . . . . . . . 37
Sound functions* . . . . . . . . . . . . . . 37
Audio. . . . . . . . . . . . . . . . . . . . . . . . . . 39
Audio operation . . . . . . . . . . . . . . . . . . 40
Opening the Audio menu . . . . . . . . 40
Selecting an audio source . . . . . . . 41
Muting . . . . . . . . . . . . . . . . . . . . . . 41
Radio operation . . . . . . . . . . . . . . . . . . 42
Switching to radio operation. . . . . . 42
Changing the Radio band . . . . . . . . 42
Selecting a station . . . . . . . . . . . . . 43
Memory functions . . . . . . . . . . . . . . 46
CD operation . . . . . . . . . . . . . . . . . . . . 50
General Information on
CD operation . . . . . . . . . . . . . . . . . 50
Tips on caring for your CDs . . . . . . 51
Loading a CD . . . . . . . . . . . . . . . . . 51
CD changer* operation . . . . . . . . . . . . 54
Switching to CD changer* mode . . 54
Loading CDs into the CD changer* 54CD operation . . . . . . . . . . . . . . . . . . . . 56
Switching to CD operation . . . . . . . 56
Switching on . . . . . . . . . . . . . . . . . . 57
Selecting a CD (CD changer* only). 58
Track select . . . . . . . . . . . . . . . . . . 59
Fast forward/reverse . . . . . . . . . . . 61
Muting. . . . . . . . . . . . . . . . . . . . . . . 62
Playback mode . . . . . . . . . . . . . . . . 62
MP3 CD operation . . . . . . . . . . . . . . . . 65
Safety instructions . . . . . . . . . . . . . 65
Tips on data storage media . . . . . . 65
Tips on caring for your MP3 CDs . . 66
Tips on creating MP3 CDs . . . . . . . 66
Tips on creating MP3 tracks . . . . . . 68
Tips on copyright . . . . . . . . . . . . . . 68
Switching to MP3 CD mode . . . . . . 69
Loading a MP3 CD . . . . . . . . . . . . . 69
Ejecting a MP3 CD . . . . . . . . . . . . . 69
MP3 main menu . . . . . . . . . . . . . . . 70
Selecting a folder . . . . . . . . . . . . . . 71
Track select . . . . . . . . . . . . . . . . . . 73
Fast forward/reverse . . . . . . . . . . . 75
Muting. . . . . . . . . . . . . . . . . . . . . . . 75
Playback options. . . . . . . . . . . . . . . 75
AUX operation . . . . . . . . . . . . . . . . . . . 77
Page 9 of 202

7
Where to find it
Introduction
� Where to find it
This Operator’s Manual is designed to pro-
vide support information for you, the
COMAND operator. Each chapter has its
own guide color to provide fast access to
information.
At a glance
Here you will find an overview of
all COMAND control elements and system
components. If you are operating
COMAND for the first time or if you have
rented or borrowed the vehicle, this is the
chapter you should read first.
Audio
Here you will find all the information on
how to use the radio, CD player (CD, MP3
CD), CD changer* (CD, MP3 CD) and AUX
operation.
Satellite radio*
This chapter provides information on how
to select a station and a program category.
Telephone*
Here you can learn in detail about the
many functions of the telephone, how to
initiate an emergency call and use the pho-
ne book.
Navigation
This chapter provides detailed information
on the following topics:
�Destination input
�Route guidance including detour
�Last destinations and destination
memory
�POIs
�Today’s plan
Service
Here you will find all the information about:
�SMS*
�Tele Aid*
System settings
This chapter provides information on how
to adjust COMAND system settings.
Directories
The glossary explains the most important
technical terms.
The table of contents and index directory
will help you quickly locate the information
you need.
Page 33 of 202
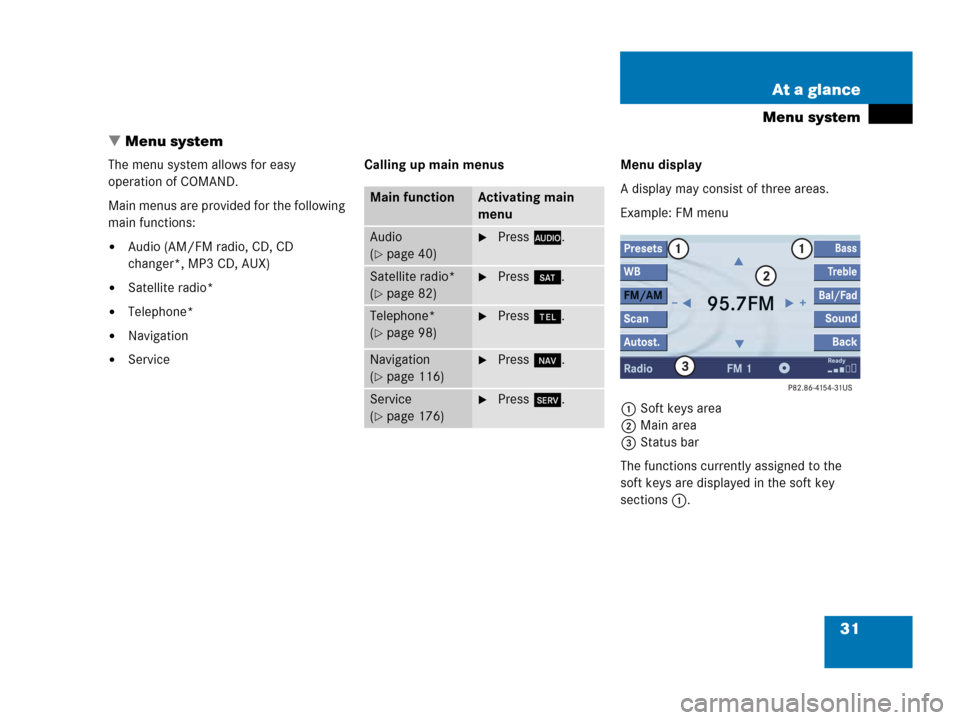
31 At a glance
Menu system
� Menu system
The menu system allows for easy
operation of COMAND.
Main menus are provided for the following
main functions:
�Audio (AM/FM radio, CD, CD
changer*, MP3 CD, AUX)
�Satellite radio*
�Telephone*
�Navigation
�ServiceCalling up main menus Menu display
A display may consist of three areas.
Example: FM menu
1Soft keys area
2Main area
3Status bar
The functions currently assigned to the
soft keys are displayed in the soft key
sections 1.
Main functionActivating main
menu
Audio
(
�page 40)
�Press A.
Satellite radio*
(
�page 82)
�Press B.
Telephone*
(
�page 98)
�Press a.
Navigation
(
�page 116)
�Press b.
Service
(
�page 176)
�Press C.
Page 38 of 202

�CD changer* operation (CD)
�MP3 CD operation (MP3)
�AUX op")
36 At a glance
Quick reference COMAND
Common balance and fader settings apply
to the following systems:
�Radio operation
�CD operation (CD)
�CD changer* operation (CD)
�MP3 CD operation (MP3)
�AUX operation
�Satellite radio*
When you make balance or fader settings,
the system will automatically save the
settings for the current operating mode
and others.Setting balance and fader
In any audio source operation:
�Press the Bal/Fad soft key.
Cross-hairs are displayed. The
horizontal hair line indicates the
balance setting. The vertical hair line
indicates the fader setting. You can
now make balance and fader settings.
�Push the joystick to H or h.
Move the cross-hairs horizontally and
adjust the balance.
or
�Push the joystick to g or G.
Move the cross-hairs vertically and
adjust the fader.
�Press E or the Back soft key.
or
�Wait until the display changes.
The new setting is saved.
Balance and fader
i
Push the joystick to F and f to
move the cross-hairs simultaneously in
vertical and horizontal direction.
Page 39 of 202
 bands
�Single CD (CD) and CD changer*
(
CD")
37 At a glance
Quick reference COMAND
Different bass and treble settings are
possible for the following operating modes:
�Radio: FM-, AM- and
Weather (WB) bands
�Single CD (CD) and CD changer*
(
CD)
�MP3 CD operation (MP3)
�AUX operation
�Satellite radio*
When you adjust bass or treble, the
settings apply to other sources within the
group, but not to the other modes. For
example, if you adjust the bass while
listening to FM, that same bass level
applies to AM and Weather band, but not
to satellite radio* or CD/MP3 CD.
Activating the Bass or Treble menu
In any audio source operation:
�Press the Bass or Treble soft key.
The Bass or Treble menu will appear. Setting Bass and Treble
�Push the joystick to H or h.
Bass or Treble is adjusted.
�Press E or the Back soft key.
or
�Wait until the display changes.
The new setting is saved.
If your vehicle is equipped with the
premium sound system*, the sound
functions* will be available for the
following operating modes:
�Radio: FM-, AM- and
Weather (WB) bands
�Single CD (CD) and CD changer*
(
CD)
�MP3 CD operation (MP3)
�AUX operation
�Satellite radio*
The following sound functions* are
available:
�Default Settings:
COMAND sets the default settings
(Bass, Treble, Bal/Fad) for the active
source mode.
�Standard:
COMAND sets the sound linear for the
center of the vehicle.
Bass and Treble
i
Press the Bass or Treble soft key and
keep it depressed to move the cursor
continuously. Release the soft key to
set the current value.
Sound functions*
Page 41 of 202
39 Audio
Audio operation
Radio operation
CD operation
CD changer* operation
MP3 CD operation
AUX operation
Page 42 of 202
40 Audio
Audio operation
� Audio operation
In chapter “Audio” you will find detailed
information regarding
�radio operation
�CD operation (CD drive, CD changer*)
�MP3 CD operation
�AUX operation
If you have not done so already, please fa-
miliarize yourself with these functions by
reading chapter “At a glance”.
�Press A.
Audio menu
WarningG
In order to avoid distraction which could
lead to an accident, the driver should enter
system settings with the vehicle at a stand-
still and operate the audio system only if
permitted by road, weather and traffic con-
ditions.
Bear in mind that at a speed of just 30 mph
(approximately 50 km/h), your vehicle is co-
vering a distance of 44 feet (approximately
14 m) every second.
Opening the Audio menu
Page 79 of 202
77 Audio
AUX operation
� AUX operation
An external audio source can be
connected to the COMAND via the 1/8"
socket located inside the glovebox.
C class illustrated
11/8“ socket
�Open the Audio menu (�page 40).
�Press the AUX soft key.
The AUX menu is displayed. The exter-
nal audio source is played back if it is
connected and switched to playback.At the COMAND, you can set the following
for the AUX operation:
�Volume (�page 34)
�Balance control and fader (�page 36)
�Bass and treble control (�page 37)
�Sound functions* (�page 37)
i
For further information please contact
an authorized Mercedes-Benz Center.
i
For instructions on how to operate the
external audio source, please see the
operation manual of the device con-
nected.