Page 173 of 202

171 Navigation*
Today’s plan
Display details for starting position
�Push the joystick to G to select
Starting position.
�Press the Details soft key.
The address information will appear.
Selecting a destination from the
today’s plan
�Activate the today’s plan.
�Push the joystick to G or g to
select an entry.
�Use the Page soft keys to scroll page-
wise through the list (if available).
�Press E.
The Start route guidance menu will
appear (
�page 135).Saving a today’s plan entry in the
destination memory
�Activate the today’s plan.
�Press the Save soft key.
The Destination memory input menu
will appear (
�page 160).
Deleting a today’s plan entry
�Activate the today’s plan.
�Push the joystick to G or g to
select an entry.
�Press the Delete soft key.
A prompt message will appear.
�Push the joystick to H to select Yes.
If you do not want to delete the entry:
�Press E to confirm No.
�Press E.
The system deletes the destination in
the today’s plan. The entries below the
destination deleted move up by one
position.Deleting all the today’s plan entries
�Activate the today’s plan.
�Press the Del. all soft key.
A prompt message will appear.
�Push the joystick to H to select Yes.
If you do not want to delete the entries:
�Press E to confirm No.
�Press E.
The system deletes all the destination
entries in the today’s plan.
i
When you reach the destination, route
guidance ends and the system deletes
the today’s plan entry.
Page 175 of 202

173 Navigation*
Software Updates
1Ejecting DVD
2Opening/closing the display unit
3Warning message
Press EJECT to
close
You can update the system with a new
navigation DVD. The new DVD may include
new map/road information.Starting an update
DVDs are loaded and ejected at the
navigation module.
�Switch the COMAND on (�page 34).Ejecting
�Press l.
The display unit moves forward and
then tilts down. The DVD NAVIGATION
slot is visible.
�Press the l button left of the
DVD NAVIGATION slot.
The navigation module ejects the DVD.
The message
No DVD in drive.
Please insert Navigation DVD.
will appear.
�Remove the DVD from the slot.
WarningG
The display unit can cause injury if
contacted when open. Please close after
inserting a navigation DVD.
!
Do not place anything on the lowered
display panel (i.e. do not use as a shelf).
Placing objects on the lowered display
panel may result in damage to the
display or COMAND
unit which is not covered by the
Mercedes-Benz Limited Warranty.
i
Updating may take several minutes.
During updating, the operation of
COMAND is restricted. You cannot
switch off the system.
i
The navigation module is located
behind the display unit of the COMAND
(
�page 172).
i
There are two l buttons. One is on
the display unit 2. The other is located
left of the DVD NAVIGATION slot 1
behind the display.
Page 176 of 202

174 Navigation*
Software Updates
Loading
�Insert the new navigation DVD into the
DVD slot with the label side up.
The message
Navigation is
initializing. Please wait.
will
appear.
�Press l on the display unit to return
the display unit to its closed position.
The display unit tilts up and then moves
to the rear.After that, the COMAND loads the
software on the DVD.
Shortly after that, the progress bar
appears. After some time, the progress
bar reaches 100%.
The update is completed. You can now
operate the navigation system again.
i
Inserting a second DVD with another
DVD still loaded will cause damage to
the DVD drive which is not covered by
the Mercedes-Benz Limited Warranty.
i
The message Press EJECT to
close
will appear. If l on the
display unit is not pressed within 20
seconds, eight successive series of two
beep tones will sound to remind you to
return the display to its closed position
by pressing l on the display unit.
After the beep tones COMAND returns
the display unit to its closed position.
Page 178 of 202
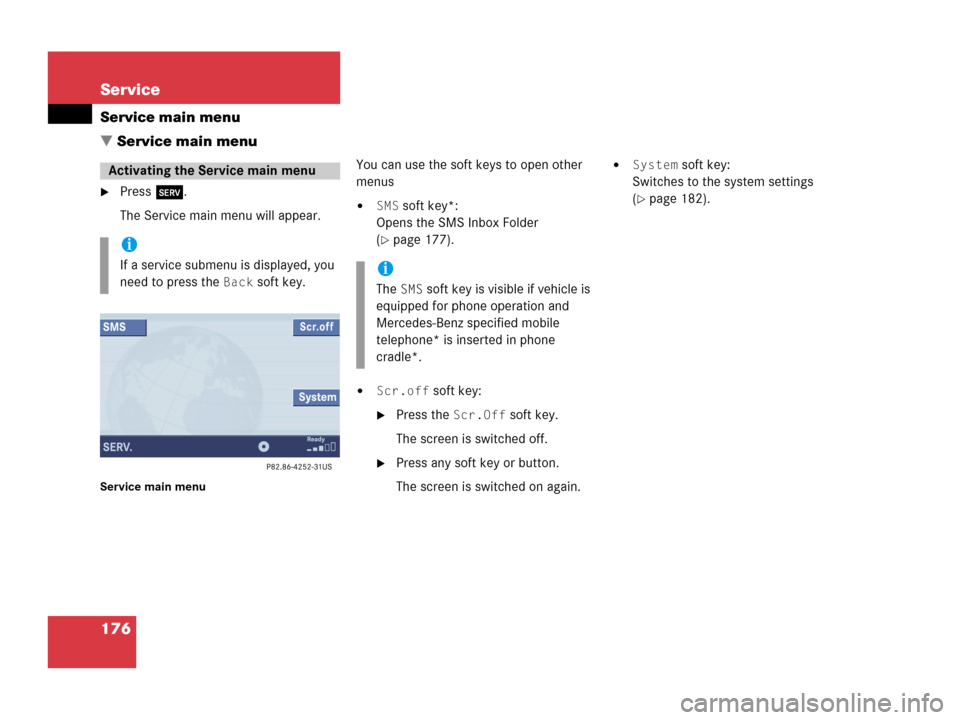
176 Service
Service main menu
� Service main menu
�Press C.
The Service main menu will appear.
Service main menu
You can use the soft keys to open other
menus
�SMS soft key*:
Opens the SMS Inbox Folder
(
�page 177).
�Scr.off soft key:
�Press the Scr.Off soft key.
The screen is switched off.
�Press any soft key or button.
The screen is switched on again.
�System soft key:
Switches to the system settings
(
�page 182).
Activating the Service main menu
i
If a service submenu is displayed, you
need to press the
Back soft key.i
The SMS soft key is visible if vehicle is
equipped for phone operation and
Mercedes-Benz specified mobile
telephone* is inserted in phone
cradle*.
Page 179 of 202
177 Service
SMS*
� SMS*
With the SMS Received list, you can
receive SMS messages provided that SMS
messaging is available from your mobile
phone service provider.
�Activate the Service main menu
(
�page 176).
�Press the SMS soft key.
The Received list will appear.The status bar shows date and time of
the message.
One line is provided for each message.
Symbol = = Message unread
Symbol z = SMS message
i
The functions described here apply if
your vehicle is equipped with mobile
phone cradle* and a Mercedes-Benz
specified mobile phone*.
i
If you have received new SMS
messages, n is displayed on the
status bar. Additionally, a message
received tone is played.
i
If another system is active (e.g. radio),
a window with the message
Received
a new SMS
appears when SMS
message is coming in.
SMS Received list
i
If there is no SMS message, the SMS
soft key appears greyed out.
Page 180 of 202
178 Service
SMS*
�Press the Detail soft key.
The list entry will appear in full in a
window.
Line-by-line scrolling through the SMS
Received list:
�Push the joystick to g or G
to highlight the desired message.
Back to the Service main menu:
�Press the Back soft key.
�In the SMS Received (�page 177) list,
push the joystick to g or G to
highlight the desired message.
�Press E.
The message is displayed. In the status
bar, the name or the phone number of
the sender will appear.Line-by-line scrolling through the message
text:
�Push the joystick to g or G.
Back to the SMS Received list:
�Press the Back soft key.
Reading SMS message received
Page 184 of 202
182 System settings
System settings
� System settings
�Press C.
�In the Service main menu
(
�page 176), press the System soft
key.
System settings menu
In the System settings menu you can:
�select the time zone and daylight
savings time settings
�select the language (�page 183)
�switch verification and notification
tones on and off (
�page 184)
�adjust display settings (�page 185)
�activate and deactivate the Voice
control system* help screen
�start Voice control system*
individualization
�reset all settings to the factory settings
(
�page 186)You can select the applicable time zone
and daylight saving time settings.
�In the System settings menu, press the
Time soft key.
The available time zones are shown.
�Push the joystick to g or G to
select the time zone.
�Press E.
You can now select the daylight saving
time settings.
Activating the System settings
menu Selecting the time zone
Page 185 of 202
183 System settings
System settings
�Push the joystick to g or G to
select the desired entry.
Daylight Savings Time:
Changes from summer to winter time.
Standard Time:
Changes from winter to summer time.
�Press E.
The System settings menu will appear.
The setting is saved.The language affects the menu text
displays and the voice output during route
guidance.
�In the System settings menu
(
�page 182), press the Lang. soft
key.
The languages list will appear.
OptionSymbol
Time change selected_
Time change not
selected-
Selecting the language