2007 MAZDA MODEL RX 8 ECO mode
[x] Cancel search: ECO modePage 207 of 443

Black plate (206,1)
Mode selector switch
Press the mode selector switch to select
airflow mode (page 6-4).
NOTE
To set the air vent to, press the
windshield defroster switch.
A/C switch
Push the A/C switch to turn the air
conditioner on. The indicator light on the
switch will illuminate when the fan
control dial is set at position 1, 2, 3, or 4.
Push the switch once again to turn the air
conditioner off.
NOTE
The air conditioner may not function
when the outside temperature
approaches 0 °C (32 °F).
Air intake selector
This switch controls the source of air
entering the vehicle.
Press the switch to alternate between the
andpositions. The indicator
light for the selected mode will illuminate.
It is recommended that under normal
conditions the switch be kept in the
outside air position.
Outside air position (
)
Outside air is taken into the vehicle. Use
this position for normal ventilation and
heating.
Recirculated air position (
)
Outside air is shut off. Air within the
vehicle is recirculated.
This position can be used when driving on
a dusty road or in similar conditions. It
also helps to provide quicker cooling of
the interior.
6-6
Interior Comfort
Climate Control System
RX-8_8V89-EA-06F_Edition1 Page206
Friday, May 19 2006 9:51 AM
Form No.8V89-EA-06F
Page 224 of 443

Black plate (223,1)
*
* BOSE Sound
System-
equipped model
* Depending on the mode selected, the
indication changes.
2. Turn the audio control dial to adjust the
selected functions as follows:
Standard audio-equipped model
Indication Turn Left Turn Right
Select mode
Decrease
bassIncrease
bass
Decrease
mid-rangeIncrease
mid-range
Decrease
trebleIncrease
treble
Shift the
sound to the
frontShift the
sound to the
rear
Shift the
sound to the
leftShift the
sound to the
right
OFF ON
BOSE Sound System-equipped model
Indication Turn Left Turn Right
OFF ON
Decrease
bassIncrease
bass
Decrease
trebleIncrease
treble
Shift the
sound to the
frontShift the
sound to the
rear
Shift the
sound to the
leftShift the
sound to the
right
OFF ON
NOTE
About 5 seconds after selecting any
mode, the volume function will be
automatically selected. To reset bass,
mid-range, treble, fade, and balance,
press the audio control dial for 2
seconds. The unit will beep and
“CLEAR”will be displayed.
Automatic Level Control (ALC)
(Standard audio-equipped model)
The automatic level control is a feature
that automatically adjusts audio volume
and sound quality according to the vehicle
speed.
The volume increases in accordance with
the increase in vehicle speed, and
decreases as vehicle speed decreases.
Interior Comfort
Audio System
6-23
RX-8_8V89-EA-06F_Edition1 Page223
Friday, May 19 2006 9:51 AM
Form No.8V89-EA-06F
Page 227 of 443

Black plate (226,1)
qOperating the Radio
Seek tuning
buttonScan button
Manual tuning dial/Auto
memory button/Electric
serial number buttonSatellite button
Band selector buttonChannel preset buttons
Radio ON
Press a band selector button (
)to
turn the radio on.
Band selection
Successively pressing the band selector
button (
) switches the bands as
follows: FM1→FM2→AM.
The selected mode will be indicated. If
FM stereo is being received,“ST”will be
displayed.
NOTE
If the FM broadcast signal becomes
weak, reception automatically changes
from STEREO to MONO for reduced
noise, and the“ST”indicator will go
out.
Tuning
The radio has the following tuning
methods: Manual, Seek, Scan, Preset
channel, and Auto memory tuning. The
easiest way to tune stations is to set them
on preset channels.
NOTE
If the power supply is interrupted (fuse
blows or the battery is disconnected),
the preset channels will be canceled.
Manual tuning
Turning the manual tuning dial will
change the frequency higher or lower.
6-26
Interior Comfort
Audio System
RX-8_8V89-EA-06F_Edition1 Page226
Friday, May 19 2006 9:51 AM
Form No.8V89-EA-06F
Page 233 of 443

Black plate (232,1)
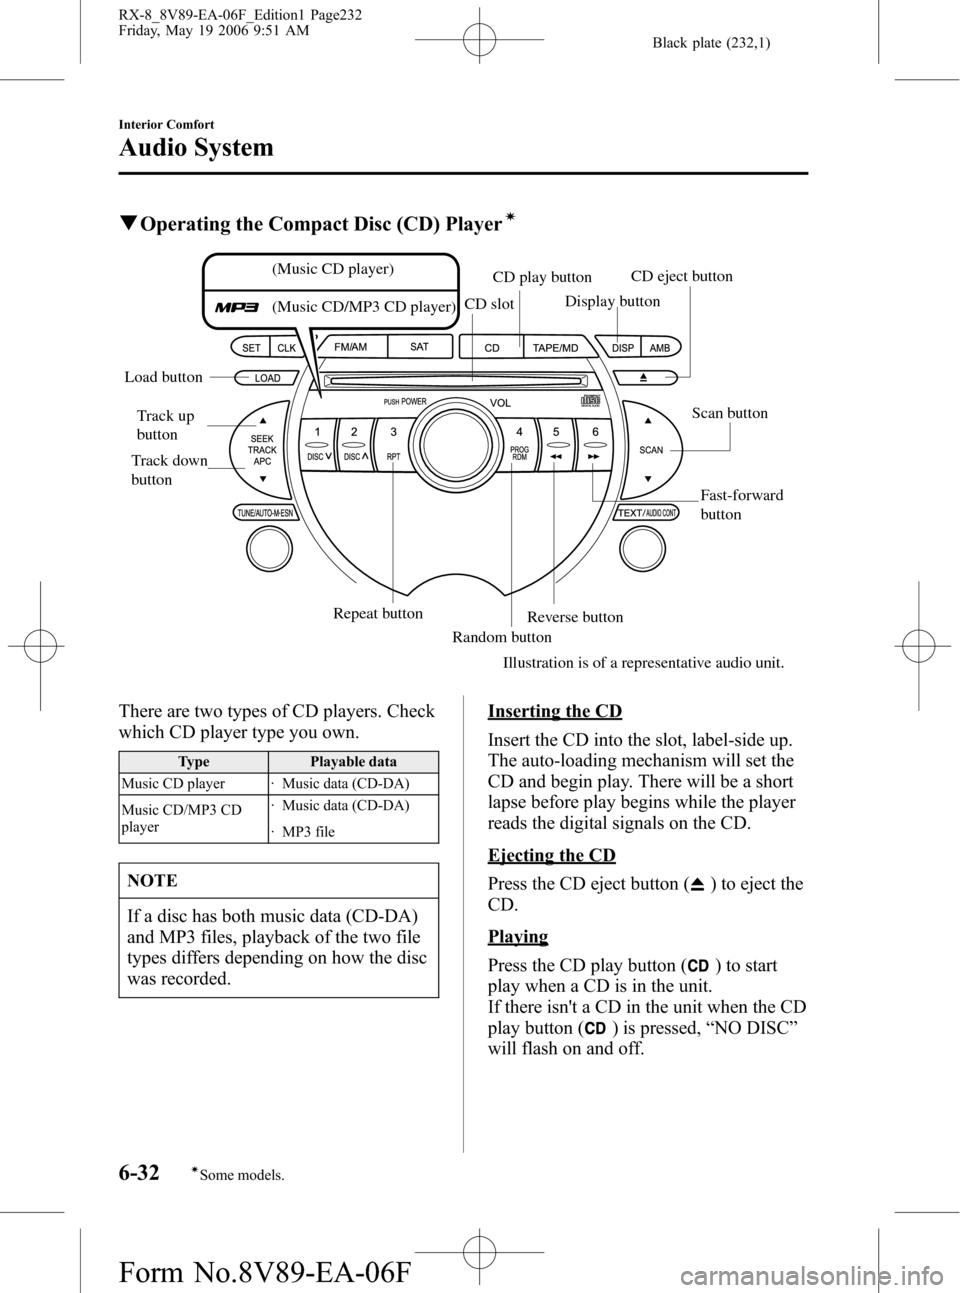
qOperating the Compact Disc (CD) Playerí
(Music CD player)
(Music CD/MP3 CD player)
Fast-forward
button Track up
button
Track down
button Load buttonCD slotCD play button
Display button
Repeat button
Random buttonReverse button
Illustration is of a representative audio unit.Scan button CD eject button
There are two types of CD players. Check
which CD player type you own.
Type Playable data
Music CD player · Music data (CD-DA)
Music CD/MP3 CD
player· Music data (CD-DA)
· MP3 file
NOTE
If a disc has both music data (CD-DA)
and MP3 files, playback of the two file
types differs depending on how the disc
was recorded.
Inserting the CD
Insert the CD into the slot, label-side up.
The auto-loading mechanism will set the
CD and begin play. There will be a short
lapse before play begins while the player
reads the digital signals on the CD.
Ejecting the CD
Press the CD eject button (
) to eject the
CD.
Playing
Press the CD play button (
) to start
play when a CD is in the unit.
If there isn't a CD in the unit when the CD
play button (
) is pressed,“NO DISC”
will flash on and off.
6-32
Interior Comfort
íSome models.
Audio System
RX-8_8V89-EA-06F_Edition1 Page232
Friday, May 19 2006 9:51 AM
Form No.8V89-EA-06F
Page 237 of 443

Black plate (236,1)
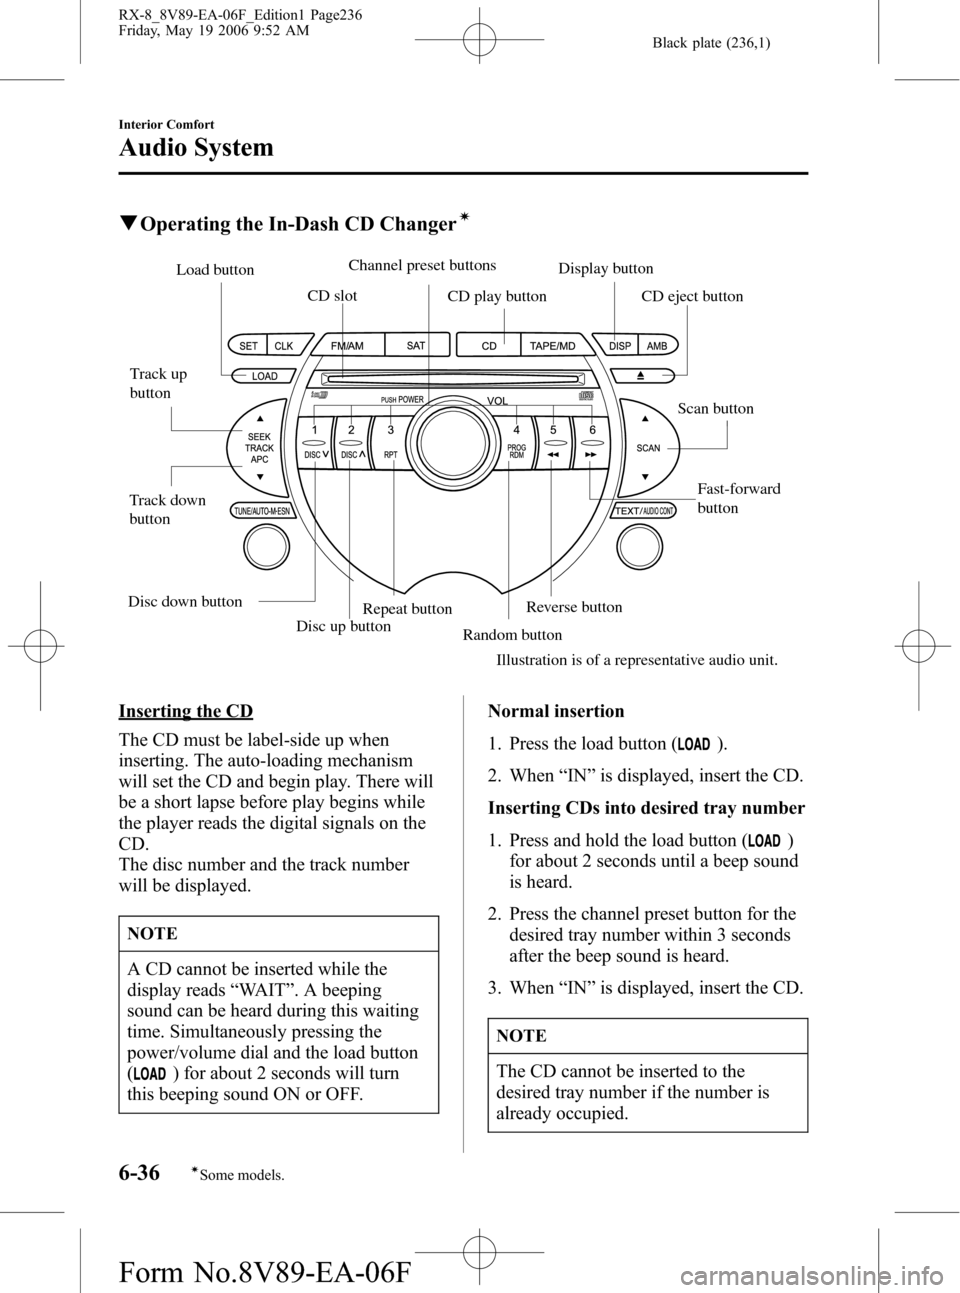
qOperating the In-Dash CD Changerí
Disc up button
Fast-forward
button Track up
button
Track down
buttonLoad button
CD slot
CD play buttonDisplay button
Repeat button
Random buttonReverse button
Illustration is of a representative audio unit.Scan button CD eject button Channel preset buttons
Disc down button
Inserting the CD
The CD must be label-side up when
inserting. The auto-loading mechanism
will set the CD and begin play. There will
be a short lapse before play begins while
the player reads the digital signals on the
CD.
The disc number and the track number
will be displayed.
NOTE
A CD cannot be inserted while the
display reads“WAIT”. A beeping
sound can be heard during this waiting
time. Simultaneously pressing the
power/volume dial and the load button
(
) for about 2 seconds will turn
this beeping sound ON or OFF.Normal insertion
1. Press the load button (
).
2. When“IN”is displayed, insert the CD.
Inserting CDs into desired tray number
1. Press and hold the load button (
)
for about 2 seconds until a beep sound
is heard.
2. Press the channel preset button for the
desired tray number within 3 seconds
after the beep sound is heard.
3. When“IN”is displayed, insert the CD.
NOTE
The CD cannot be inserted to the
desired tray number if the number is
already occupied.
6-36
Interior Comfort
íSome models.
Audio System
RX-8_8V89-EA-06F_Edition1 Page236
Friday, May 19 2006 9:52 AM
Form No.8V89-EA-06F
Page 242 of 443

Black plate (241,1)
qChanging the Source
Press the mode switch () to change
the audio source (FM1 radio> FM2 radio>
AM radio> CD player or CD changer>
Cassette tape player> SIRIUS1>
SIRIUS2> SIRIUS3> cyclical).
NOTE
Cassette tape, CD, CD changer, and
SIRIUS digital satellite radio modes
cannot be selected in the following
cases:
lA cassette deck, CD, CD changer, or
SIRIUS digital satellite radio unit is
not equipped on the audio system.
lA cassette tape, or CD has not been
inserted.
qSeek Switch
When listening to the radio
Press the seek switch (
,), the radio
switches to the next/previous stored
station in the order that it was stored
(1―6).
Press the seek switch (
,) for about 2
seconds until a beep sound is heard to
seek all usable stations at a higher or
lower frequency whether programmed or
not.
When playing a cassette tape
Press the seek switch (
), release, and it
will advance to the next selection.
Press the seek switch (
), release, and it
will repeat the selection being played.
When playing a CD
Press the seek switch (
) to skip to the
next track.
Press the seek switch (
) to repeat the
current track.
Interior Comfort
Audio System
6-41
RX-8_8V89-EA-06F_Edition1 Page241
Friday, May 19 2006 9:52 AM
Form No.8V89-EA-06F
Page 307 of 443

Black plate (306,1)
Tires
For reasons of proper performance, safety,
and better fuel economy, always maintain
recommended tire inflation pressures and
stay within the recommended load limits
and weight distribution.
WARNING
Using Different Tire Types:
Driving your vehicle with different
types of tires is dangerous. It could
cause poor handling and poor
braking; leading to loss of control.
Use all radial, all bias-belted, or all
bias-type tires.
Using Wrong-Sized Tires:
Using any other tire size than what is
specified for your Mazda (page 10-6)
is dangerous. It could seriously affect
ride, handling, ground clearance, tire
clearance, and speedometer
calibration. This could cause you to
have an accident. Use only tires that
are the correct size specified for your
Mazda.
qTire Inflation Pressure
WARNING
Always inflate the tires to the correct
pressure:
Overinflation or underinflation of tires
is dangerous. Adverse handling or
unexpected tire failure could result in
a serious accident.
Refer to specification charts on page
10-6.The Tire Pressure Monitoring System
í
does not alleviate the need to check the
tire condition every day, including
whether the tires all look inflated properly.
Inspect all tire pressure monthly
(including the spare
í) when the tires are
cold. Maintain recommended pressures
for the best ride, handling, and minimum
tire wear.
When checking the tire pressures, use of a
digital tire pressure gauge is
recommended.
Refer to the specification charts (page
10-6).
8-24
Maintenance and Care
íSome models.
Owner Maintenance
RX-8_8V89-EA-06F_Edition1 Page306
Friday, May 19 2006 9:52 AM
Form No.8V89-EA-06F
Page 329 of 443

Black plate (328,1)
Interior Care
qDashboard Precautions
Prevent caustic solutions such as perfume
and cosmetic oils from contacting the
dashboard. They'll damage and discolor it.
If these solutions get on the dashboard,
wipe them off immediately.
CAUTION
Do not use glazing agents.
Glazing agents contain ingredients
which may cause discoloration,
wrinkling, cracks and peeling.
qCleaning the Upholstery and
Interior Trim
Vinyl
Remove dust and loose dirt from vinyl
with a whisk broom or vacuum cleaner.
Clean vinyl with a leather-and-vinyl
cleaner.
Leatherí
Real leather isn't uniform and may have
scars, scratches, and wrinkles. Clean it
with a leather cleaner or mild soap.
If the leather gets wet from rain, remove
the moisture as soon as possible and dry
in a shaded area.
If the seats get wet, promptly remove
moisture with a dry cloth and allow it to
further dry in a shaded area.
If moisture is not removed, it will cause
hardening and shrinkage of the leather.
Do not leave vinyl products on the seats
for long periods as they may affect the
leather quality and coloring.
Fabricí
Remove dust and loose dirt from fabric
with a whisk broom or vacuum cleaner.
Clean it with a mild soap solution good
for upholstery and carpets. Remove fresh
spots immediately with a fabric spot
cleaner.
To keep the fabric looking clean and
fresh, take care of it. Otherwise its color
will be affected, it can be stained easily,
and its fire-resistance may be reduced.
CAUTION
Use only recommended cleaners and
procedures. Others may affect
appearance and fire-resistance.
Suede-like materialí
Stains which are not treated immediately
will be difficult to remove later, and may
cause fading or discoloration.
Remove stains as soon as possible.
To clean,wipe with a soft, damp cloth.
Then buff with a soft, dry cloth.
If stains cannot be removed, using plain
water, try wiping with soapy water or a
mild detergent.
CAUTION
Don't clean the suede with leather
cleaner, a detergent, or soap. It will
cause discoloration.
To dry away any water,wipe with a soft,
dry cloth.
8-46
Maintenance and Care
íSome models.
Appearance Care
RX-8_8V89-EA-06F_Edition1 Page328
Friday, May 19 2006 9:53 AM
Form No.8V89-EA-06F