2007 MAZDA MODEL RX 8 reset
[x] Cancel search: resetPage 237 of 443

Black plate (236,1)
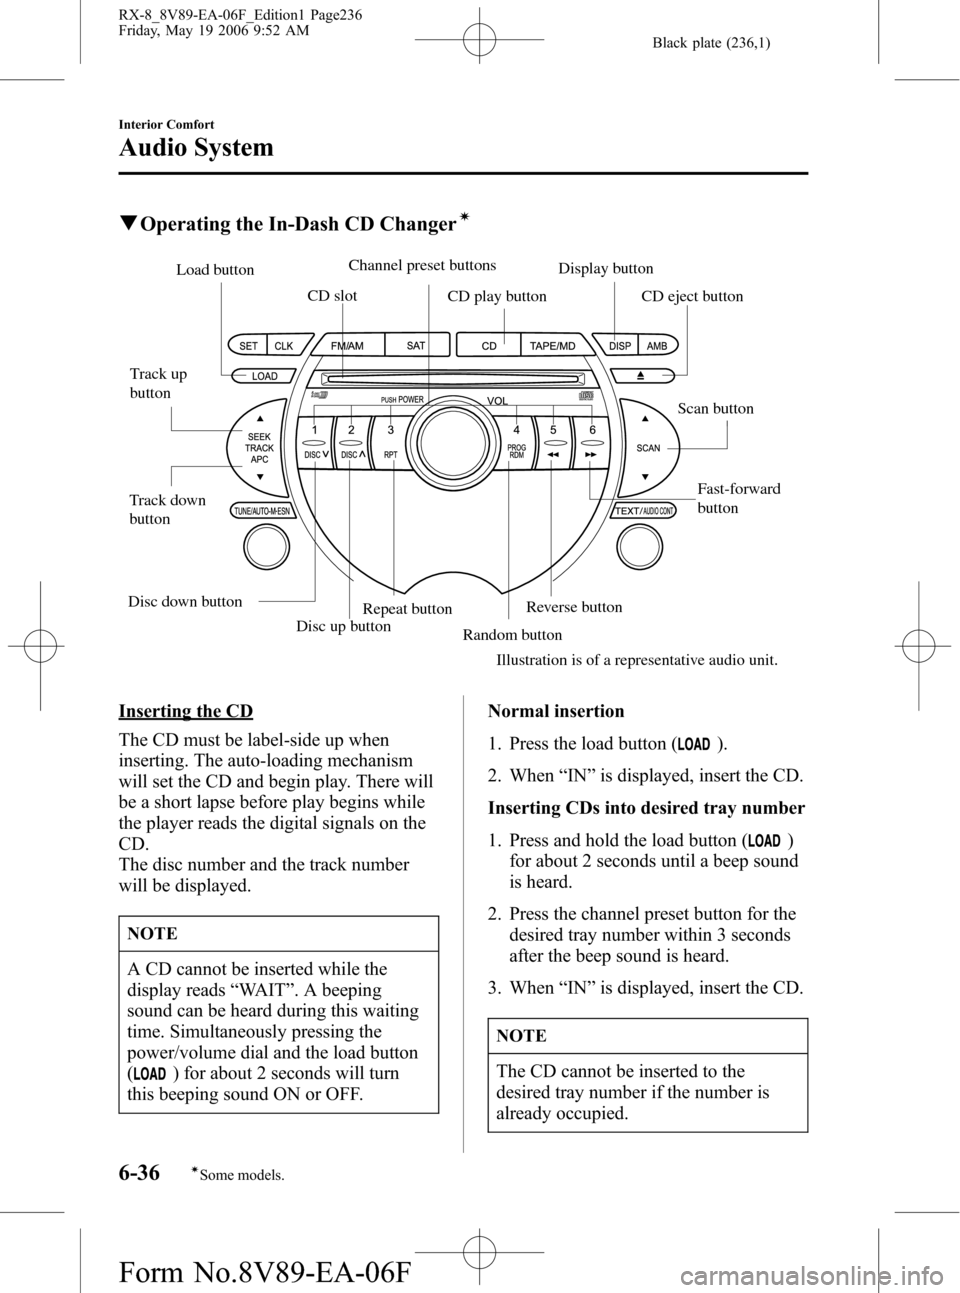
qOperating the In-Dash CD Changerí
Disc up button
Fast-forward
button Track up
button
Track down
buttonLoad button
CD slot
CD play buttonDisplay button
Repeat button
Random buttonReverse button
Illustration is of a representative audio unit.Scan button CD eject button Channel preset buttons
Disc down button
Inserting the CD
The CD must be label-side up when
inserting. The auto-loading mechanism
will set the CD and begin play. There will
be a short lapse before play begins while
the player reads the digital signals on the
CD.
The disc number and the track number
will be displayed.
NOTE
A CD cannot be inserted while the
display reads“WAIT”. A beeping
sound can be heard during this waiting
time. Simultaneously pressing the
power/volume dial and the load button
(
) for about 2 seconds will turn
this beeping sound ON or OFF.Normal insertion
1. Press the load button (
).
2. When“IN”is displayed, insert the CD.
Inserting CDs into desired tray number
1. Press and hold the load button (
)
for about 2 seconds until a beep sound
is heard.
2. Press the channel preset button for the
desired tray number within 3 seconds
after the beep sound is heard.
3. When“IN”is displayed, insert the CD.
NOTE
The CD cannot be inserted to the
desired tray number if the number is
already occupied.
6-36
Interior Comfort
íSome models.
Audio System
RX-8_8V89-EA-06F_Edition1 Page236
Friday, May 19 2006 9:52 AM
Form No.8V89-EA-06F
Page 238 of 443

Black plate (237,1)
Multiple insertion
1. Press and hold the load button (
)
for about 2 seconds until a beep sound
is heard.
2. Wait 3 seconds or press the load button
(
) again within 3 seconds after the
beep sound is heard.
3. When“IN”is displayed, insert the CD.
4. When“IN”is displayed again, insert
the next CD.
NOTE
The first-inserted CD will be played
automatically when:
lNo other CD is inserted within 15
seconds after“IN”is displayed.
lThe CD trays are full.
Displaying the CD-inserted tray
number
When you want to know the number for a
CD-inserted tray, press the display button
(
). The tray number will be displayed
for 5 seconds.
Ejecting the CD
Normal ejection
1. Press the CD eject button (
). The
disc number and“DISC”“OUT”will
be displayed.
2. Pull out the CD.
NOTE
When the CD is ejected during play, the
next CD will be played automatically.Ejecting CDs from desired tray number
1. Press and hold the CD eject button (
)
for about 2 seconds until a beep sound
is heard.
2. Press the channel preset button for the
desired CD number within 3 seconds
after the beep sound is heard.
3. Pull out the CD.
Multiple ejection
1. Press and hold the CD eject button (
)
for about 2 seconds until a beep sound
is heard.
2. Wait 3 seconds or press the CD eject
button (
) again within 3 seconds
after the beep sound is heard.
3. Pull out the CD, then the next CD will
be ejected.
NOTE
lCDs will be ejected starting with the
one with the lowest number.
lAll CDs in the tray will be ejected
continuously.
lCDs can be ejected when the ignition
switch is off. Press and hold the CD
eject button (
) for about 2 seconds
and all CDs will eject.
Playing
Press the CD play button (
) to start
play when a CD is in the unit.
If there isn't a CD in the unit when the CD
play button (
) is pressed,“NO DISC”
will flash on and off.
Interior Comfort
Audio System
6-37
RX-8_8V89-EA-06F_Edition1 Page237
Friday, May 19 2006 9:52 AM
Form No.8V89-EA-06F
Page 248 of 443

Black plate (247,1)
qClock
When the ignition switch is in the ACC or
ON position, the time is displayed.
Time setting
1. Press the CLK switch until a beep
sounds, and“12Hr”and“24Hr”will be
displayed.
2. Press the SET switch to switch between
“12Hr”and“24Hr”displays. The
selected display will flash.
To select the desired clock setting,
press the CLK switch again while the
preferred setting is flashing.
3.“Hr. ADJUST”will be displayed next,
and the hour portion of the display will
flash. Press the SET switch to set the
hour, then press the CLK switch.
4.“Min. ADJUST”will be displayed
next, and the minutes portion of the
display will flash. Press the SET switch
to set the minutes, then press the CLK
switch.
Time resetting
While the clock is displayed, press the
SET switch 1.5 seconds or more. When
the switch is released, a beep will sound
and the clock will be reset as follows:
(Example)12:01―12:29→12:00
12:30―12:59→1:00
NOTE
When the SET switch is released, the
seconds are reset to“00”.
qAmbient Temperature Display
When the ignition switch is in the ON
position, press the AMB switch to display
the ambient temperature.
Interior Comfort
Interior Equipment
6-47
RX-8_8V89-EA-06F_Edition1 Page247
Friday, May 19 2006 9:52 AM
Form No.8V89-EA-06F
Page 273 of 443

Black plate (272,1)
Overheating
If the temperature gauge indicates
overheating, the vehicle loses power, or
you hear a loud knocking or pinging
noise, the engine is probably too hot.
WARNING
Turn off the ignition switch and
make sure the fan is not running
before attempting to work near the
electrical cooling fan:
Working near the electrical cooling
fan when it is running is dangerous.
You could be hit by the fan and
seriously injured.
Do not remove the cooling
system cap when the engine and
radiator are hot:
When the engine and radiator are hot,
scalding coolant and steam may shoot
out under pressure and cause serious
injury.
Open the hood ONLY after steam is no
longer escaping from the engine:
Steam from an overheated engine is
dangerous. The escaping steam could
seriously burn you.
NOTE
Once the engine coolant exceeds a
preset temperature, an electrical cooling
fan turns on. It will continue running
for about 10 minutes after the ignition
switch is turned to off.
If the temperature gauge indicates
overheating:
1. Drive safely to the side of the road and
park off the right-of-way.
2. Put a vehicle with an automatic
transmission in park (P), a manual
transmission in neutral.
3. Apply the parking brake.
4. Turn off the air conditioner.
5. Check whether coolant or steam is
escaping from under the hood or from
the engine compartment.
If steam is coming from the engine
compartment:
Don't go near the front of the vehicle.
Stop the engine.
Wait until the steam dissipates, then
open the hood and start the engine.
If neither coolant nor steam is
escaping:
Open the hood and idle the engine until
it cools.
CAUTION
If the cooling fan does not operate
while the engine is running, the engine
temperature will increase. Stop the
engine and call an Authorized Mazda
Dealer.
7-18
In Case of an Emergency
Overheating
RX-8_8V89-EA-06F_Edition1 Page272
Friday, May 19 2006 9:52 AM
Form No.8V89-EA-06F
Page 293 of 443

Black plate (292,1)
NOTE
Once the engine coolant exceeds a preset temperature, an electrical cooling fan turns on.
It will continue running for about 10 minutes after the ignition switch is turned to off.
8-10
Maintenance and Care
Owner Maintenance
RX-8_8V89-EA-06F_Edition1 Page292
Friday, May 19 2006 9:52 AM
Form No.8V89-EA-06F
Page 298 of 443

Black plate (297,1)
NOTE
Once the engine coolant exceeds a
preset temperature, an electrical cooling
fan turns on. It will continue running
for about 10 minutes after the ignition
switch is turned to off.
NOTE
Changing the coolant should be done
by an Authorized Mazda Dealer.
Inspect the antifreeze protection and
coolant level in the coolant reservoir at
least once a year―at the beginning of the
winter season―and before traveling
where temperatures may drop below
freezing.
Inspect the condition and connections of
all cooling system and heater hoses.
Replace any that are swollen or
deteriorated.
The coolant should be at full in the
radiator and between the F and L marks
on the coolant reservoir when the engine
is cool.
If it's at or near L, add enough coolant to
the coolant reservoir to provide freezing
and corrosion protection and to bring the
level to F.
CAUTION
lRadiator coolant will damage paint.
Rinse it off quickly if spilled.
lUse only soft (demineralized) water
in the coolant mixture. Water that
contains minerals will cut down on
the coolant's effectiveness.
lDon't add only water. Always add a
proper coolant mixture.
lThe engine has aluminum parts and
must be protected by an ethylene-
glycol-based coolant to prevent
corrosion and freezing.
lDO NOT USE coolants Containing
Alcohol, methanol, Borate or
Silicate.
These coolants could damage the
cooling system.
lDO NOT MIX alcohol or methanol
with the coolant. This could damage
the cooling system.
lDon't use a solution that contains
more than 60% antifreeze.
This would reduce effectiveness.
Maintenance and Care
Owner Maintenance
8-15
RX-8_8V89-EA-06F_Edition1 Page297
Friday, May 19 2006 9:52 AM
Form No.8V89-EA-06F
Page 391 of 443

4
Before Use
Navigation
Set Up
RDM-TMCIf
necessary
Rear View
Monitor
Contents
Preparation
nBefore Use
Accessories ........................................................................................ 2
Laser products: .................................................................................. 2
Contents ............................................................................................. 4
Safety Information .............................................................................. 6
Introduction ........................................................................................ 8
(Use This Product Safety), (Navigation System), (Screens)
Names and Functions ...................................................................... 10
Immediate use
nGetting startedlActivation....................................................................................... 12(Removing the Map Disc), (Buttons on the screen)
l
Screen Names and Functions....................................................... 14(Screens Before Setting Route), (Screens During Route Guidance),
(Menu), (Screen adjustments and settings)
l
Screen change .............................................................................. 16(Changing the Map Orientation/Scale)
n
RoutinglDestination Entry and Route Search............................................. 18(Change (Change Search Area)), (Address), (Point of interest),
(Emergency), (Memory Point), (Home), (Preset Destination),
(Previous Destination), (Intersection), (Freeway On/Off Ramp),
(Coordinates), (Select from map)
l
Quick POI ...................................................................................... 26(Displaying POI(s) on a Map), (Local Search), (Deleting POI Markers),
(Showing POI Data)
l
Character Entry ............................................................................. 27(To enter the street name, city name, and other.),
(To enter the house phone number, and other.)
l
Direct Destination Input................................................................. 28(Direct Destination Input), (Selecting Route)
l
POI Icons on Maps / Delete Destination ....................................... 29(POI (Point of Interest) Icons), (Delete destination)
l
Route Options ............................................................................... 30(Route Preferences), (Modification of Destination or Way Point Positions),
(Deletion of Destination or Way Points), (Detour), (Turn List),
(Display Preview), (Route Preview)
<0034003a000f001a0041003000230038002b0041002700230010004400510051004d0002000200320043004900470002001600020002002f0051005000460043005b000e0002002f0043005b000200130017000e0002001400120012001800020002001400
1c0016001500020032002f>
Page 392 of 443

5
Before Use
Ifnecessary
Rear View
Monitor
Advanced use
nAddress BooklAddress Book ................................................................................ 34(Memory Point Storage), (Memory Point Confirmation and Modification),
(Preset Destinations or Home storage), (Memory Point Deletion),
(All Memory Point Deletion), (Displays Icons at Memory Points),
(Avoid Area Storage), (Avoid Area Confirmation and Modification),
(Avoid Area Deletion), (All Avoid Area Deletion),
(Category Name Modification), (Previous Destination Deletion),
(All Preset Destination Deletion)
n
Navigation Set UplVolume Adjustment........................................................................ 38lNavigation Set Up.......................................................................... 40(User Setting), (Quick POI Selection), (Calibration), (Restore System
Defaults), (Language), (Map Configuration)
If necessary
nIf necessarylPrecautions/System Performance ................................................. 49(Voice Guidance), (GPS), (Map Matching), (Positioning Accuracy),
(Route Guide), (Route Search)
l
Troubleshooting ............................................................................. 53(Verification First), (Error Messages)
l
Maintenance .................................................................................. 56(Care of the Product), (Handling and Care of Map Discs)
<0034003a000f001a0041003000230038002b0041002700230010004400510051004d0002000200320043004900470002001700020002002f0051005000460043005b000e0002002f0043005b000200130017000e0002001400120012001800020002001400
1c0016001500020032002f>