2007 MAZDA MODEL CX-9 radio
[x] Cancel search: radioPage 245 of 502

Black plate (245,1)
Flutter/Skip noise
Signals from an FM transmitter move in
straight lines and become weak in valleys
between tall buildings, mountains, and
other obstacles. When a vehicle passes
through such an area, the reception
conditions may change suddenly, resulting
in annoying noise.
Weak signal noise
In suburban areas, broadcast signals
become weak because of distance from
the transmitter. Reception in such fringe
areas is characterized by sound breakup.
Strong signal noise
This occurs very close to a transmitter
tower. The broadcast signals are
extremely strong, so the result is noise and
sound breakup at the radio receiver.
Station drift noise
When a vehicle reaches the area of two
strong stations broadcasting at similar
frequencies, the original station may be
temporarily lost and the second station
picked up. At this time there will be some
noise from this disturbance.
Station 2
88.3 MHz Station 1
88.1 MHz
Interior Comfort
Audio System
6-19
CX-9_8V83-EA-06I_Edition3 Page245
Monday, February 26 2007 7:19 PM
Form No.8V83-EA-06I
Page 253 of 502

Black plate (253,1)
Audio Set
Audio information is displayed on the information display.
In-Dash CD Changer (Music CD Player)
In-Dash CD Changer (Music CD/MP3 CD Player) CD Player
Power/Volume/Sound Controls .............................................................................. page 6-28
Operating the Radio ............................................................................................... page 6-34
Operating the Compact Disc (CD) Player .............................................................. page 6-38
Operating the In-Dash CD Changer ....................................................................... page 6-40
Operating the Auxiliary jack .................................................................................. page 6-44
Error Indications ..................................................................................................... page 6-45
Interior Comfort
Audio System
6-27
CX-9_8V83-EA-06I_Edition3 Page253
Monday, February 26 2007 7:19 PM
Form No.8V83-EA-06I
Page 260 of 502

Black plate (260,1)
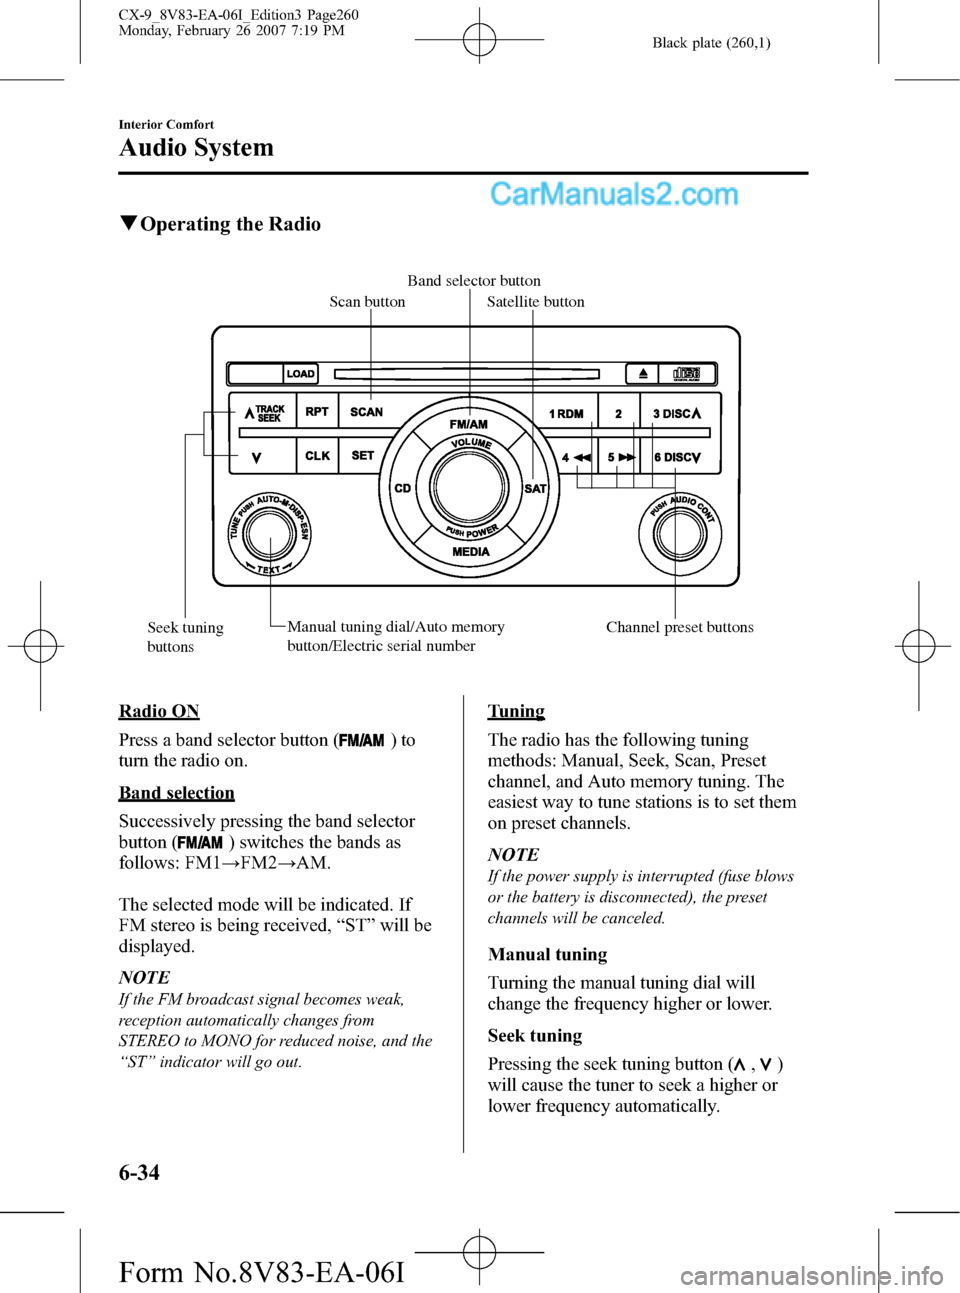
qOperating the Radio
Band selector button
Scan button
Satellite button
Seek tuning
buttonsManual tuning dial/Auto memory
button/Electric serial number Channel preset buttons
Radio ON
Press a band selector button (
)to
turn the radio on.
Band selection
Successively pressing the band selector
button (
) switches the bands as
follows: FM1→FM2→AM.
The selected mode will be indicated. If
FM stereo is being received,“ST”will be
displayed.
NOTE
If the FM broadcast signal becomes weak,
reception automatically changes from
STEREO to MONO for reduced noise, and the
“ST”indicator will go out.
Tuning
The radio has the following tuning
methods: Manual, Seek, Scan, Preset
channel, and Auto memory tuning. The
easiest way to tune stations is to set them
on preset channels.
NOTE
If the power supply is interrupted (fuse blows
or the battery is disconnected), the preset
channels will be canceled.
Manual tuning
Turning the manual tuning dial will
change the frequency higher or lower.
Seek tuning
Pressing the seek tuning button (
,)
will cause the tuner to seek a higher or
lower frequency automatically.
6-34
Interior Comfort
Audio System
CX-9_8V83-EA-06I_Edition3 Page260
Monday, February 26 2007 7:19 PM
Form No.8V83-EA-06I
Page 261 of 502

Black plate (261,1)
NOTE
If you continue to press and hold the button,
the frequency will continue changing without
stopping.
Scan tuning
Press the scan button (
)to
automatically sample strong stations.
Scanning stops at each station for about 5
seconds. To hold a station, press the scan
button (
) again during this interval.
Preset channel tuning
The 6 preset channels can be used to store
6 AM and 12 FM stations.
1. To set a channel first select AM, FM1,
or FM2. Tune to the desired station.
2. Depress a channel preset button for
about 2 seconds until a beep sound is
heard. The preset channel number and
station frequency will be displayed.
The station is now held in the memory.
3. Repeat this operation for the other
stations and bands you want to store.
To tune one in the memory, select AM,
FM1, or FM2 and then press its
channel preset button. The station
frequency and the channel number will
be displayed.
NOTE
If the power supply is interrupted (fuse blows
or the battery is disconnected), the preset
channels will be canceled.
Auto memory tuning
This is especially useful when driving in
an area where the local stations are not
known. Additional AM/FM stations can
be stored without disturbing the
previously set channels.Press and hold the auto memory button
(
) for about 2 seconds until a beep
sound is heard; the system will
automatically scan and temporarily store
up to 6 stations with the strongest
frequencies in each selected band in that
area.
After scanning is completed, the station
with the strongest frequency will be tuned
and its frequency displayed.
Press and release the auto memory button
(
) to recall stations from the auto-
stored stations. One stored station will be
selected each time; its frequency and
channel number will be displayed.
NOTE
If no stations can be tuned after scanning
operations,“A”will be displayed.
SATELLITE RADIO (SAT)
Vehicles equipped with the separately
purchased SIRIUS digital satellite radio
unit have the ability to receive up to 100
channels of digital quality programming
coast to coast via satellite. For information
on use, read the Satellite Radio Kit
manual accompanying the SIRIUS digital
satellite radio unit. A subscription to
SIRIUS digital satellite radio service is
required (available in the U.S. - Except
Alaska and Hawaii) to enable this feature
once the separately purchased SIRIUS
digital satellite radio unit has been
installed. For subscription information or
digital satellite radio technical issues
contact SIRIUS directly at:
- Web: www.siriusradio.com
- Phone (24 hrs/day, 7 days/week): 888-
539-SIRI (7474)
- E-mail: [email protected]
- Mailing Address: Sirius Satellite Radio
Interior Comfort
Audio System
6-35
CX-9_8V83-EA-06I_Edition3 Page261
Monday, February 26 2007 7:19 PM
Form No.8V83-EA-06I
Page 262 of 502

Black plate (262,1)
1221 Avenue Of The Americas
New York, NY 10020
Attention: Customer Care
Include your Sirius Radio ESN
(Electronic Serial Number) when
subscribing or requesting technical
assistance. See the Satellite Radio Kit
manual accompanying the SIRIUS unit
for complete satellite radio activation
procedures and information on how to
display the ESN#.
6-36
Interior Comfort
Audio System
CX-9_8V83-EA-06I_Edition3 Page262
Monday, February 26 2007 7:19 PM
Form No.8V83-EA-06I
Page 273 of 502

Black plate (273,1)
qChanging the Source
Press the mode switch () to change
the audio source (FM1 radio> FM2 radio>
AM radio> CD player or CD changer>
SIRIUS1> SIRIUS2> SIRIUS3> RSES or
AUX> cyclical).
NOTE
CD, CD changer, RSES, and SIRIUS digital
satellite radio modes cannot be selected in the
following cases:
lCD, CD changer, RSES, or SIRIUS digital
satellite radio unit is not equipped on the
audio system.
lCD has not been inserted.
Connect a portable audio unit or similar
product on the market to the auxiliary jack to
listen to music or audio over the vehicle's
speakers. Change the audio source to AUX
mode (page 6-48).
The audio source is changed to the AUX mode
only when a commercially available portable
audio unit is connected to the auxiliary jack.
qSeek Switch
When listening to the radio
Pull up or press down the seek switch, the
radio switches to the next/previous stored
station in the order that it was stored
(1―6).
Pull up or press down the seek switch for
about 2 seconds until a beep sound is
heard to seek all usable stations at a
higher or lower frequency whether
programmed or not.
When playing a CD
Pull up the seek switch to skip to the next
track.
Press down the seek switch to repeat the
current track.
qMute Switch
Press the mute switch () once to mute
audio, press it again to resume audio
output.
NOTE
If the ignition switch is turned to the LOCK
position with the audio muted, the mute will be
canceled.
Therefore, when the engine is restarted, the
audio is not muted. To mute the audio again,
press the mute switch (
).
Interior Comfort
Audio System
6-47
CX-9_8V83-EA-06I_Edition3 Page273
Monday, February 26 2007 7:19 PM
Form No.8V83-EA-06I
Page 276 of 502

Black plate (276,1)
Safety Certification
This CD player is made and tested to meet exacting safety standards. It meets FCC
requirements and complies with safety performance standards of the U.S. Department of
Health and Human Services.
CAUTION
ØThis CD player should not be adjusted or repaired by anyone except qualified
service personnel.
If servicing is required, contact an Authorized Mazda Dealer.
ØUse of controls or adjustments or performance of procedures other than those
specified herein may result in hazardous laser exposure. Never operate the CD
player with the top case of the unit removed.
ØChanges or modifications not expressly approved by the party responsible for
compliance could void the user's authority to operate this equipment.
NOTE
For CD player section:
This device complies with part 15 of the FCC Rules. Operation is subject to the following two
conditions: (1) This device may not cause harmful interference, and (2) this device must accept any
interference received, including interference that may cause undesired operation.
NOTE
This equipment has been tested and found to comply with the limits for a Class B digital device,
pursuant to part 15 of the FCC Rules. These limits are designed to provide reasonable protection
against harmful interference in a residential installation. This equipment generates, uses, and can
radiate radio frequency energy and, if not installed and used in accordance with the instructions,
may cause harmful interference to radio communications. However, there is no guarantee that
interference will not occur in a particular installation.
6-50
Interior Comfort
Audio System
CX-9_8V83-EA-06I_Edition3 Page276
Monday, February 26 2007 7:19 PM
Form No.8V83-EA-06I
Page 316 of 502

Black plate (316,1)
2. Lightly insert the plug and turn the
outlet 90 degrees, then insert it fully.
POWER OUTLET
Unplug
1. Pull the plug out.
2. Close the cover.NOTE
The following electrical appliances may not
operate even if their electrical capacity is 100
W or less.
lAppliances requiring large amounts of
power for activation (such as cathode-ray
tube televisions, refrigerators with a
compressor, electrical pumps, and electrical
tools)
lAppliances with a power supply frequency
switch function (such as clocks and audio)
lAppliances for precise data processing
(such as measurement equipment)
Some electrical appliances other than the
above may not operate.
The protection circuit may operate and the
power supply may be stopped to prevent
battery depletion.
When using an electrical appliance for data
processing such as a personal computer, back
up the data frequently.
The power outlet (AC115V) cannot be used in
the following cases:
lBattery power is weaklAppliances with a capacity of 100 W or
more are used
lCabin temperature is extremely hot
Noise may occur during radio or television
operation depending on the electrical
appliance being used.
qUsing AV Equipment
CAUTION
For safe driving, adjust the volume
while driving so that ambient sound
can be heard.
NOTE
Before operating, read the instruction manual
accompanying the AV equipment to be used.
6-90
Interior Comfort
Rear Entertainment System
CX-9_8V83-EA-06I_Edition3 Page316
Monday, February 26 2007 7:20 PM
Form No.8V83-EA-06I