2007 MAZDA MODEL CX-9 AUX
[x] Cancel search: AUXPage 210 of 502

Black plate (210,1)
If the warning light illuminates again even
after the tire pressures are adjusted, there
may be a tire puncture. Replace the
punctured tire with the temporary spare
tire (page 7-8).
NOTE
A tire pressure sensor is not installed to the
temporary spare tire. The warning light will
flash continuously while the temporary spare
tire is being used.
Warning light flashes
When the warning light flashes, there may
be a system malfunction. Consult an
Authorized Mazda Dealer.
qKEY Warning Light (Red)/KEY
Indicator Light (Green) (with
Advanced Key)
This indicator has two colors.
KEY Warning Light (Red)
When illuminated
lWhen the ignition switch is turned to
the ON position, it illuminates
momentarily and then goes out.
lIf any malfunction occurs in the
advanced keyless system, it illuminates
continuously.
WARNING
Do not drive the vehicle with the KEY
warning light illuminated:
If the KEY warning light remains
illuminated, do not continue to drive
using the advanced key system. Park
the vehicle in a safe place and use
the auxiliary key to continue driving
the vehicle. Have the vehicle
inspected at an Authorized Mazda
Dealer as soon as possible.
When flashing
lUnder the following conditions, the
KEY warning light (red) flashes to
inform the driver that the start knob
will not rotate to the ACC position
even if it is pushed in from the LOCK
position.
lThe advanced key battery is dead.lThe advanced key is not within
operational range.
lThe advanced key is placed in areas
where it is difficult for the system to
detect the signal (page 3-7).
lA key from another manufacturer
similar to the advanced key is in the
operational range.
5-48
Driving Your Mazda
Warning/Indicator Lights and Beep Sounds
CX-9_8V83-EA-06I_Edition3 Page210
Monday, February 26 2007 7:18 PM
Form No.8V83-EA-06I
Page 227 of 502

Black plate (227,1)
6Interior Comfort
Use of various features for drive comfort, including air-conditioning and audio
system.
Climate Control System .......................... 6-2
Operating Tips .................................... 6-2
Vent Operation (Front) ........................ 6-4
Fully Automatic Type ......................... 6-6
Vent Operation (Rear) ....................... 6-12
Control Panel (Rear) ......................... 6-14
Audio System ......................................... 6-17
Antenna ............................................. 6-17
Operating Tips for Audio System ..... 6-17
Audio Set .......................................... 6-27
Audio Control Switch Operation (Steering
Wheel) ............................................... 6-46
Auxiliary Input (AUX mode) ............ 6-48
Safety Certification ........................... 6-50
Rear Entertainment System ................. 6-51
Rear Entertainment System
í............ 6-51
Part Names ........................................ 6-60
Before Operation ............................... 6-63
Sound Output .................................... 6-69
Rear Entertainment System
Functions ........................................... 6-73
DVD video, DVD audio, Video CD, Audio
CD and MP3/WMA CD Playback (Disc
Mode) ................................................ 6-74
Auxiliary Input (AUX mode) ............ 6-88
Language Code List .......................... 6-92
Country Code List ............................. 6-94
Error Message ................................... 6-98
Symptoms and Actions ................... 6-100Bluetooth Hands-Free ......................... 6-103
Bluetooth Hands-Free
í.................. 6-103
Basic Bluetooth Hands-Free
Operation ........................................ 6-106
Convenient Use of the Hands-Free
System ............................................. 6-109
Hands-Free Telephone Setting ........ 6-113
When the Bluetooth Hands-Free cannot be
used ................................................. 6-118
Safety Certification ......................... 6-119
Interior Equipment ............................. 6-120
Sunvisors ......................................... 6-120
Interior Lights ................................. 6-121
Information Display ........................ 6-123
Cup Holder ...................................... 6-125
Bottle Holder ................................... 6-127
Storage Compartments .................... 6-127
Accessory Sockets .......................... 6-131
Power Outlet
í................................ 6-132
6-1íSome models.
CX-9_8V83-EA-06I_Edition3 Page227
Monday, February 26 2007 7:19 PM
Form No.8V83-EA-06I
Page 253 of 502

Black plate (253,1)
Audio Set
Audio information is displayed on the information display.
In-Dash CD Changer (Music CD Player)
In-Dash CD Changer (Music CD/MP3 CD Player) CD Player
Power/Volume/Sound Controls .............................................................................. page 6-28
Operating the Radio ............................................................................................... page 6-34
Operating the Compact Disc (CD) Player .............................................................. page 6-38
Operating the In-Dash CD Changer ....................................................................... page 6-40
Operating the Auxiliary jack .................................................................................. page 6-44
Error Indications ..................................................................................................... page 6-45
Interior Comfort
Audio System
6-27
CX-9_8V83-EA-06I_Edition3 Page253
Monday, February 26 2007 7:19 PM
Form No.8V83-EA-06I
Page 257 of 502

Black plate (257,1)
*Centerpoint®(Bose®Sound System-
equipped model)
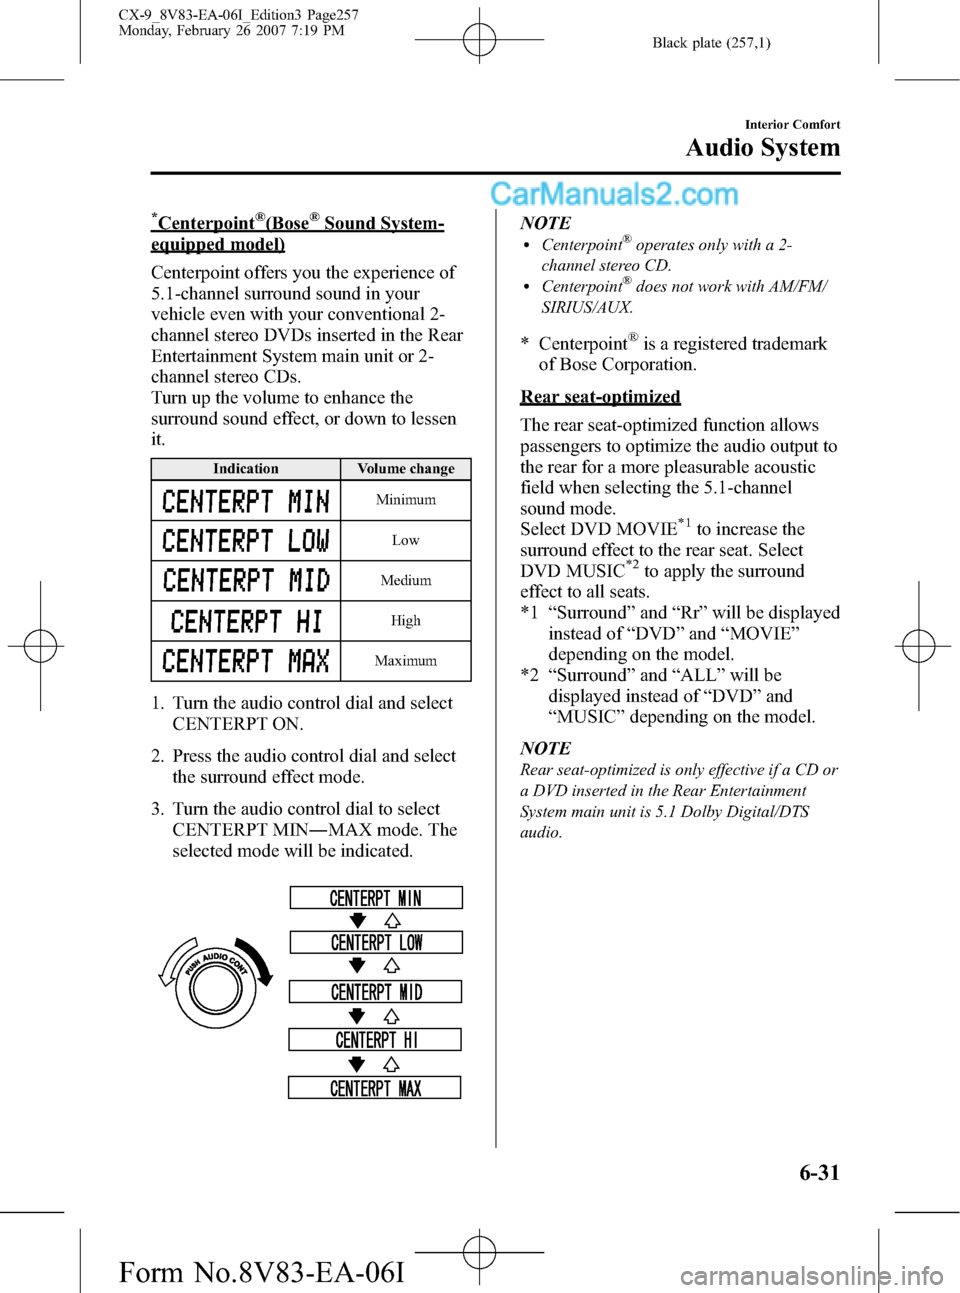
Centerpoint offers you the experience of
5.1-channel surround sound in your
vehicle even with your conventional 2-
channel stereo DVDs inserted in the Rear
Entertainment System main unit or 2-
channel stereo CDs.
Turn up the volume to enhance the
surround sound effect, or down to lessen
it.
Indication Volume change
Minimum
Low
Medium
High
Maximum
1. Turn the audio control dial and select
CENTERPT ON.
2. Press the audio control dial and select
the surround effect mode.
3. Turn the audio control dial to select
CENTERPT MIN―MAX mode. The
selected mode will be indicated.
NOTElCenterpoint®operates only with a 2-
channel stereo CD.
lCenterpoint®does not work with AM/FM/
SIRIUS/AUX.
* Centerpoint®is a registered trademark
of Bose Corporation.
Rear seat-optimized
The rear seat-optimized function allows
passengers to optimize the audio output to
the rear for a more pleasurable acoustic
field when selecting the 5.1-channel
sound mode.
Select DVD MOVIE
*1to increase the
surround effect to the rear seat. Select
DVD MUSIC
*2to apply the surround
effect to all seats.
*1“Surround”and“Rr”will be displayed
instead of“DVD”and“MOVIE”
depending on the model.
*2“Surround”and“ALL”will be
displayed instead of“DVD”and
“MUSIC”depending on the model.
NOTE
Rear seat-optimized is only effective if a CD or
a DVD inserted in the Rear Entertainment
System main unit is 5.1 Dolby Digital/DTS
audio.
Interior Comfort
Audio System
6-31
CX-9_8V83-EA-06I_Edition3 Page257
Monday, February 26 2007 7:19 PM
Form No.8V83-EA-06I
Page 270 of 502

Black plate (270,1)
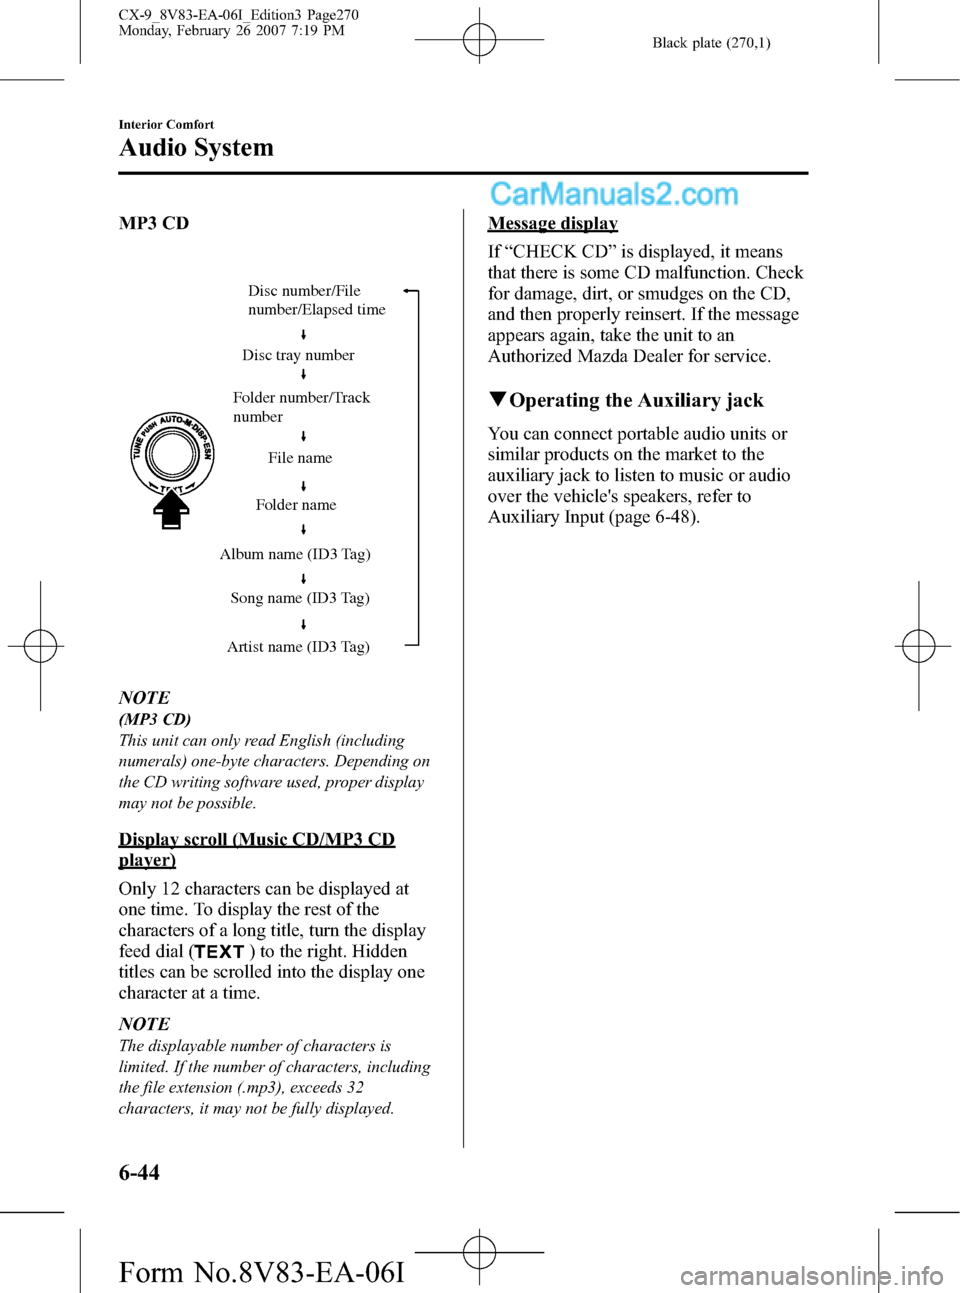
MP3 CD
Folder number/Track
numberDisc number/File
number/Elapsed time
Disc tray number
File name
Folder name
Album name (ID3 Tag)
Song name (ID3 Tag)
Artist name (ID3 Tag)
NOTE
(MP3 CD)
This unit can only read English (including
numerals) one-byte characters. Depending on
the CD writing software used, proper display
may not be possible.
Display scroll (Music CD/MP3 CD
player)
Only 12 characters can be displayed at
one time. To display the rest of the
characters of a long title, turn the display
feed dial (
) to the right. Hidden
titles can be scrolled into the display one
character at a time.
NOTE
The displayable number of characters is
limited. If the number of characters, including
the file extension (.mp3), exceeds 32
characters, it may not be fully displayed.
Message display
If“CHECK CD”is displayed, it means
that there is some CD malfunction. Check
for damage, dirt, or smudges on the CD,
and then properly reinsert. If the message
appears again, take the unit to an
Authorized Mazda Dealer for service.
qOperating the Auxiliary jack
You can connect portable audio units or
similar products on the market to the
auxiliary jack to listen to music or audio
over the vehicle's speakers, refer to
Auxiliary Input (page 6-48).
6-44
Interior Comfort
Audio System
CX-9_8V83-EA-06I_Edition3 Page270
Monday, February 26 2007 7:19 PM
Form No.8V83-EA-06I
Page 273 of 502

Black plate (273,1)
qChanging the Source
Press the mode switch () to change
the audio source (FM1 radio> FM2 radio>
AM radio> CD player or CD changer>
SIRIUS1> SIRIUS2> SIRIUS3> RSES or
AUX> cyclical).
NOTE
CD, CD changer, RSES, and SIRIUS digital
satellite radio modes cannot be selected in the
following cases:
lCD, CD changer, RSES, or SIRIUS digital
satellite radio unit is not equipped on the
audio system.
lCD has not been inserted.
Connect a portable audio unit or similar
product on the market to the auxiliary jack to
listen to music or audio over the vehicle's
speakers. Change the audio source to AUX
mode (page 6-48).
The audio source is changed to the AUX mode
only when a commercially available portable
audio unit is connected to the auxiliary jack.
qSeek Switch
When listening to the radio
Pull up or press down the seek switch, the
radio switches to the next/previous stored
station in the order that it was stored
(1―6).
Pull up or press down the seek switch for
about 2 seconds until a beep sound is
heard to seek all usable stations at a
higher or lower frequency whether
programmed or not.
When playing a CD
Pull up the seek switch to skip to the next
track.
Press down the seek switch to repeat the
current track.
qMute Switch
Press the mute switch () once to mute
audio, press it again to resume audio
output.
NOTE
If the ignition switch is turned to the LOCK
position with the audio muted, the mute will be
canceled.
Therefore, when the engine is restarted, the
audio is not muted. To mute the audio again,
press the mute switch (
).
Interior Comfort
Audio System
6-47
CX-9_8V83-EA-06I_Edition3 Page273
Monday, February 26 2007 7:19 PM
Form No.8V83-EA-06I
Page 274 of 502

Black plate (274,1)
Auxiliary Input (AUX mode)
You can connect portable audio units or
similar products on the market to the
auxiliary jack to listen to music or audio
over the vehicle's speakers.
Auxiliary jack
WARNING
Do not adjust the portable audio unit
or a similar product while driving the
vehicle:
Adjusting the portable audio unit or
a similar product while driving the
vehicle is dangerous as it could
distract your attention from the
vehicle operation which could lead to
a serious accident. Always adjust the
portable audio unit or a similar
product while the vehicle is stopped.
6-48
Interior Comfort
Audio System
CX-9_8V83-EA-06I_Edition3 Page274
Monday, February 26 2007 7:19 PM
Form No.8V83-EA-06I
Page 275 of 502

Black plate (275,1)
NOTElBefore using the auxiliary jack, read the
manufacturer's instructions for the product
being connected.
lUse a commercially-available, non-
impedance (3.5
) stereo mini plug for
connecting the portable audio unit to the
auxiliary jack. Before using the auxiliary
jack, read the manufacture's instructions
for connecting a portable audio unit to the
auxiliary jack.
lTo prevent discharging of the battery, do
not use the auxiliary input for long periods
with the engine off or idling.
lNoise may occur depending on the product
connected to the auxiliary jack.
lIf a power supply from the portable audio
unit is needed, use the unit's batteries.
Using the power socket equipped on the
vehicle may cause noise depending on the
unit connected to the power supply socket.
WARNING
Do not allow the connection plug cord
to get tangled with the parking brake
or the shift lever:
Allowing the plug cord to become
tangled with the parking brake or
the shift lever is dangerous as it
could interfere with driving, resulting
in an accident.
CAUTION
Do not place objects or apply force to
the auxiliary jack with the plug
connected.NOTE
lInsert the plug to the auxiliary jack
securely.
lInsert or remove the plug with the plug
perpendicular to the auxiliary jack hole.
lInsert or remove the plug by holding its
base.
To operate the portable audio unit
1. Turn the ignition switch to the ACC or
ON position.
2. Press the power/volume dial to turn the
audio system on.
3. Press the MEDIA button (
)of
the audio unit or the mode switch
(
) of the audio control switch to
change to the AUX mode.
NOTElSet the volume of the portable audio unit to
the maximum within the range that the
sound does not become distorted, then
adjust the volume using the power/volume
dial of the audio unit or the volume button
(
,) of the audio control switch.lIf the connection plug is pulled out from the
auxiliary jack while in AUX mode, noise
may occur.
Interior Comfort
Audio System
6-49
CX-9_8V83-EA-06I_Edition3 Page275
Monday, February 26 2007 7:19 PM
Form No.8V83-EA-06I