Page 181 of 502

Black plate (181,1)
Cruise Control
With cruise control, you can set and
automatically maintain any speed of more
than about 30 km/h (19 mph).
WARNING
Do not use the cruise control under the
following conditions:
Using the cruise control under the
following conditions is dangerous
and could result in loss of vehicle
control.
ØHilly terrain
ØSteep inclines
ØHeavy or unsteady traffic
ØSlippery or winding roads
ØSimilar restrictions that require
inconsistent speed
qCruise Main Indicator Light
(Amber)/Cruise Set Indicator
Light (Green)
The indicator light has two colors.
Cruise Main Indicator Light (Amber)
The indicator light illuminates amber
when the ON/OFF switch is pressed up
and the cruise control system is activated.
Cruise Set Indicator Light (Green)
The indicator light illuminates green when
a cruising speed has been set.
qActivation/Deactivation
To activate the system, press up on the
ON/OFF switch.
The cruise main indicator light
illuminates.
To deactivate the system, press down on
the ON/OFF switch.
The cruise main indicator light turns off.
WARNING
Keep the ON/OFF switch off when
cruise control is not in use:
Leaving the ON/OFF switch on when
not using the cruise control is
dangerous as you may hit one of the
other buttons and put the vehicle in
cruise control unexpectedly. This
could result in loss of vehicle control.
qTo Set Speed
1. Activate the cruise control system by
momentarily pressing up the ON/OFF
switch.
2. Accelerate to the desired speed, which
must be more than 30 km/h (19 mph).
Driving Your Mazda
Starting and Driving
5-19
CX-9_8V83-EA-06I_Edition3 Page181
Monday, February 26 2007 7:18 PM
Form No.8V83-EA-06I
Page 260 of 502

Black plate (260,1)
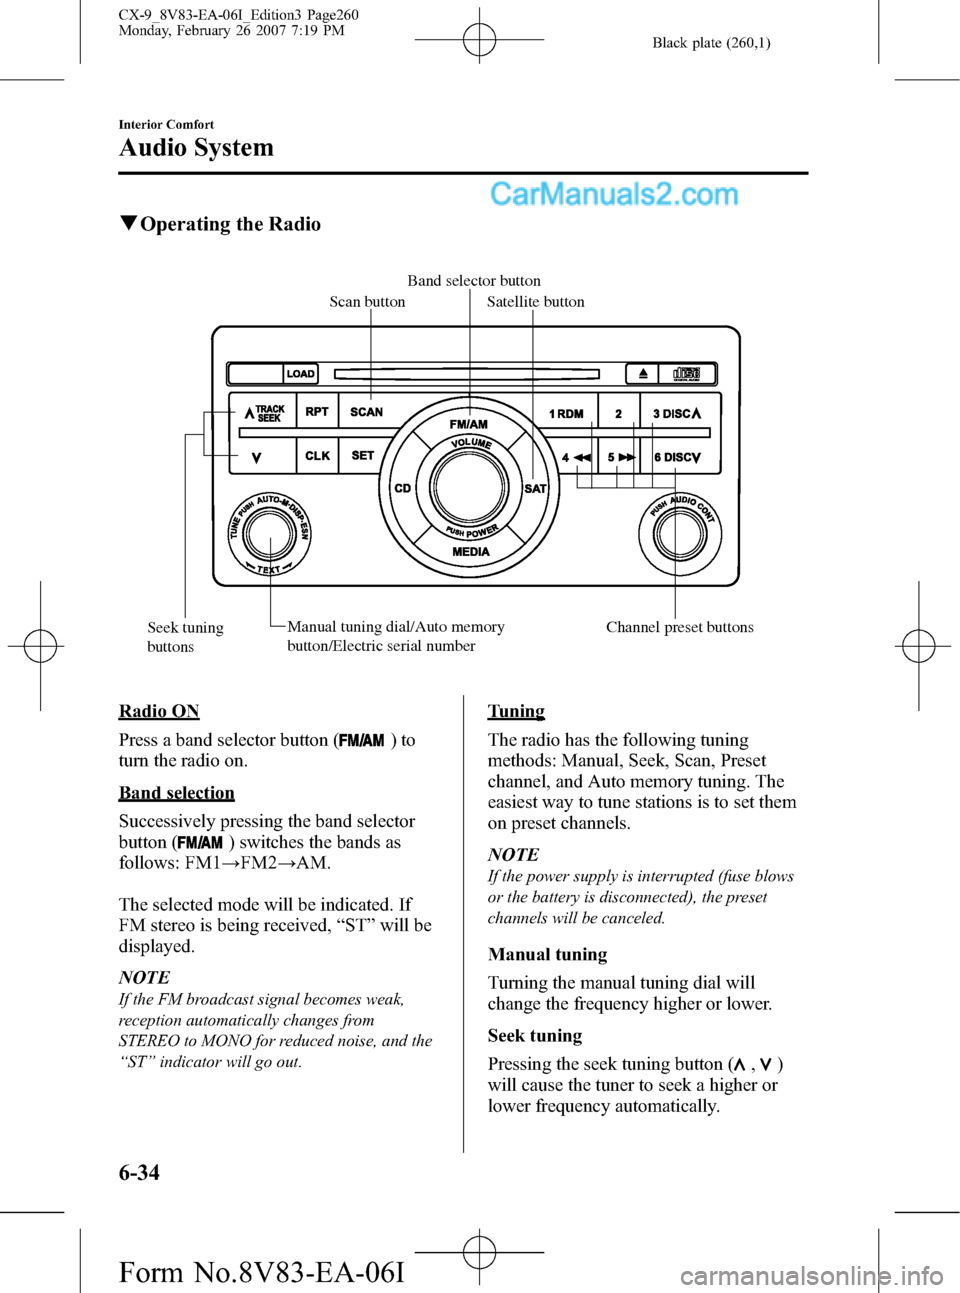
qOperating the Radio
Band selector button
Scan button
Satellite button
Seek tuning
buttonsManual tuning dial/Auto memory
button/Electric serial number Channel preset buttons
Radio ON
Press a band selector button (
)to
turn the radio on.
Band selection
Successively pressing the band selector
button (
) switches the bands as
follows: FM1→FM2→AM.
The selected mode will be indicated. If
FM stereo is being received,“ST”will be
displayed.
NOTE
If the FM broadcast signal becomes weak,
reception automatically changes from
STEREO to MONO for reduced noise, and the
“ST”indicator will go out.
Tuning
The radio has the following tuning
methods: Manual, Seek, Scan, Preset
channel, and Auto memory tuning. The
easiest way to tune stations is to set them
on preset channels.
NOTE
If the power supply is interrupted (fuse blows
or the battery is disconnected), the preset
channels will be canceled.
Manual tuning
Turning the manual tuning dial will
change the frequency higher or lower.
Seek tuning
Pressing the seek tuning button (
,)
will cause the tuner to seek a higher or
lower frequency automatically.
6-34
Interior Comfort
Audio System
CX-9_8V83-EA-06I_Edition3 Page260
Monday, February 26 2007 7:19 PM
Form No.8V83-EA-06I
Page 266 of 502

Black plate (266,1)
qOperating the In-Dash CD Changerí
Load button
Repeat buttonScan button
CD play buttonCD eject button
Disc up/Folder up
button
Channel preset
buttonsDisc down/Folder
down button Fast-forward button
Track down
buttonTrack up
button
(Music CD player)
(Music CD/MP3 CD player)
Random button
Reverse button
CD slot
Display
button
Display feed
dial
Power/Volume dial
There are two types of In-dash CD
changers. Check which In-dash CD
changer type you own.
Type Playable data
Music CD player · Music data (CD-DA)
Music CD/MP3 CD
player· Music data (CD-DA)
· MP3 file
NOTE
If a disc has both music data (CD-DA) and
MP3 files, playback of the two file types differs
depending on how the disc was recorded.
Inserting the CD
The CD must be label-side up when
inserting. The auto-loading mechanism
will set the CD and begin play. There will
be a short lapse before play begins while
the player reads the digital signals on the
CD.
The disc number and the track number
will be displayed.
NOTE
The CD will begin playback automatically
after insertion.
A CD cannot be inserted while the display
reads“WAIT”. A beeping sound can be heard
during this waiting time. Simultaneously
pressing the power/volume dial and the load
button (
) for about 2 seconds will turn
this beeping sound ON or OFF.
6-40
Interior Comfort
íSome models.
Audio System
CX-9_8V83-EA-06I_Edition3 Page266
Monday, February 26 2007 7:19 PM
Form No.8V83-EA-06I
Page 287 of 502
Black plate (287,1)
qRemote Controller
No. Name No. Name
RETURN buttonPLAY button
MENU buttonSlow playback button
ENTER/Select buttonPOWER button
STOP buttonSOURCE button
PAUSE buttonPicture adjust mode button
Fast-forward buttonPicture adjust button
Rewind buttonSET UP button
PREVIOUS (Track down) buttonNumber keys
NEXT (Track up) buttonDISPLAY MODE button
DISPLAY button
Interior Comfort
Rear Entertainment System
6-61
CX-9_8V83-EA-06I_Edition3 Page287
Monday, February 26 2007 7:19 PM
Form No.8V83-EA-06I
Page 293 of 502

Black plate (293,1)
qRemote Controller
Operate the Rear Entertainment System
with the remote controller except for disc
insertion/ejection.
CAUTION
Do not apply excessive force to the
remote controller or get it wet. Also,
do not leave the remote controller in
a place exposed to direct sunlight or
high temperature. It could cause a
malfunction.
NOTE
Operate the remote controller with it pointed
to the disc slot of the unit. Signals may not be
received depending of the angle.
Maintenance
Stow the remote controller in its case and
put it in the seatback pocket of a front
seat.
Place the remote controller into its case
properly in the direction shown in the
figure and stow it in the front seatback
pocket.
NOTE
If the remote controller is placed in the
incorrect direction, abnormal noise or an
operation error could result.
Using the remote controller
A battery has already been installed in the
remote controller.
Remove the electrical leak-protection
insulation sheet before using the remote
controller.
Insulation
sheet
Replacing the battery
If the buttons on the remote controller are
inoperable, or the operation range
becomes narrow or unsteady, the battery
may be dead.
Replace the battery using the following
procedure.
Interior Comfort
Rear Entertainment System
6-67
CX-9_8V83-EA-06I_Edition3 Page293
Monday, February 26 2007 7:19 PM
Form No.8V83-EA-06I