2007 LINCOLN TOWN CAR Map light
[x] Cancel search: Map lightPage 33 of 328
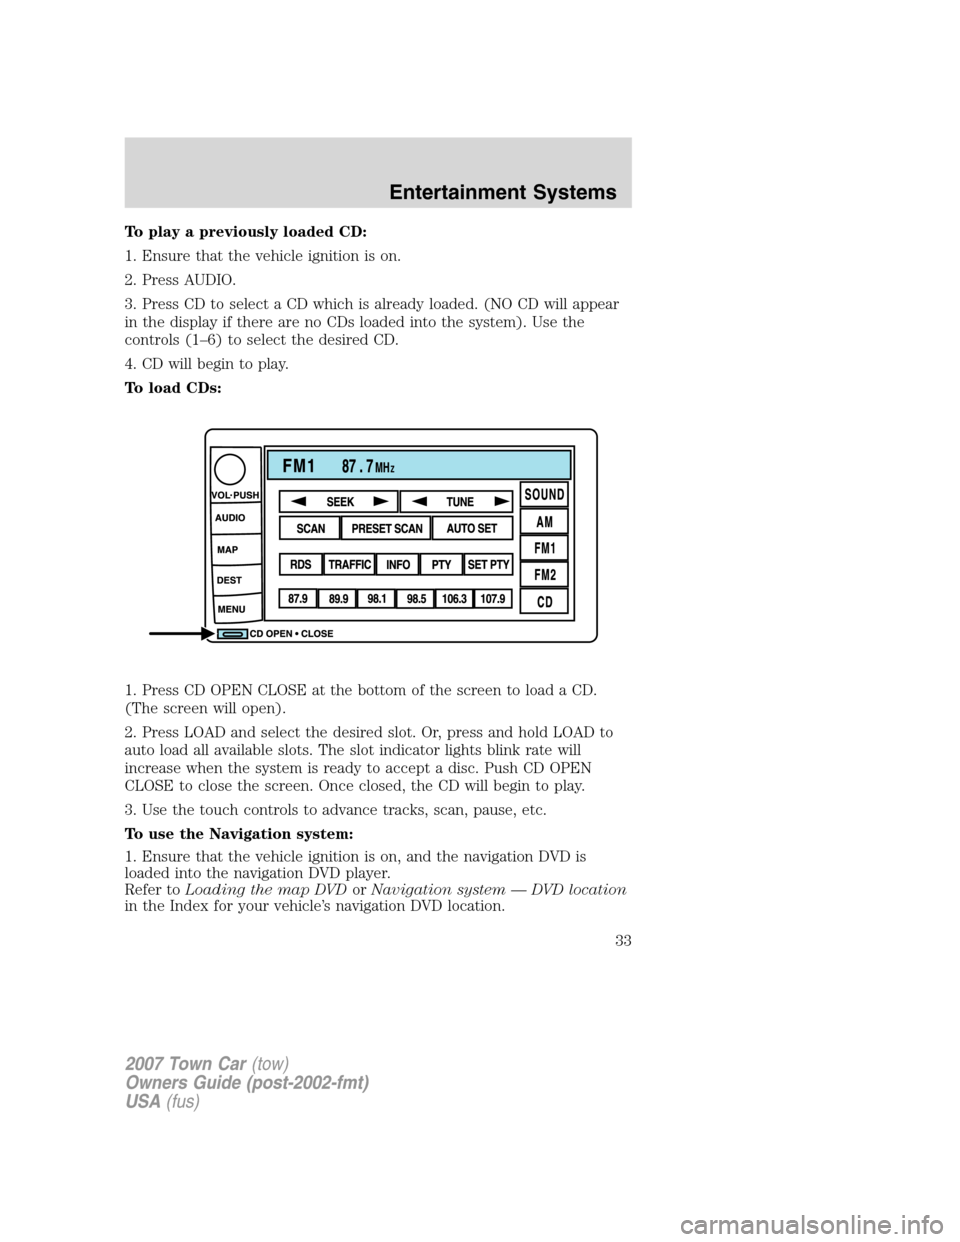
To play a previously loaded CD:
1. Ensure that the vehicle ignition is on.
2. Press AUDIO.
3. Press CD to select a CD which is already loaded. (NO CD will appear
in the display if there are no CDs loaded into the system). Use the
controls (1–6) to select the desired CD.
4. CD will begin to play.
To load CDs:
1. Press CD OPEN CLOSE at the bottom of the screen to load a CD.
(The screen will open).
2. Press LOAD and select the desired slot. Or, press and hold LOAD to
auto load all available slots. The slot indicator lights blink rate will
increase when the system is ready to accept a disc. Push CD OPEN
CLOSE to close the screen. Once closed, the CD will begin to play.
3. Use the touch controls to advance tracks, scan, pause, etc.
To use the Navigation system:
1. Ensure that the vehicle ignition is on, and the navigation DVD is
loaded into the navigation DVD player.
Refer toLoading the map DVDorNavigation system — DVD location
in the Index for your vehicle’s navigation DVD location.
2007 Town Car(tow)
Owners Guide (post-2002-fmt)
USA(fus)
Entertainment Systems
33
Page 58 of 328
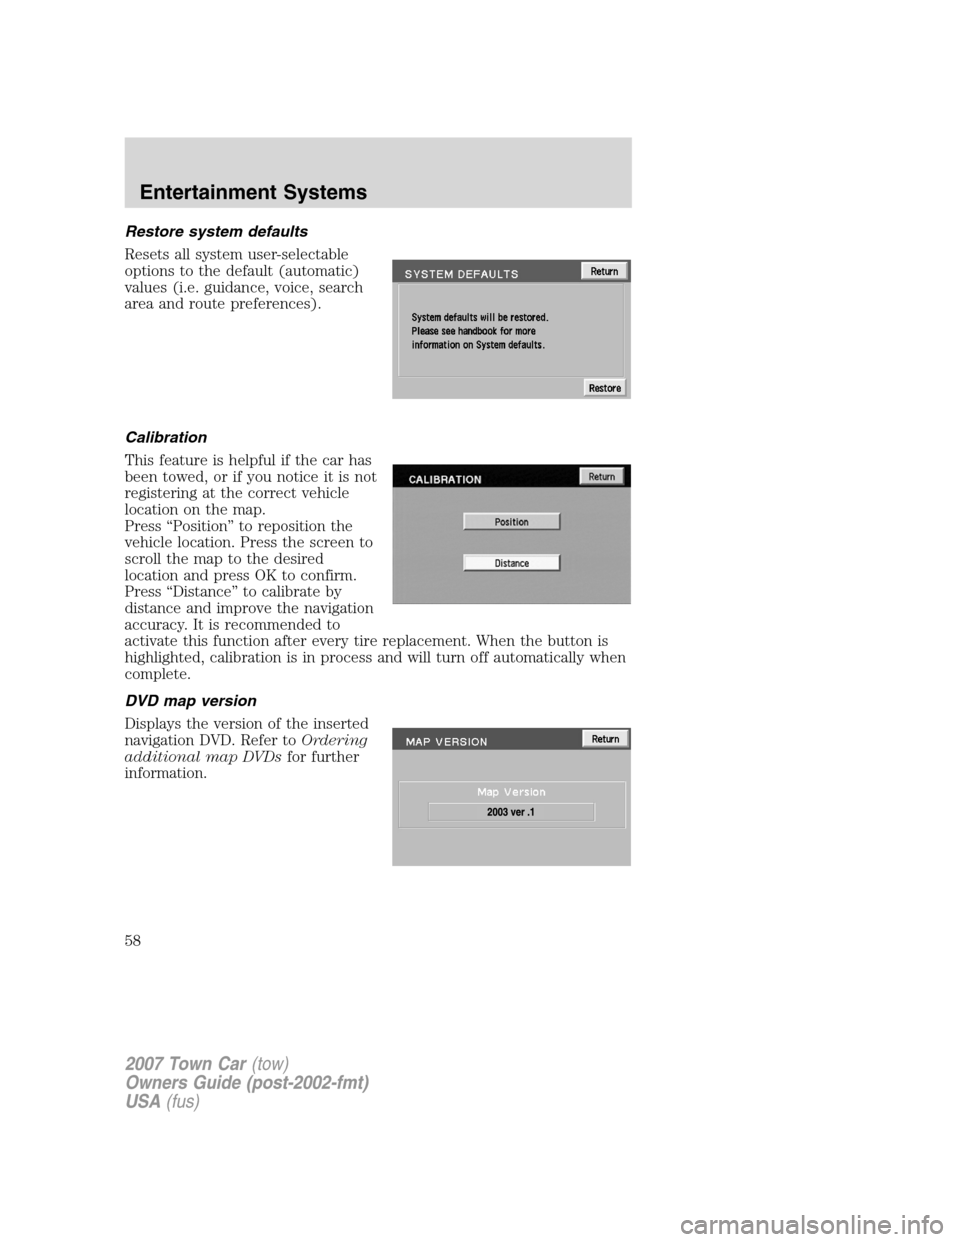
Restore system defaults
Resets all system user-selectable
options to the default (automatic)
values (i.e. guidance, voice, search
area and route preferences).
Calibration
This feature is helpful if the car has
been towed, or if you notice it is not
registering at the correct vehicle
location on the map.
Press “Position” to reposition the
vehicle location. Press the screen to
scroll the map to the desired
location and press OK to confirm.
Press “Distance” to calibrate by
distance and improve the navigation
accuracy. It is recommended to
activate this function after every tire replacement. When the button is
highlighted, calibration is in process and will turn off automatically when
complete.
DVD map version
Displays the version of the inserted
navigation DVD. Refer toOrdering
additional map DVDsfor further
information.
2007 Town Car(tow)
Owners Guide (post-2002-fmt)
USA(fus)
Entertainment Systems
58
Page 72 of 328
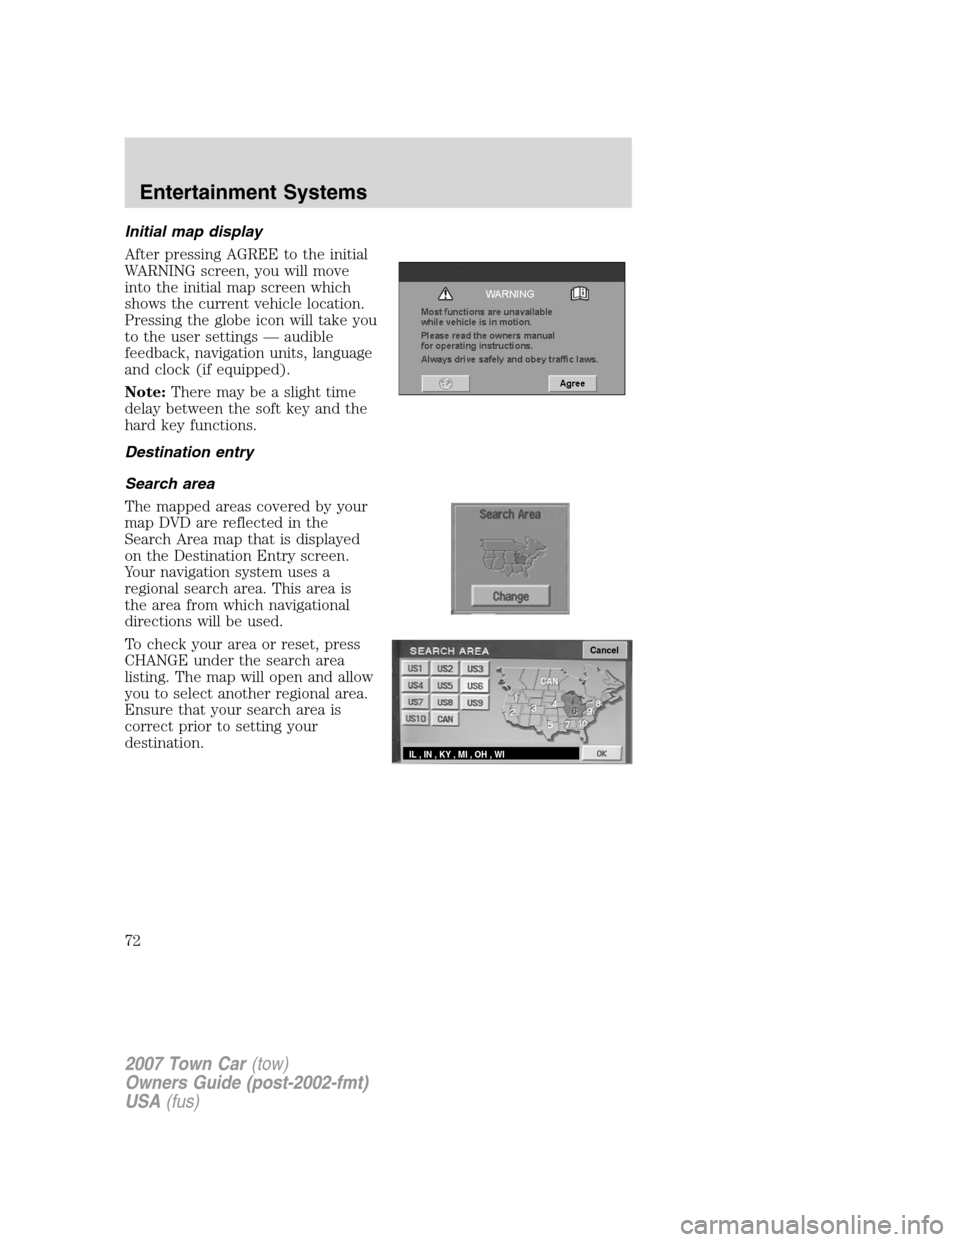
Initial map display
After pressing AGREE to the initial
WARNING screen, you will move
into the initial map screen which
shows the current vehicle location.
Pressing the globe icon will take you
to the user settings — audible
feedback, navigation units, language
and clock (if equipped).
Note:There may be a slight time
delay between the soft key and the
hard key functions.
Destination entry
Search area
The mapped areas covered by your
map DVD are reflected in the
Search Area map that is displayed
on the Destination Entry screen.
Your navigation system uses a
regional search area. This area is
the area from which navigational
directions will be used.
To check your area or reset, press
CHANGE under the search area
listing. The map will open and allow
you to select another regional area.
Ensure that your search area is
correct prior to setting your
destination.
Cancel
IL , IN , KY , MI , OH , WI
2007 Town Car(tow)
Owners Guide (post-2002-fmt)
USA(fus)
Entertainment Systems
72
Page 90 of 328
Radio reception factors
There are certain factors that may effect your radio reception.
•Distance/strength.The further an FM signal travels, the weaker it is.
The listenable range of the average FM station is approximately 40 km
(24 miles). This range can be affected by “signal modulation.” Signal
modulation is a process radio stations use to increase their
strength/volume relative to other stations.
•Terrain.Hills, mountains and tall buildings between your vehicle’s
antenna and the radio station signal can cause FM reception problems.
Static can be caused on AM stations by power lines, electric fences,
traffic lights and thunderstorms. Moving away from an interfering
structure (out of its “shadow”) returns your reception to normal.
•Station overload.Weak signals are sometimes captured by stronger
signals when you pass a broadcast tower. A stronger signal may
temporarily overtake a weaker signal and play while the weak station
frequency is displayed.
Principles of GPS (global positioning system) operation
Your system directs you based on information derived from global
positioning satellites, road maps stored on the DVD, sensors in your
vehicle and the desired destination. The system compiles all necessary
information to guide you to your selected destination. Space satellites
determine the vehicle’s current location and transmit position and time
signals to your car.
If the vehicle has been parked for a long period of time, the navigation
function may be temporarily unresponsive. The navigation system will
operate reliably again once GPS reception is available for a few minutes.
Limited GPS reception
System performance may be adversely affected if GPS reception is
interrupted or interference occurs over a distance of several miles. The
following are possible causes for GPS reception being interrupted. If the
vehicle is:
•in multi-story parking garages
•in tunnels and under bridges
•inside or in between buildings
•by forests or tree-lined avenues
•in heavy rain showers and thunderstorms
•in valleys and in mountainous regions
2007 Town Car(tow)
Owners Guide (post-2002-fmt)
USA(fus)
Entertainment Systems
90
Page 101 of 328
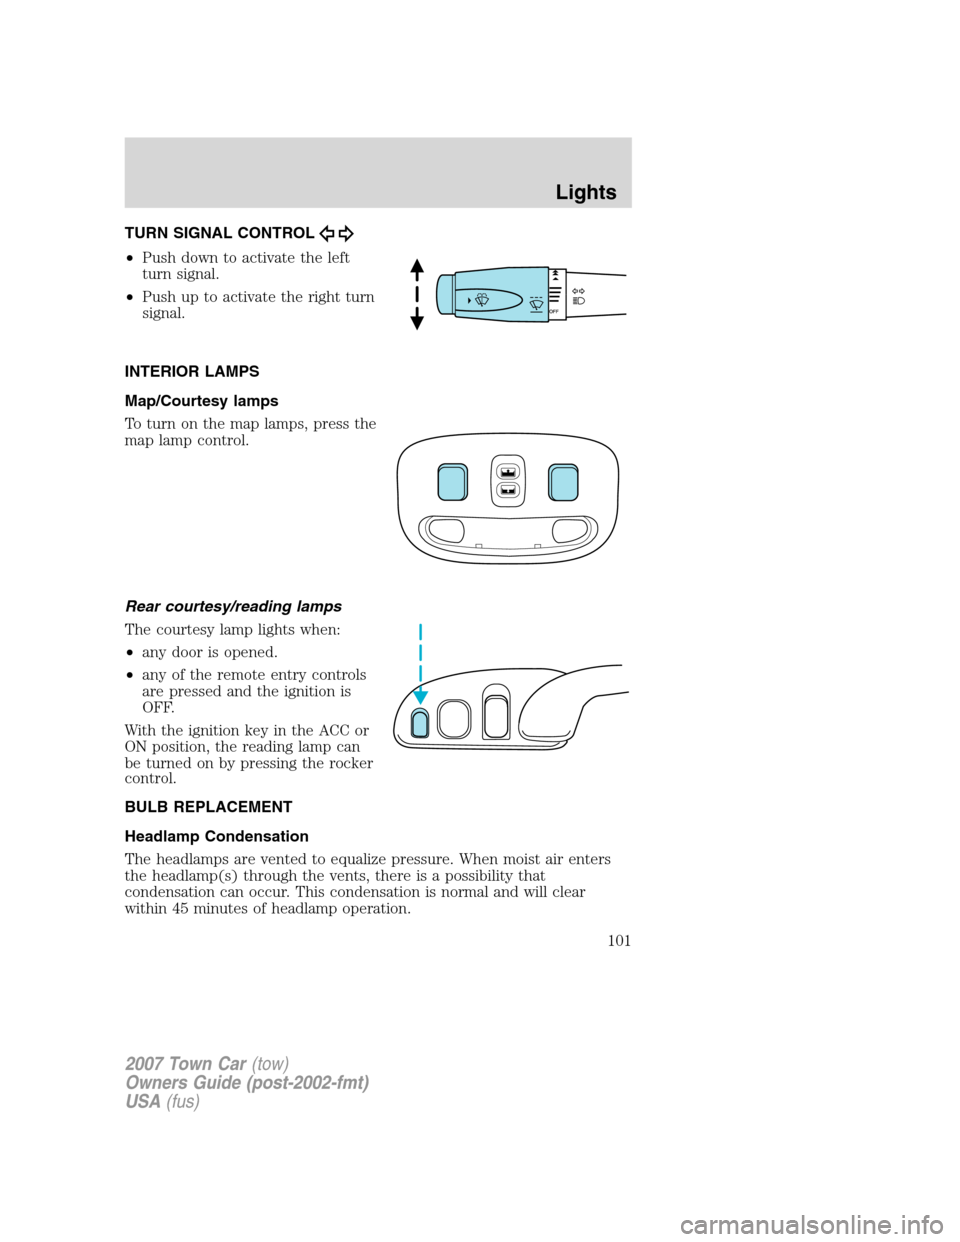
TURN SIGNAL CONTROL
•Push down to activate the left
turn signal.
•Push up to activate the right turn
signal.
INTERIOR LAMPS
Map/Courtesy lamps
To turn on the map lamps, press the
map lamp control.
Rear courtesy/reading lamps
The courtesy lamp lights when:
•any door is opened.
•any of the remote entry controls
are pressed and the ignition is
OFF.
With the ignition key in the ACC or
ON position, the reading lamp can
be turned on by pressing the rocker
control.
BULB REPLACEMENT
Headlamp Condensation
The headlamps are vented to equalize pressure. When moist air enters
the headlamp(s) through the vents, there is a possibility that
condensation can occur. This condensation is normal and will clear
within 45 minutes of headlamp operation.
2007 Town Car(tow)
Owners Guide (post-2002-fmt)
USA(fus)
Lights
101
Page 102 of 328
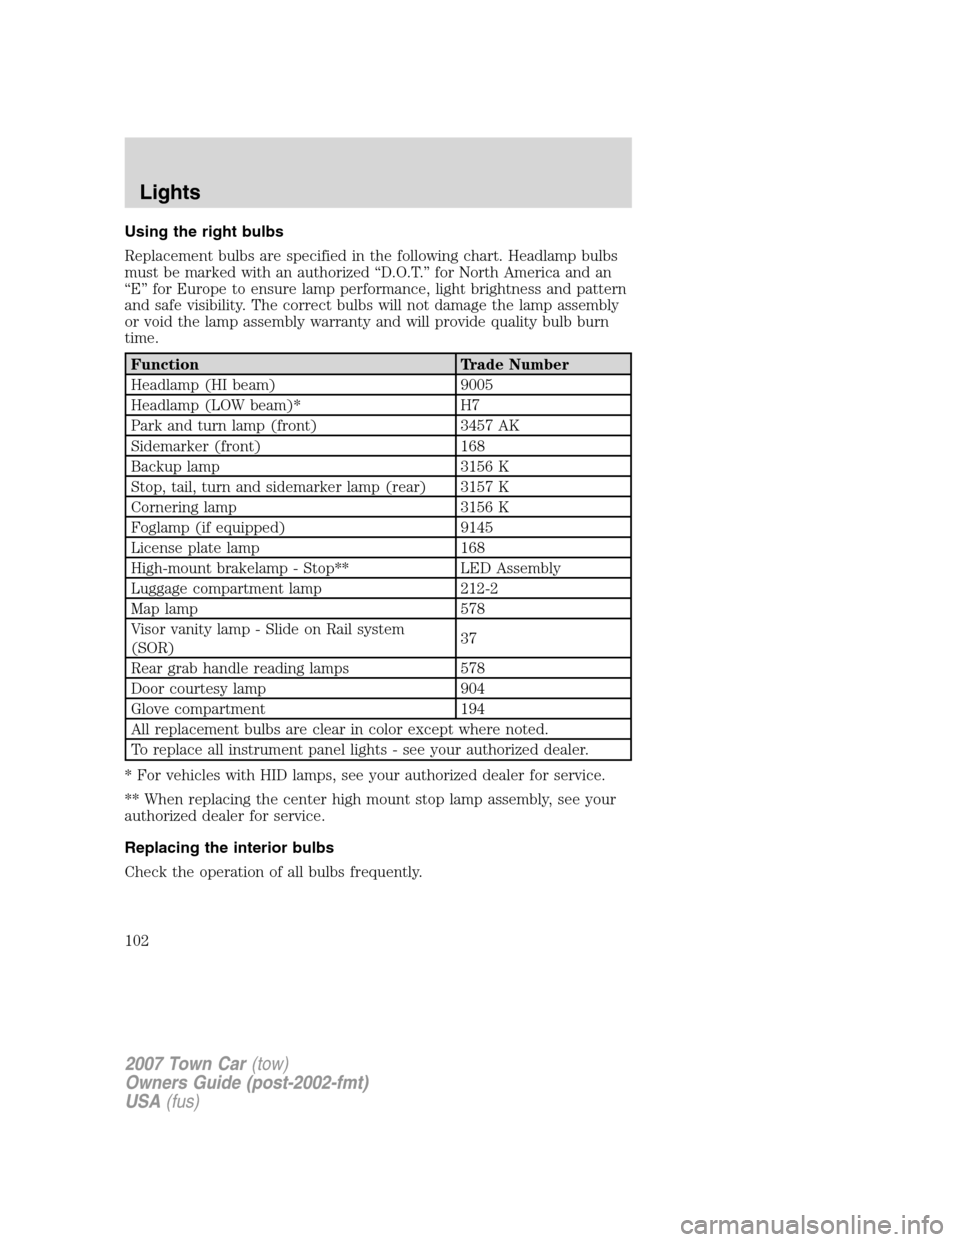
Using the right bulbs
Replacement bulbs are specified in the following chart. Headlamp bulbs
must be marked with an authorized “D.O.T.” for North America and an
“E” for Europe to ensure lamp performance, light brightness and pattern
and safe visibility. The correct bulbs will not damage the lamp assembly
or void the lamp assembly warranty and will provide quality bulb burn
time.
Function Trade Number
Headlamp (HI beam) 9005
Headlamp (LOW beam)* H7
Park and turn lamp (front) 3457 AK
Sidemarker (front) 168
Backup lamp 3156 K
Stop, tail, turn and sidemarker lamp (rear) 3157 K
Cornering lamp 3156 K
Foglamp (if equipped) 9145
License plate lamp 168
High-mount brakelamp - Stop** LED Assembly
Luggage compartment lamp 212-2
Map lamp 578
Visor vanity lamp - Slide on Rail system
(SOR)37
Rear grab handle reading lamps 578
Door courtesy lamp 904
Glove compartment 194
All replacement bulbs are clear in color except where noted.
To replace all instrument panel lights - see your authorized dealer.
* For vehicles with HID lamps, see your authorized dealer for service.
** When replacing the center high mount stop lamp assembly, see your
authorized dealer for service.
Replacing the interior bulbs
Check the operation of all bulbs frequently.
2007 Town Car(tow)
Owners Guide (post-2002-fmt)
USA(fus)
Lights
102
Page 130 of 328
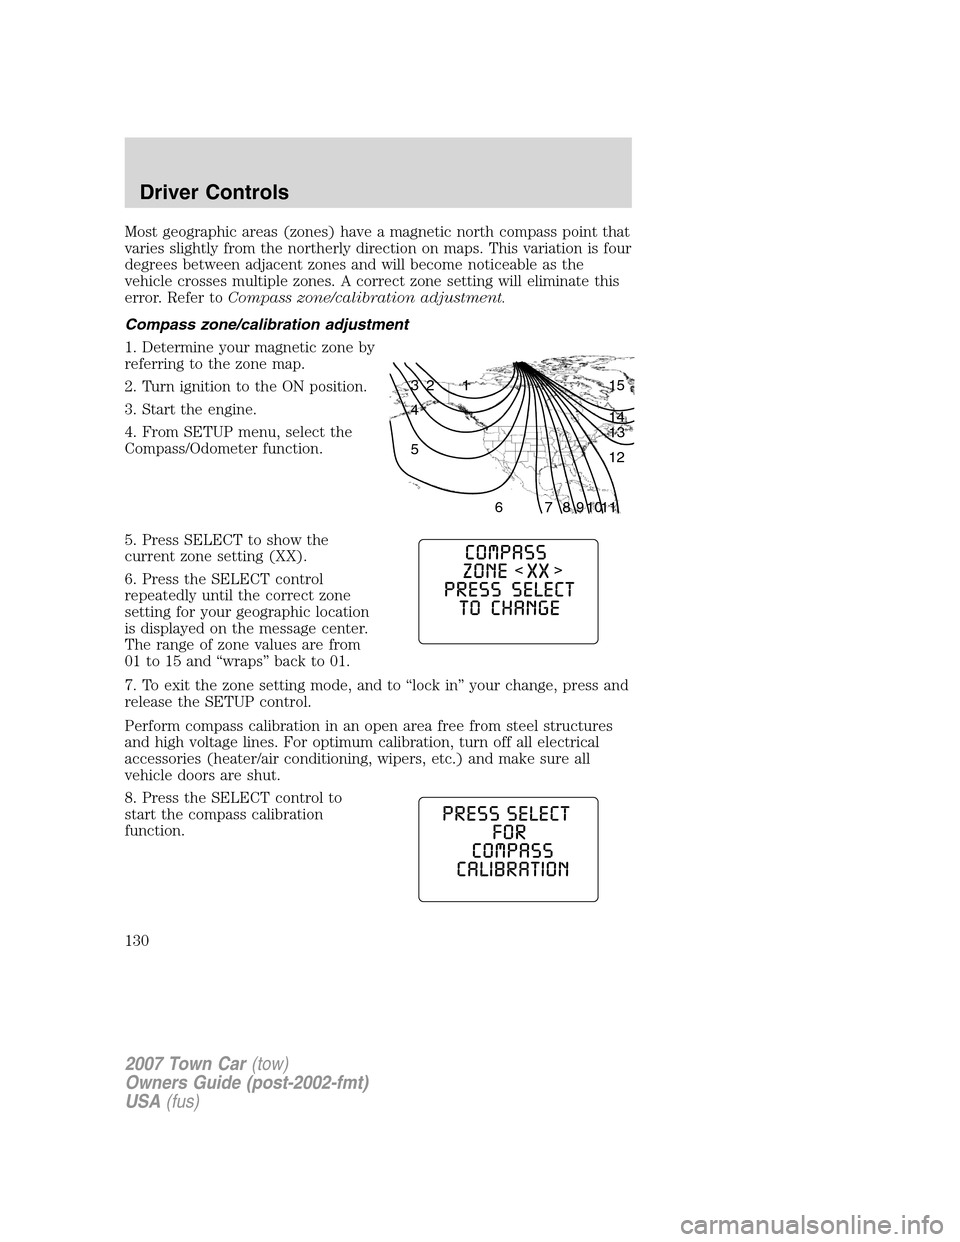
Most geographic areas (zones) have a magnetic north compass point that
varies slightly from the northerly direction on maps. This variation is four
degrees between adjacent zones and will become noticeable as the
vehicle crosses multiple zones. A correct zone setting will eliminate this
error. Refer toCompass zone/calibration adjustment.
Compass zone/calibration adjustment
1. Determine your magnetic zone by
referring to the zone map.
2. Turn ignition to the ON position.
3. Start the engine.
4. From SETUP menu, select the
Compass/Odometer function.
5. Press SELECT to show the
current zone setting (XX).
6. Press the SELECT control
repeatedly until the correct zone
setting for your geographic location
is displayed on the message center.
The range of zone values are from
01 to 15 and “wraps” back to 01.
7. To exit the zone setting mode, and to “lock in” your change, press and
release the SETUP control.
Perform compass calibration in an open area free from steel structures
and high voltage lines. For optimum calibration, turn off all electrical
accessories (heater/air conditioning, wipers, etc.) and make sure all
vehicle doors are shut.
8. Press the SELECT control to
start the compass calibration
function.
1 2 3
4
5
6 7 8 9 101112 13 14 15
2007 Town Car(tow)
Owners Guide (post-2002-fmt)
USA(fus)
Driver Controls
130
Page 182 of 328
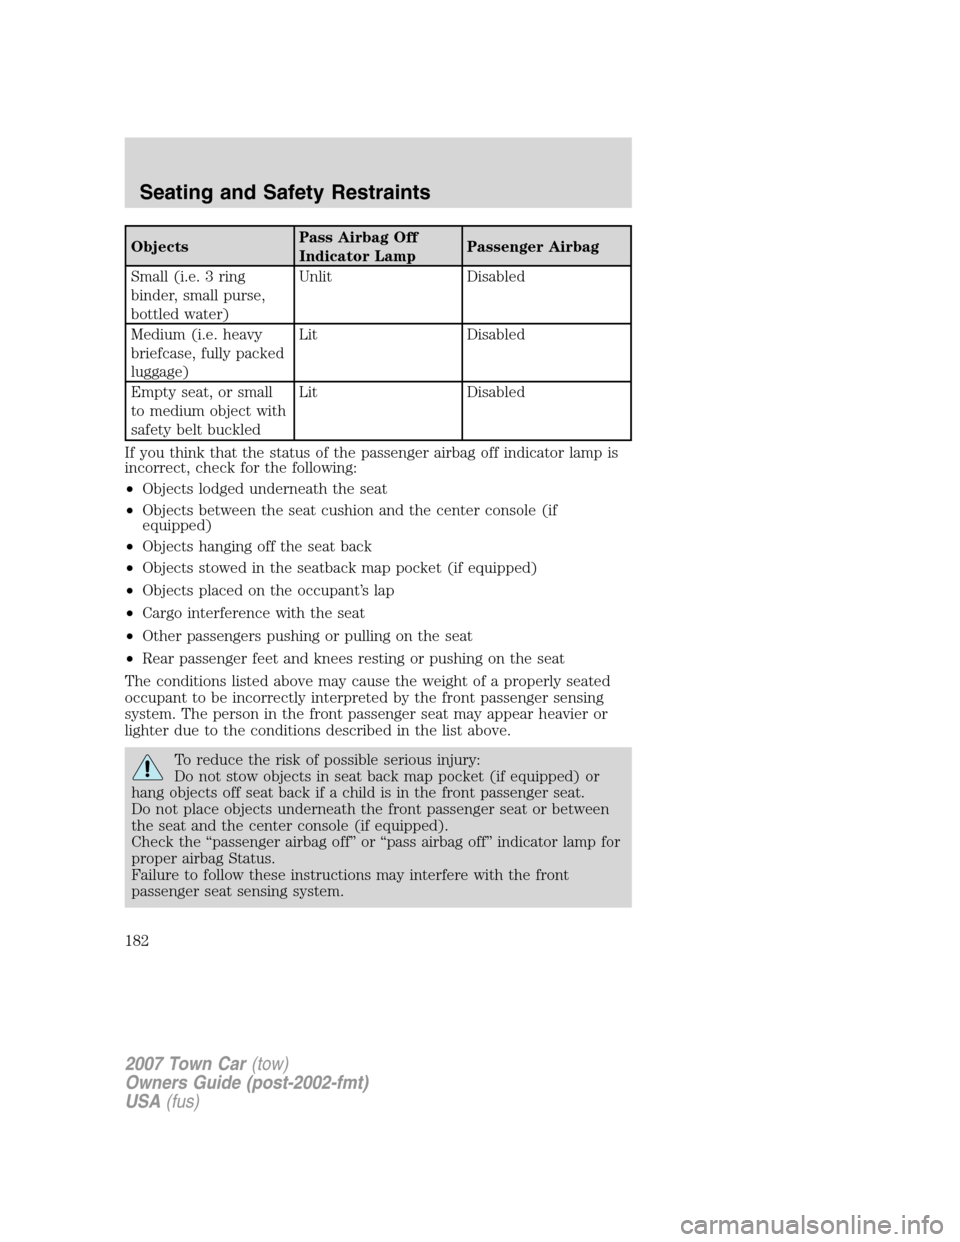
ObjectsPass Airbag Off
Indicator LampPassenger Airbag
Small (i.e. 3 ring
binder, small purse,
bottled water)Unlit Disabled
Medium (i.e. heavy
briefcase, fully packed
luggage)Lit Disabled
Empty seat, or small
to medium object with
safety belt buckledLit Disabled
If you think that the status of the passenger airbag off indicator lamp is
incorrect, check for the following:
•Objects lodged underneath the seat
•Objects between the seat cushion and the center console (if
equipped)
•Objects hanging off the seat back
•Objects stowed in the seatback map pocket (if equipped)
•Objects placed on the occupant’s lap
•Cargo interference with the seat
•Other passengers pushing or pulling on the seat
•Rear passenger feet and knees resting or pushing on the seat
The conditions listed above may cause the weight of a properly seated
occupant to be incorrectly interpreted by the front passenger sensing
system. The person in the front passenger seat may appear heavier or
lighter due to the conditions described in the list above.
To reduce the risk of possible serious injury:
Do not stow objects in seat back map pocket (if equipped) or
hang objects off seat back if a child is in the front passenger seat.
Do not place objects underneath the front passenger seat or between
the seat and the center console (if equipped).
Check the “passenger airbag off” or “pass airbag off” indicator lamp for
proper airbag Status.
Failure to follow these instructions may interfere with the front
passenger seat sensing system.
2007 Town Car(tow)
Owners Guide (post-2002-fmt)
USA(fus)
Seating and Safety Restraints
182