2007 LINCOLN NAVIGATOR weight
[x] Cancel search: weightPage 85 of 312

Note:If weight is added to the gate (bike rack, snow, etc.) the gate may
automatically start a power close event immediately after a power open.
In this mode a unique continuous chime will sound.
To close the liftgate with the
rear cargo area control button:
Press and release the control on the
left rear quarter panel to close the
liftgate. The chime will beep once if
conditions are not correct to start
an operation (i.e., the vehicle is out
of park). In a normal close, the
chime will begin just before the gate
starts to move and continue for total
of three seconds.
Press and release the control to open or reverse the liftgate.
Rear cargo area control button will not open the liftgate when the
liftgate is latched.
Warning, keep clear of the liftgate when activating the rear
switch.
To manually operate the liftgate:
1. Disable the liftgate power function, refer to theMessage Centerin
this chapter.
2. Open and close the liftgate as you would a standard liftgate.
Note:In case of operation in extreme cold -40° F (-40° C), or on
extreme inclines, manual operation of the liftgate is suggested.
Obstacle detection
The power liftgate system is equipped with an obstacle detection feature.
If the power liftgate is closing, the system is designed to reverse to full
open when it encounters a solid obstacle. A three second chime is also
sounded when an obstacle is detected. Once the obstacle is removed, the
liftgate can be closed under power.
If the power liftgate is opening, the system is designed to stop when it
encounters a solid obstacle.
2007 Navigator(nav)
Owners Guide (post-2002-fmt)
USA(fus)
Driver Controls
85
Page 146 of 312

The importance of shoulder belts
Using a booster without a shoulder belt increases the risk of a child’s
head hitting a hard surface in a collision. For this reason, you should
never use a booster seat with a lap belt only. It is best to use a booster
seat with lap/shoulder belts in the back seat- the safest place for children
to ride.
Move a child to a different seating location if the shoulder belt
does not stay positioned on the shoulder during use.
Follow all instructions provided by the manufacturer of the
booster seat.
Never put the shoulder belt under a child’s arm or behind the
back because it eliminates the protection for the upper part of
the body and may increase the risk of injury or death in a collision.
Never use pillows, books, or towels to boost a child. They can
slide around and increase the likelihood of injury or death in a
collision.
SAFETY SEATS FOR CHILDREN
Child and infant or child safety seats
Use a safety seat that is recommended for the size and weight of the
child. Carefully follow all of the manufacturer’s instructions with the
safety seat you put in your vehicle. If you do not install and use the
safety seat properly, the child may be injured in a sudden stop or
collision.
2007 Navigator(nav)
Owners Guide (post-2002-fmt)
USA(fus)
Seating and Safety Restraints
146
Page 161 of 312

TIRES
Tires are designed to give many thousands of miles of service, but they
must be maintained in order to get the maximum benefit from them.
Glossary of tire terminology
•Tire label:A label showing the OE (Original Equipment) tire sizes,
recommended inflation pressure and the maximum weight the vehicle
can carry.
•Tire Identification Number (TIN):A number on the sidewall of
each tire providing information about the tire brand and
manufacturing plant, tire size and date of manufacture. Also referred
to as DOT code.
•Inflation pressure:A measure of the amount of air in a tire.
•Standard load:A class of P-metric or Metric tires designed to carry a
maximum load at 35 psi [37 psi (2.5 bar) for Metric tires]. Increasing
the inflation pressure beyond this pressure will not increase the tire’s
load carrying capability.
•Extra load:A class of P-metric or Metric tires designed to carry a
heavier maximum load at 41 psi [43 psi (2.9 bar) for Metric tires].
Increasing the inflation pressure beyond this pressure will not increase
the tire’s load carrying capability.
•kPa:Kilopascal, a metric unit of air pressure.
•PSI:Pounds per square inch, a standard unit of air pressure.
•Cold inflation pressure:The tire pressure when the vehicle has
been stationary and out of direct sunlight for an hour or more and
prior to the vehicle being driven for 1 mile (1.6 km).
•Recommended inflation pressure:The cold inflation pressure found
on the Safety Compliance Certification Label or Tire Label located on
the B-Pillar or the edge of the driver’s door.
•B-pillar:The structural member at the side of the vehicle behind the
front door.
•Bead area of the tire:Area of the tire next to the rim.
•Sidewall of the tire:Area between the bead area and the tread.
•Tread area of the tire:Area of the perimeter of the tire that
contacts the road when mounted on the vehicle.
•Rim:The metal support (wheel) for a tire or a tire and tube assembly
upon which the tire beads are seated.
2007 Navigator(nav)
Owners Guide (post-2002-fmt)
USA(fus)
Tires, Wheels and Loading
161
Page 170 of 312

4.R:Indicates a “radial” type tire.
5.15:Indicates the wheel or rim diameter in inches. If you change your
wheel size, you will have to purchase new tires to match the new wheel
diameter.
6.95:Indicates the tire’s load index. It is an index that relates to how
much weight a tire can carry. You may find this information in your
Owner’s Guide.If not, contact a local tire dealer.
Note:You may not find this information on all tires because it is not
required by federal law.
7.H:Indicates the tire’s speed rating. The speed rating denotes the
speed at which a tire is designed to be driven for extended periods of
time under a standard condition of load and inflation pressure. The tires
on your vehicle may operate at different conditions for load and inflation
pressure. These speed ratings may need to be adjusted for the difference
in conditions. The ratings range from 81 mph (130 km/h) to 186 mph
(299 km/h). These ratings are listed in the following chart.
Note:You may not find this information on all tires because it is not
required by federal law.
Letter rating Speed rating - mph (km/h)
M 81 mph (130 km/h)
N 87 mph (140 km/h)
Q 99 mph (159 km/h)
R 106 mph (171 km/h)
S 112 mph (180 km/h)
T 118 mph (190 km/h)
U 124 mph (200 km/h)
H 130 mph (210 km/h)
V 149 mph (240 km/h)
W 168 mph (270 km/h)
Y 186 mph (299 km/h)
Note:For tires with a maximum speed capability over 149 mph (240
km/h), tire manufacturers sometimes use the letters ZR. For those with
a maximum speed capability over 186 mph (299 km/h), tire
manufacturers always use the letters ZR.
2007 Navigator(nav)
Owners Guide (post-2002-fmt)
USA(fus)
Tires, Wheels and Loading
170
Page 178 of 312

any tire is under-inflated, carefully drive the vehicle to the nearest
location where air can be added to the tires. Inflate all the tires to the
recommended inflation pressure.
SNOW TIRES AND CHAINS
Snow tires must be the same size and grade as the tires you
currently have on your vehicle.
The tires on your vehicle have all weather treads to provide traction in
rain and snow. However, in some climates, you may need to use snow
tires and chains. If you need to use chains, it is recommended that steel
wheels (of the same size and specifications) be used, as chains may chip
aluminum wheels.
Follow these guidelines when using snow tires and chains:
•Use only cable type chains or chains offered by Ford as an accessory
or equivalent. Other conventional link type chains may contact and
cause damage to the vehicle’s wheel house and/or body.
•Do not install chains on the front wheels. Chains on the front wheels
may interfere with suspension components.
•Chains are not recommended for use on the P275/55R20 tire.
•Install chains securely, verifying that the chains do not touch any
wiring, brake lines or fuel lines.
•Drive cautiously. If you hear the chains rub or bang against your
vehicle, stop and re-tighten the chains. If this does not work, remove
the chains to prevent damage to your vehicle.
•If possible, avoid fully loading your vehicle.
•Remove the tire chains when they are no longer needed. Do not use
tire chains on dry roads.
•The suspension insulation and bumpers will help prevent vehicle
damage. Do not remove these components from your vehicle when
using snow tires and chains.
•Do not exceed 30 mph (48 km/h) with tire chains on your vehicle.
VEHICLE LOADING – WITH AND WITHOUT A TRAILER
This section will guide you in the proper loading of your vehicle and/or
trailer, to keep your loaded vehicle weight within its design rating
capability, with or without a trailer. Properly loading your vehicle will
provide maximum return of vehicle design performance. Before loading
2007 Navigator(nav)
Owners Guide (post-2002-fmt)
USA(fus)
Tires, Wheels and Loading
178
Page 179 of 312

your vehicle, familiarize yourself with the following terms for determining
your vehicle’s weight ratings, with or without a trailer, from the vehicle’s
Tire Label or Safety Compliance Certification Label:
Base Curb Weight– is the weight of the vehicle including a full tank of
fuel and all standard equipment. It does not include passengers, cargo, or
optional equipment.
Vehicle Curb Weight– is the weight of your new vehicle when you
picked it up from your authorized dealer plus any aftermarket
equipment.
Payload– is the combined weight of cargo and passengers that the
vehicle is carrying. The maximum payload for your vehicle can be found
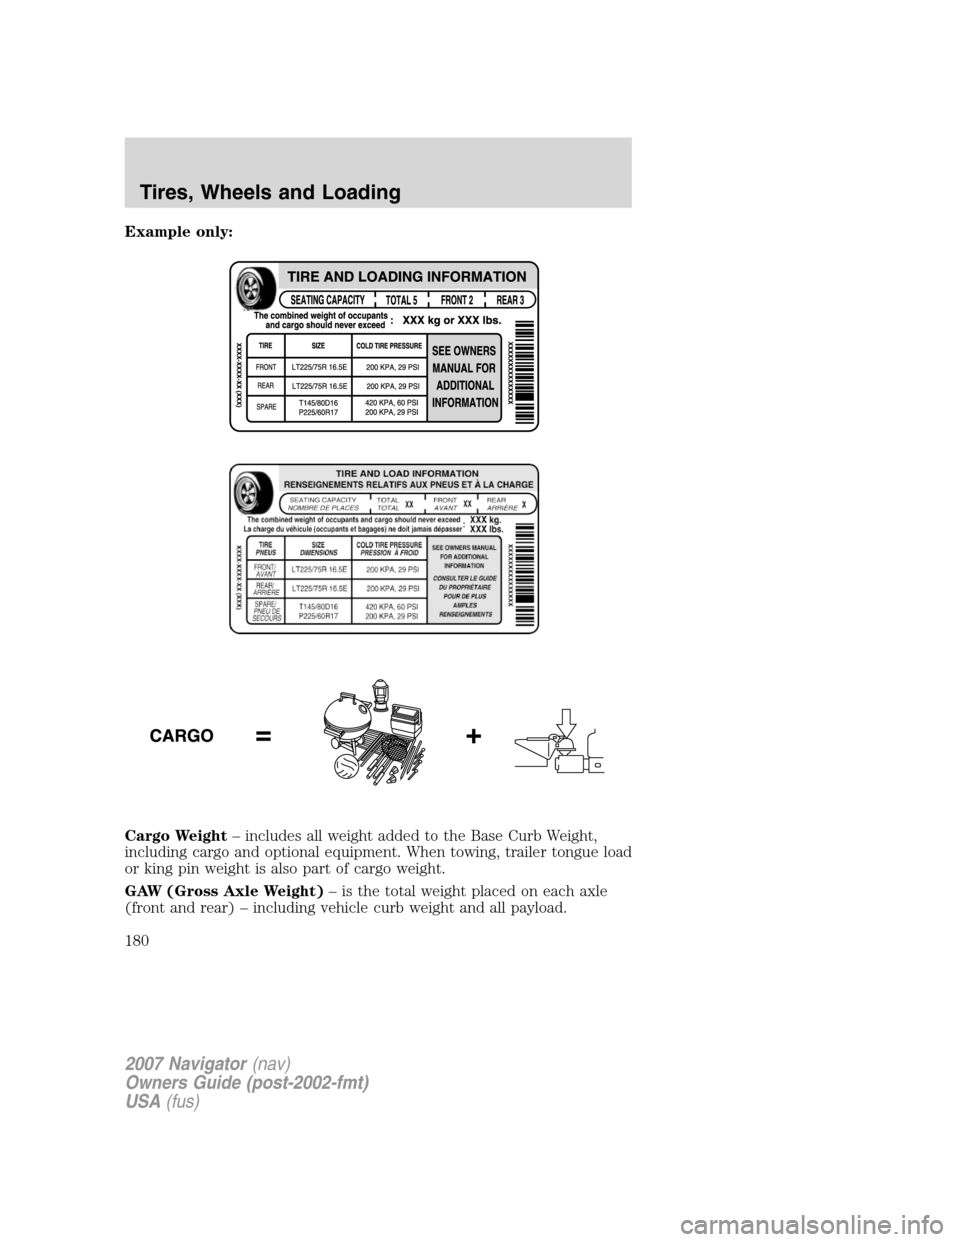
on the Tire Label on the B-Pillar or the edge of the driver’s door
(vehicles exported outside the US and Canada may not have a Tire
Label). Look for“THE COMBINED WEIGHT OF OCCUPANTS AND
CARGO SHOULD NEVER EXCEED XXX kg OR XXX lb.”for
maximum payload. The payload listed on the Tire Label is the maximum
payload for the vehicle as built by the assembly plant. If any aftermarket
or authorized-dealer installed equipment has been installed on the
vehicle, the weight of the equipment must be subtracted from the
payload listed on the Tire Label in order to determine the new payload.
The appropriate loading capacity of your vehicle can be limited
either by volume capacity (how much space is available) or by
payload capacity (how much weight the vehicle should carry). Once
you have reached the maximum payload of your vehicle, do not add
more cargo, even if there is space available. Overloading or improperly
loading your vehicle can contribute to loss of vehicle control and
vehicle rollover.
2007 Navigator(nav)
Owners Guide (post-2002-fmt)
USA(fus)
Tires, Wheels and Loading
179
Page 180 of 312

Example only:
Cargo Weight– includes all weight added to the Base Curb Weight,
including cargo and optional equipment. When towing, trailer tongue load
or king pin weight is also part of cargo weight.
GAW (Gross Axle Weight)– is the total weight placed on each axle
(front and rear) – including vehicle curb weight and all payload.
2007 Navigator(nav)
Owners Guide (post-2002-fmt)
USA(fus)
Tires, Wheels and Loading
180
Page 181 of 312

GAWR (Gross Axle Weight Rating)– is the maximum allowable
weight that can be carried by a single axle (front or rear).These
numbers are shown on the Safety Compliance Certification Label
located on the B-Pillar or the edge of the driver’s door. The total
load on each axle must never exceed its GAWR.
Note:For trailer towing information refer toTrailer towingfound in
this chapter or theRV and Trailer Towing Guideprovided by your
authorized dealer.
GVW (Gross Vehicle Weight)– is the Vehicle Curb Weight + cargo +
passengers.
GVWR (Gross Vehicle Weight
Rating)– is the maximum
allowable weight of the fully loaded
vehicle (including all options,
equipment, passengers and cargo).
The GVWR is shown on the
Safety Compliance Certification
Label located on the B-Pillar or
the edge of the driver’s door.
The GVW must never exceed the
GVWR.
Exceeding the Safety Compliance Certification Label vehicle
weight rating limits could result in substandard vehicle handling
or performance, engine, transmission and/or structural damage, serious
damage to the vehicle, loss of control and personal injury.
2007 Navigator(nav)
Owners Guide (post-2002-fmt)
USA(fus)
Tires, Wheels and Loading
181