2007 LINCOLN MKZ window
[x] Cancel search: windowPage 87 of 272

Unlocking the doors/two stage unlock
1. Pressand release to unlock the driver’s door.Note:The interior
lamps will illuminate.
2. Press
and release again within five seconds to unlock all the doors.
The remote entry system activates the illuminated entry feature; this
feature turns on the lamps for 25 seconds or until the ignition is turned
to the 3 (RUN) position.
The inside lights will not turn off if:
•they have been turned on using the dimmer control or
•any door is open.
The battery saver feature will turn off the interior lamps 30 minutes after
the ignition is turned to the 1 (LOCK) position.
Two stage unlocking may be disabled or re-enabled by simultaneously
pressing the
andcontrols on the IKT for four seconds (disabling
two stage unlock allows all vehicle doors to unlock simultaneously). The
turn lamps will flash twice to indicate that two-stage unlock was enabled
or disabled.
Opening front windows and moonroof (if equipped)
Pressand hold for more than two seconds in order to begin opening
the two front windows and moonroof (if equipped).
•The
control can then be released and the windows and moonroof
will complete the opening operation.Note:If the moonroof is in the
vent range, the moonroof will move to full vent.
•If any other remote entry transmitter control is pressed during the
opening operation, both windows and moonroof movement will stop.
Note:The ignition must be in the 1 (LOCK) position and the accessory
delay feature must be not activated in order for this feature to operate.
Locking the doors
1. Pressand release to lock all the doors. The turn lamps will flash.
2. Press
and release again within three seconds to confirm that all
the doors are closed.Note:The doors will lock again, the horn will chirp
and the turn lamps will flash once if all the doors and trunk are closed.
Note:If any door or the trunk is not closed, or if the hood is not closed
in vehicles equipped with the perimeter alarm feature, the horn will
chirp twice and the lamps will not flash.
2007 Zephyr(378)
Owners Guide (post-2002-fmt)
USA(fus)
Locks and Security
87
Page 134 of 272

How does the side air curtain system work?
The design and development of the
side air curtain system included
recommended testing procedures
that were developed by a group of
automotive safety experts known as
the Side Airbag Technical Working
Group. These recommended testing
procedures help reduce the risk of
injuries related to the deployment of
side airbags (including side air
curtain systems).
The side air curtain system consists
of the following:
•An inflatable nylon curtain with a
gas generator concealed behind
the headliner and above the
doors.
•The headliner will flex to open
above the side doors to allow air curtain deployment.
•The same warning light, electronic control and diagnostic unit as used
for the front airbags.
•Two crash sensors located under the outboard side of the front seats,
attached near the floor.
•Two crash sensors located at the base of the “C” pillars above the
wheel house.
Side air curtains and side airbags, in combination with safety belts, can
help reduce the risk of severe injuries in the event of a significant side
impact collision.
The side air curtains are mounted to the sheet metal above the first and
second row seats. In certain lateral collisions, the air curtain and
seat-mounted side airbag on the side affected by the collision will be
inflated, except that the passenger sensing system will deactivate the
passenger seat-mounted side airbag if it detects an empty unbuckled
passenger seat. The air curtain was designed to inflate between the side
window area and occupant to further enhance the head protection
provided to occupants in side impact collisions. The seat-mounted side
airbag was designed to inflate between the door panel and occupant to
further enhance the protection provided occupants in side impact
collisions.
REVIEW COPY ——
2007(com), Owners Guide (post-2002-fmt)(own2002),Market:USA(fus)
Seating and Safety Restraints
134
Page 173 of 272

Note:If the engine does not start within five seconds on the first try,
turn the key to LOCK, wait 10 seconds and try again. If the engine still
fails to start, press the accelerator to the floor and try again; this will
allow the engine to crank with the fuel shut off in case the engine is
flooded with fuel.
Guarding against exhaust fumes
Carbon monoxide is present in exhaust fumes. Take precautions to avoid
its dangerous effects.
If you smell exhaust fumes inside your vehicle, have your dealer
inspect your vehicle immediately. Do not drive if you smell
exhaust fumes.
Important ventilating information
If the engine is idling while the vehicle is stopped for a long period of
time, open the windows at least one inch (2.5 cm) or adjust the heating
or air conditioning to bring in fresh air.
ENGINE BLOCK HEATER (IF EQUIPPED)
An engine block heater warms the engine coolant which aids in starting
and heater/defroster performance. Use of an engine block heater is
strongly recommended if you live in a region where temperatures reach
-10°F (-23°C) or below. For best results, plug the heater in at least three
hours before starting the vehicle. The heater can be plugged in the night
before starting the vehicle.
To reduce the risk of electrical shock, do not use your heater
with ungrounded electrical systems or two-pronged (cheater)
adapters.
BRAKES
Occasional brake noise is normal. If a metal-to-metal, continuous grinding
or continuous squeal sound is present, the brake linings may be worn-out
and should be inspected by an authorized dealer. If the vehicle has
continuous vibration or shudder in the steering wheel while braking, the
vehicle should be inspected by an authorized dealer.
REVIEW COPY ——
2007(com), Owners Guide (post-2002-fmt)(own2002),Market:USA(fus)
Driving
173
Page 191 of 272

To remove a fuse use the fuse puller tool provided on the fuse panel
cover.
The fuses are coded as follows.
Fuse/Relay
LocationFuse Amp
RatingPassenger Compartment Fuse Panel
Description
1 10A Backup lamps, Electrochromatic mirror
2 20A Horns
3 15A Battery saver: Interior lamps, Puddle
lamps, Trunk lamp, Glove box lamp, Rear
power windows
4 15A Parklamps, License plate lamps
5 — Not used
6 — Not used
7 — Not used
8 30A Rear window defroster
9 10A Heated mirrors
10 30A Starter coil, PCM
11 15A High beams
REVIEW COPY ——
2007(com), Owners Guide (post-2002-fmt)(own2002),Market:USA(fus)
Roadside Emergencies
191
Page 192 of 272
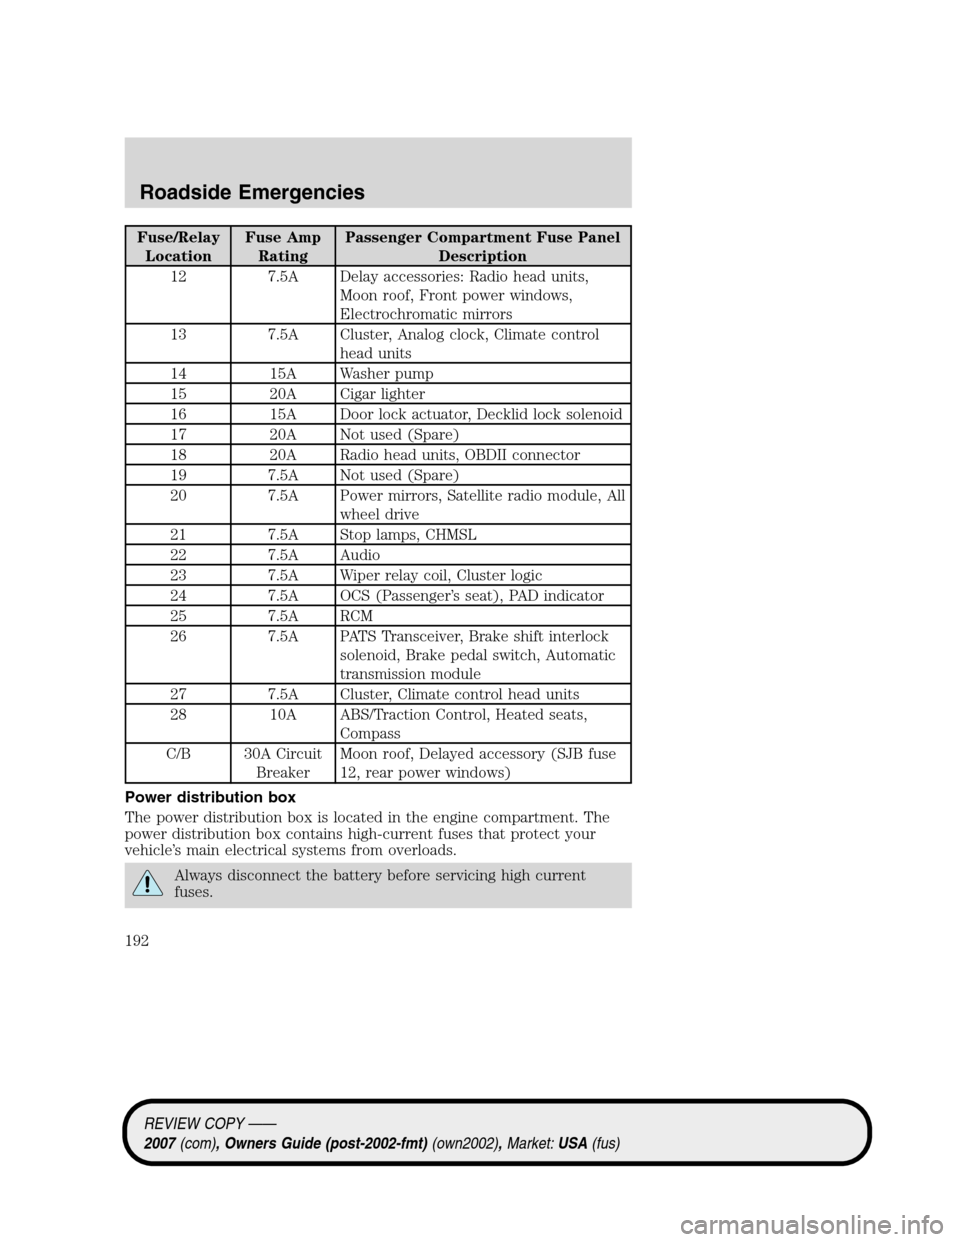
Fuse/Relay
LocationFuse Amp
RatingPassenger Compartment Fuse Panel
Description
12 7.5A Delay accessories: Radio head units,
Moon roof, Front power windows,
Electrochromatic mirrors
13 7.5A Cluster, Analog clock, Climate control
head units
14 15A Washer pump
15 20A Cigar lighter
16 15A Door lock actuator, Decklid lock solenoid
17 20A Not used (Spare)
18 20A Radio head units, OBDII connector
19 7.5A Not used (Spare)
20 7.5A Power mirrors, Satellite radio module, All
wheel drive
21 7.5A Stop lamps, CHMSL
22 7.5A Audio
23 7.5A Wiper relay coil, Cluster logic
24 7.5A OCS (Passenger’s seat), PAD indicator
25 7.5A RCM
26 7.5A PATS Transceiver, Brake shift interlock
solenoid, Brake pedal switch, Automatic
transmission module
27 7.5A Cluster, Climate control head units
28 10A ABS/Traction Control, Heated seats,
Compass
C/B 30A Circuit
BreakerMoon roof, Delayed accessory (SJB fuse
12, rear power windows)
Power distribution box
The power distribution box is located in the engine compartment. The
power distribution box contains high-current fuses that protect your
vehicle’s main electrical systems from overloads.
Always disconnect the battery before servicing high current
fuses.
REVIEW COPY ——
2007(com), Owners Guide (post-2002-fmt)(own2002),Market:USA(fus)
Roadside Emergencies
192
Page 193 of 272

To reduce risk of electrical shock, always replace the cover to
the Power Distribution Box before reconnecting the battery or
refilling fluid reservoirs.
If the battery has been disconnected and reconnected, refer to the
Batterysection of theMaintenance and Specificationschapter.
The high-current fuses are coded as follows.
Fuse/Relay
LocationFuse Amp
RatingPower Distribution Box
Description
1 60A*** SJB power feed (fuses 12, 13, 14,
15, 16, 17, 18, C/B)
2 60A*** SJB power feed (fuses 1, 2, 4, 10,
11)
3 40A** Powertrain power, PCM relay coil
4 40A** Blower motor
5 — Not used
6 40A** Rear window defroster, Heated
mirrors
7 — Not used
8 40A** ABS pump
45 46 47
48 4950 51
52
53
55
5654
57
58
41 42 43 44
23 24 25 26 27
28
29 30 31 32 33 34 35
13 12
89
10 11 12
18 19 20 21 22345 6 7
1415
16
17
36
37
38
39
40
REVIEW COPY ——
2007(com), Owners Guide (post-2002-fmt)(own2002),Market:USA(fus)
Roadside Emergencies
193
Page 194 of 272

Fuse/Relay
LocationFuse Amp
RatingPower Distribution Box
Description
9 20A** Wipers
10 30A** ABS Valves
11 30A** Heated seats, Passenger
heated/cooled seat
12 30A** Driver heated/cooled seat
13 — Not used
14 15A* Ignition switch
15 10A* Memory module logic
16 15A* Transmission
17 10A* Alternator sense
18 — Not used
19 40A** Logic feed to SJB (solid state
devices)
20 20A** THXII Amplifier #1
21 20A** THXII Amplifier #2
22 20A** Console power point
23 10A* PCM KAM, FNR5 and canister
vent solenoid
24 15A* Fog lamps
25 10A* A/C Compressor clutch
26 15A* LH HID Low beam
27 15A* RH HID Low beam
28 80A*** Engine cooling fan
29 — Not used
30 30A** Fuel pump/injectors relay
31 30A** Passenger power seat
32 30A** Driver power seat
33 20A** Moon roof
34 30A** Driver Smart power window
35 30A** Passenger Smart power window
36 1A* PCM diode
REVIEW COPY ——
2007(com), Owners Guide (post-2002-fmt)(own2002),Market:USA(fus)
Roadside Emergencies
194
Page 218 of 272

WINDOWS AND WIPER BLADES
The windshield, rear and side windows and the wiper blades should be
cleaned regularly. If the wipers do not wipe properly, substances on the
vehicle’s glass or the wiper blades may be the cause. These may include
hot wax treatments used by commercial car washes, water repellant
coatings, tree sap, or other organic contamination; these contaminants
may cause squeaking or chatter noise from the blades, and streaking and
smearing of the windshield. To clean these items, follow these tips:
•The windshield, rear windows and side windows may be cleaned with
a non-abrasive cleaner such as Motorcraft Ultra-Clear Spray Glass
Cleaner (ZC-23), available from your authorized dealer.
•The wiper blades can be cleaned with isopropyl (rubbing) alcohol or
Motorcraft Premium Windshield Washer Concentrate (ZC-32–A),
available from your authorized dealer. This washer fluid contains
special solution in addition to alcohol which helps to remove the hot
wax deposited on the wiper blade and windshield from automated car
wash facilities. Be sure to replace wiper blades when they appear
worn or do not function properly.
•Do not use abrasives, as they may cause scratches.
•Do not use fuel, kerosene, or paint thinner to clean any parts.
If you cannot remove those streaks after cleaning with the glass cleaner
or if the wipers chatter and move in a jerky motion, clean the outer
surface of the windshield and the wiper blades using a sponge or soft
cloth with a neutral detergent or mild-abrasive cleaning solution. After
cleaning, rinse the windshield and wiper blades with clean water. The
windshield is clean if beads do not form when you rinse the windshield
with water.
Do not use sharp objects, such as a razor blade, to clean the
inside of the rear window or to remove decals, as it may cause
damage to the rear window defroster’s heated grid lines.
INSTRUMENT PANEL AND CLUSTER LENS
Clean the instrument panel with a damp cloth, then with a clean, dry
cloth, or use Motorcraft Dash & Vinyl Cleaner (ZC-38-A).
•Avoid cleaners or polish that increase the gloss of the upper portion of
the instrument panel. The dull finish in this area helps protect the
driver from undesirable windshield reflection.
REVIEW COPY ——
2007(com), Owners Guide (post-2002-fmt)(own2002),Market:USA(fus)
Cleaning
218